

Tie Dye Shoes are so fun and easy to make!
If you’re a long time reader of my blog, you’ll know we LOVE making tie dye projects over here, and tie dye shoes are no exception!
I found a fun and easy way to create tie dye shoes using common supplies you probably already have at home!
They are also MUCH less messy to create than regular tie dye projects, making them the perfect group craft.
These fun kicks can be designed in any tie dye pattern you like.
Both kids and adults alike will really enjoy creating their own one of a kind pair of tie dye shoes.

Links in this post may be affiliate links, which means I may earn a commission if you make a purchase from any of them, at no additional cost to you. You can find out more information by reading my full disclaimer.
What You’ll Need To Tie Dye Shoes
Having the right supplies makes all the difference in any project, and tie dye shoes are no exception. This project will come out best if you use good materials.
Supplies:
You can use any white canvas shoes you happen to have already. Want to jazz up your old kicks? You can totally do that!

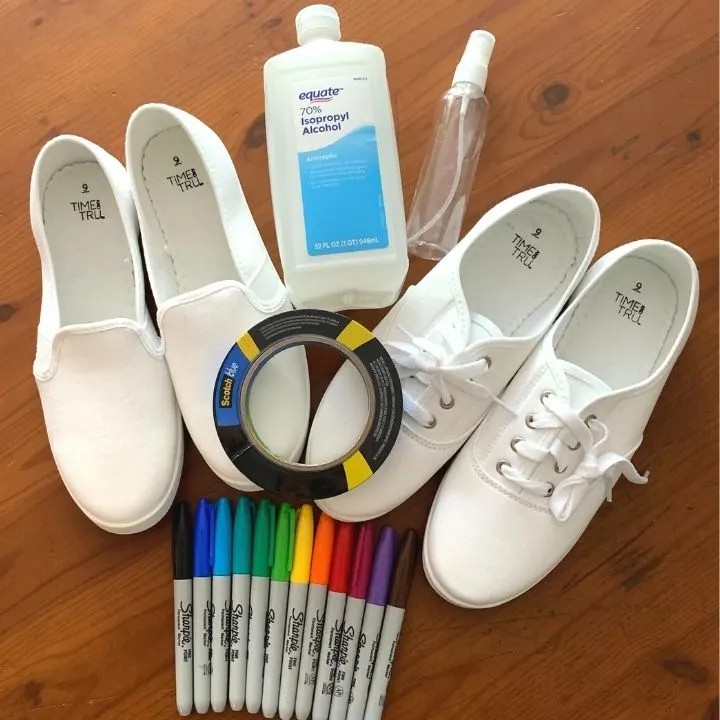
We didn’t have any canvas shoes already, so we purchased some of white canvas shoes at our local big box store, but you can easily find them on Amazon.
We liked this slip on style, just because it had more surface to decorate, but you could use any type of white canvas shoes. Keds style and Converse style work well for this project also.
Any old masking tape will do for this project. We really like to use painters tape here, but regular masking tape is fine as well.
Sharpie is always my go-to brand for permanent markers. The colors are always consistent and they tend to last longer than other brands.
We found empty spray bottles, foam brushes, and rubbing alcohol at our local dollar store.
Prepping The Shoes
To prep your shoes for your tie dye project, you’ll first want to make sure they’re clean and dry.
If you’re using old shoes, run them through the washing machine to get out any old dirt or residue that may be on them.
If you’re using new shoes, you can wash them too if you like, but it’s not 100% necessary. Just make sure you give them a good wipe down to remove any dust or grime that may have settled on them.

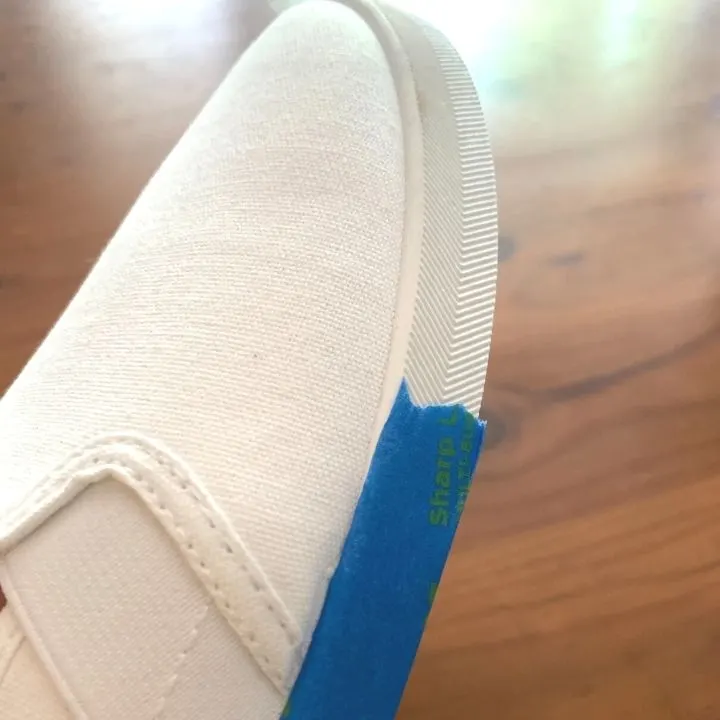
The next thing you’ll want to do is cover any areas you don’t want tie dyed with masking tape. You probably don’t need to cover the sole of the shoe with tape, but it wouldn’t hurt if you want to be thorough.
Creating Your Designs
Before I start working on the shoes, I like to plan out what I want my design to look like.
I originally wanted to do a spiral tie dye pattern on them, but ended up deciding to go with an offset tie dye bullseye on one and a traditional gradient pattern on the other, so we could carry the designs between the two shoes.
I measured the shoes and used a pencil to lightly mark where I wanted my color changes to be on the shoes.
It’s important to consider color placement as well.
In this process, colors will likely bleed into each other, so make sure you’re not placing shades together that would clash if they combine.
For example, placing red and green next to each other will likely not blend into a pleasing color if they overlap.
It’s always best to think through what you want the final result to be before you start applying colors.
You can use as few or as many colors as you like.
Once you’ve planned out your design, this is where the fun really comes in!
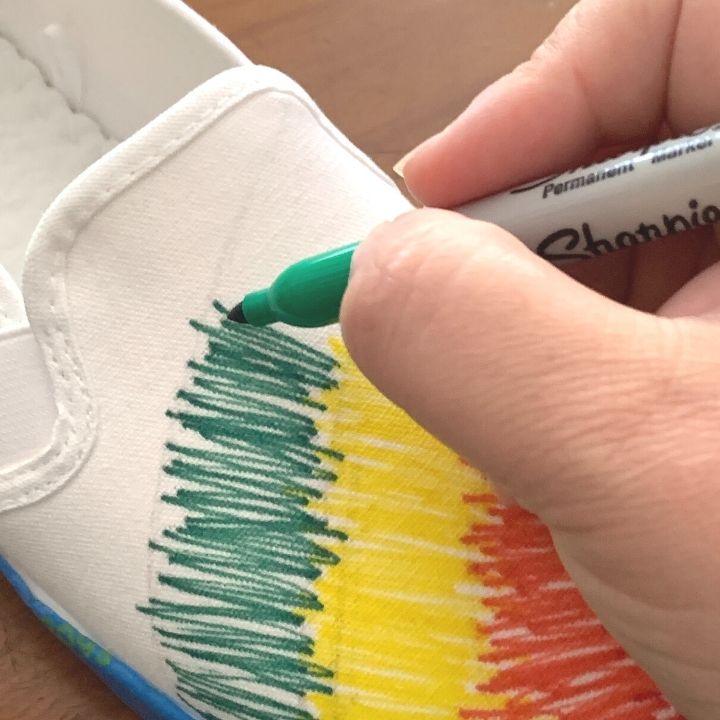
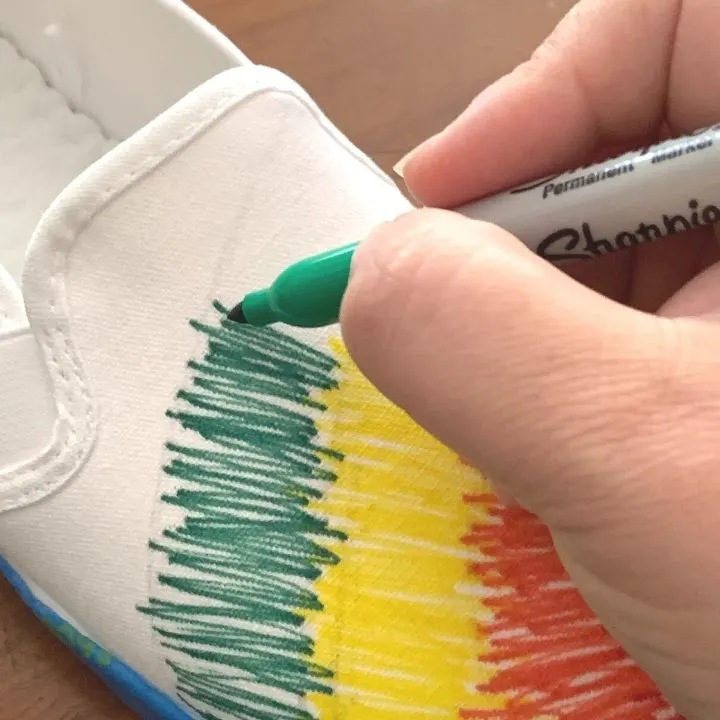
Take your permanent markers, and start coloring.
We tried two different coloring techniques for our tie dye shoes, and ended up with vastly different results. One method DEFINITELY worked better than the other one.
I’ll describe both methods and let you know how they turned out in the end.
For the first pair (the slip on shoes), we used a general back and forth motion to color in the areas with each marker.
For the second pair (the lace ups shoes), we went with more of a looping technique, frequently leaning the marker sideways to get more coverage with each stroke.

Make sure you apply more marker where you want deeper colors, and less marker where you want it to be lighter.
Also, overlap the colors where you want them to bleed together.
Keep in mind that you aren’t creating an exact design. Like with any tie dye project, the colors are going to go where they want to, and you’re really just suggesting where you want them to go.
It’s kind of like you’re creating a general map for your colors and then letting them spread where they want to go.
Once you’ve finished coloring the shoes, you can move onto the next step that really creates that tie dye look!
The Tie Dye Shoes Process
I like to complete this step outside, since rubbing alcohol has such a strong smell.
We also used two different application methods for the rubbing alcohol, both with different results.
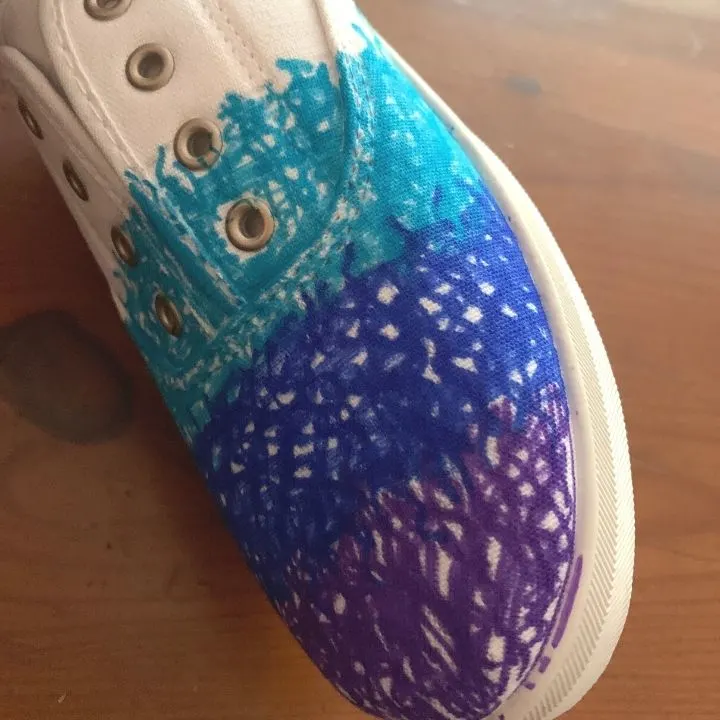
For the first pair (the slip ons), we used a spray bottle method.
To do this, you’ll want to choose a spray bottle that delivers a fine mist, and not just blotches of liquid.
Fill your spray bottle with rubbing alcohol, and in a well ventilated area, lightly spray the shoes.
The colors from the permanent markers will start to spread and bleed, immediately creating a tie dye effect.
Go slow here. You don’t want to add too much rubbing alcohol to quickly, and have the colors spread too much.
Take your time, and add more in areas as needed.
I found that the spray bottle was hard to control which direction the colors would bleed. The application did work, but it was definitely challenging.
For the second pair (the lace ups), we poured the rubbing alcohol into a bowl and applied it with a sponge brush.If you want to use this method, you’ll need a small foam brush and a bowl.
Pour the rubbing alcohol into the bowl and lightly dip the brush into it, trying not to overload the brush with the rubbing alcohol.
Apply it to the shoes in the direction you want the colors to bleed, taking your time and adding more where necessary.
I liked this application method much better than spray bottle, as it offered more control over the tie dye shoe design.
Once you’re satisfied with the design, let the shoes dry completely.
The Final Results
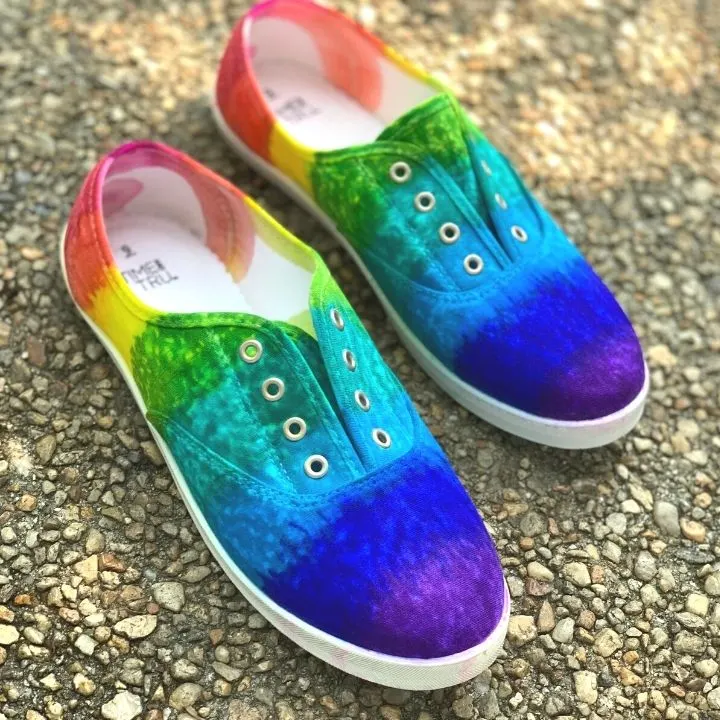
In our final results, one pair of tie dye shoes was a big success, while the other wasn’t quite as good.
The first pair (the slip on shoes) that we used the back and forth stroke and the spray bottle on had some problems.
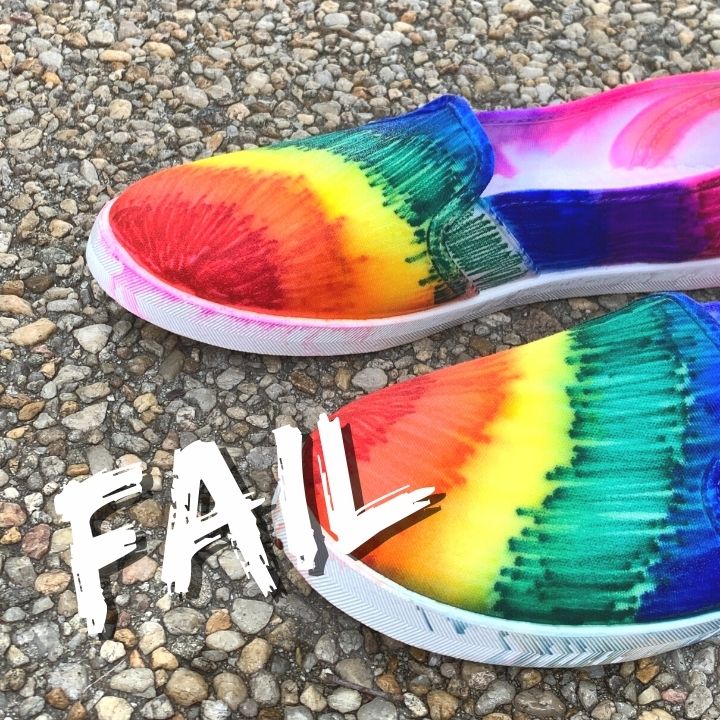
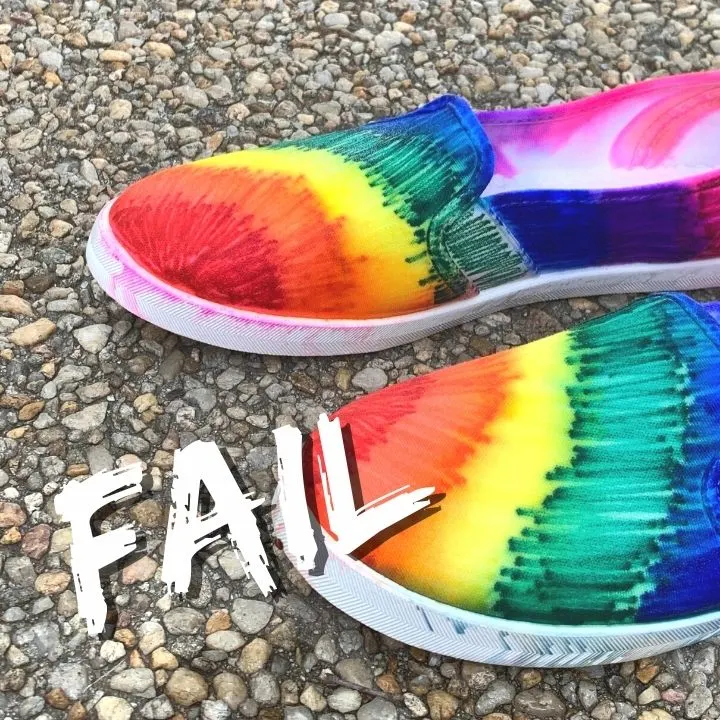
The stroke markes were VERY apparent, with some colors just not bleeding the way we intended them to.
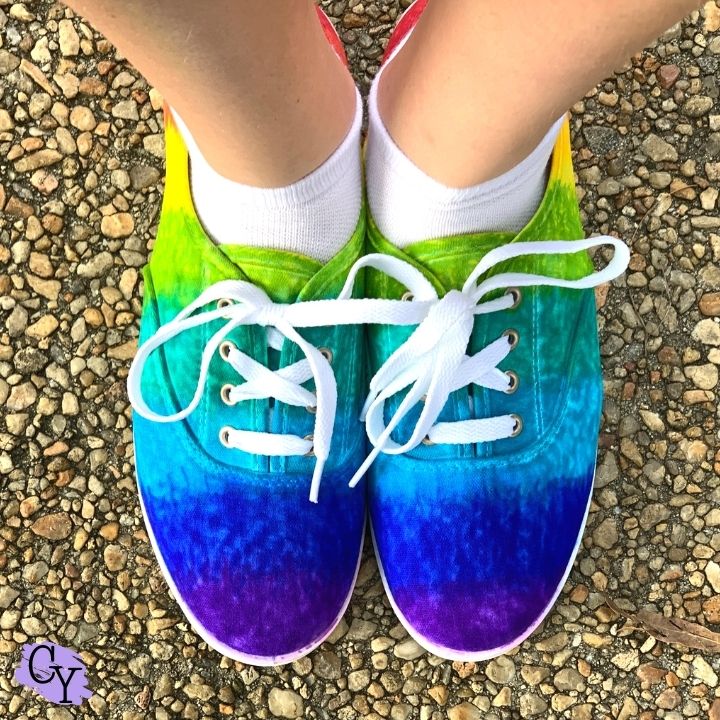
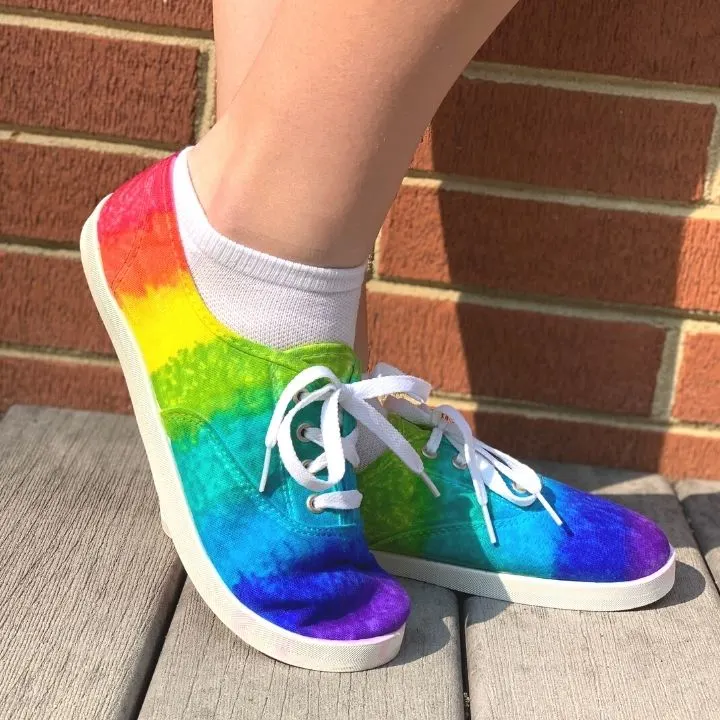
The second pair (the lace ups) that we used the swirly coloring technique turned out MUCH better.
The second pair gave us much more of a tie dye effect, so that’s the method I outlined in the printable.


 0
0
I really love how that second pair of tie dye shoes turned out. They’re so bright and happy.
Have you tried to tie dye with sharpies? Tell me your results in the comments!
Recently we also did a Bleach Tie Dye Shoes project that turned out super cool too! Be sure to check it out!
Also, tie dye shoes make a fun compliment to my Tie Dye Socks project!
Tie Dye Shoes: How To Use Sharpies To DIY Your Own Pair!
Tie dye shoes are so fun and easy to make with this hack! Use sharpies to create tie dye shoes quickly and easily in any pattern you like!
Materials
- Canvas Shoes
- Masking Tape
- Permanent Markers
- Rubbing Alcohol
Tools
- Foam Brush
- Bowl
Instructions
- Clean your shoes and cover any areas you don't want dyed with masking tape.
- Plan out your tie dye shoes design.
- Create your design on the shoes with permanent markers, keeping in mind that colors will spread and possibly bleed into one another.
- Put rubbing alcohol into the bowl.
- Take decorated shoes to a well ventilated area, preferably outside.
- Use the foam brush to lightly paint the shoes with rubbing alcohol, slowly adding more to areas where you want the color to spread more.
- Let your tie dye shoes dry completely.
- Wear as usual.
Tie Dye Shoes: How To Use Sharpies To DIY Your Own Pair!