

I had so much fun making these bleach tie dye shoes.
Bleach tie dye (aka reverse tie dye) is one of the coolest trends out there right now.
It’s super easy to accomplish and the results are always one of a kind and look really cool!
I made some bleach tie dye shoes recently, and I’m super excited to share how I did it with the world!
Links in this post may be affiliate links, which means I may earn a commission if you make a purchase from any of them, at no additional cost to you. You can find out more information by reading my full disclaimer.
What is Bleach Tie Dye?
Bleach tie dye is the process of strategically applying bleach to colored items to take the color out of it.
Once the color is removed, the item can just stay that way or color can be added back in with dye. It works best on black clothing, but can be done on any color.
Bleach tie dye creates a really unique look on any article of clothing, and is really fun to play with.
Why Bleach Tie Dye Shoes?
We absolutely love tie dye around here and have done just about every tie dye project you can think of!
I’ve also done several other craft projects with bleach and clothing, and they all turned out great.
I started with bleach tie dyeing shirts and then moved on to bleach stenciling. I even did bleach dip dyeing.
The process for reverse tie dye was so fun to do, and I loved the results so much, I decided to try to transfer the method over to shoes.
What You’ll Need
To bleach tie dye shoes, you’ll need a few basic items that should be easy to find.
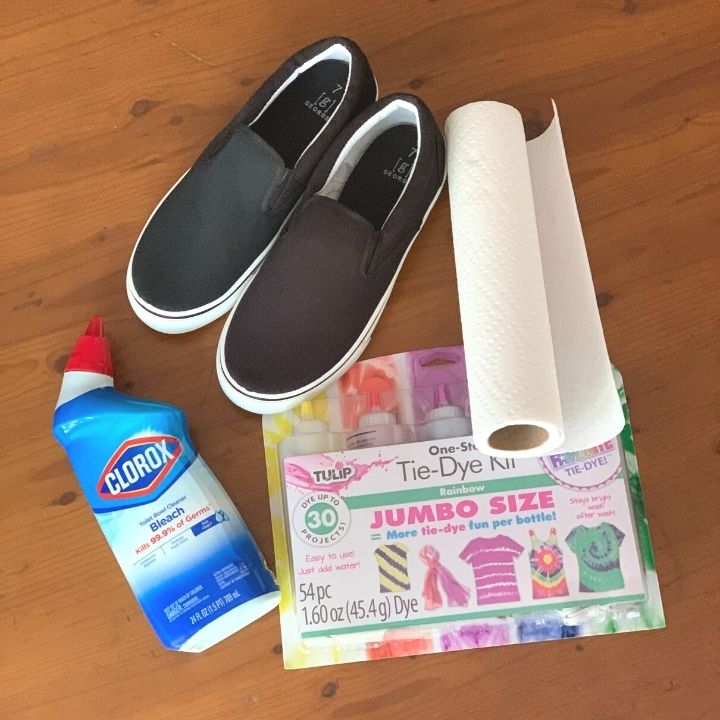

You’ll need:
- Black canvas shoes
- A tie dye kit
- Bleach toilet bowl cleaner
- Old paintbrush (optional)
- Disposable gloves
- Paper towels
- Plastic bags
I found black canvas shoes in several varieties at our local big box store, but Amazon usually has them as well for a reasonable price. Just make sure they are a cotton based fabric, since synthetic fabrics won’t accept the dye as well.
I’m a big fan of Tulip tie dye kits. They come with everything you need for a tie dye project and are ready to go just minutes after opening the package.
I used bleach toilet bowl cleaner instead of straight bleach for this project so that it was easier to control. A bleach pen might also work well for the project.
Depending on what method you decide to use for your bleach application, you might want to use a small paint brush. Make sure it’s one you won’t want to use again, since putting the bleach cleaner on it will likely ruin the brush for other projects.
Regular old paper towels and plastic grocery bags rounded out our list of supplies for this project.
How To Bleach Tie Dye Shoes
Making bleach tie dye shoes is easier than you might think.
But please be warned that this process uses toxic chemicals and should not be done by children.
Also note that bleach is a highly damaging chemical, and can ruin surfaces and clothes. Please work in a well ventilated area that can easily be cleaned up.
I chose the bottom of our shower as the work space for this project. It has a vent fan and a window to open, plus the bleach cleaner won’t damage the shower floor.
Prepping The Shoes
The first step to the bleach tie dye process is to prepare your shoes.
Start by removing any laces or ties on the shoes, and wiping them clean of any dust or residue with a damp cloth.
Next, stuff some paper towels inside the shoes to help them keep their shape while dyeing and to soak up any bleach that might seep through the layers.
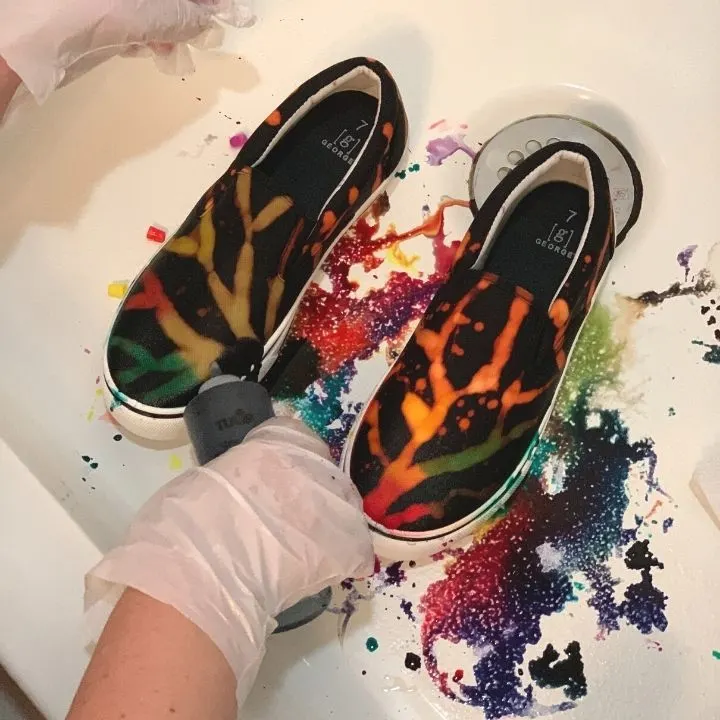
Applying the Bleach
I forgot to wear gloves for this portion of the tutorial, and I certainly regretted it later. I barely got any of the bleach cleaner on my hands, but it left them dry and irritated.
Definitely wear gloves for this step!
You can apply the bleach cleaner to the shoes in several ways. I experimented with two different methods: a splatter method and a paintbrush method.
For the splatter method, placed the shoes a few inches apart in the middle of the shower floor. I then only opened the bottle of bleach cleaner just a little bit and drizzled it onto the shoes in a random pattern.
This left lots of bleach cleaner to be cleaned up in the bottom of the shower, and required a little specific application to the sides of the shoes.
For the paintbrush method, I squirted some of the bleach cleaner into a small disposable cup. I then used it like paint to create a pattern on the shoes.
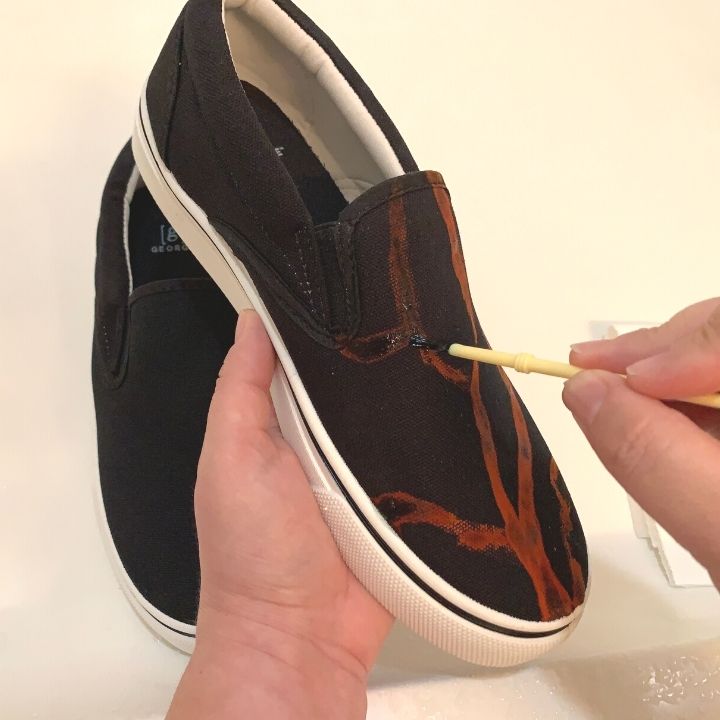

It takes a few moments for the bleach to start to change the colors of the shoes, and when I was using the paintbrush method, I had to go over a few places twice to make sure I applied enough cleaner.
Once you have applied as much bleach cleaner as you want, let the shoes sit for a few hours.
It may seem like the bleach cleaner is changing the color of the shoes immediately, but that my not really be true. The bleach cleaner really needs time to do it’s work effectively.
When I came back the the shoes I was bleach tie dying, the color where I applied the bleach had faded out to an orange shade, as I expected it to.
Don’t freak out if the color doesn’t change to white. The color will still adhere to the shoes and you’ll never even know the orange was tehre.
Applying The Color
You could leave the shoes like this, with just the splatter effect of the bleach and the orange color. They look pretty cool at this stage.
Either way, you need to thoroughly rinse the shoes to remove any residual bleach that might be on them.
If you plan to add color to your bleach tie dye shoes, you’ll want to leave them damp for the next step.
Making sure you cleaned up the bleach before moving onto this step, return to your appropriate workspace with the bleached shoes.
Now you’ll need to mix up your tie dye according to the package directions. You’ll want your gloves on again for this portion.
The Tulip Tie Dye Kit that I always use comes pre-measured and ready to mix in plastic squeeze bottles.
Pro Tip: Fill the dye bottle only halfway, then secure the top and shake it. Once the dye powder is mixed in, add the remaining water and shake again.
Doing that initial half fill and shake makes it much easier to get the dye evenly mixed into the water and actually ends up saving a little time.
Now you can apply the dye to the shoes.

If you’re going for just one color peeking through the black, this part will be super easy. If you want multiple colors, it will take a little more care to get it right.
As carefully as you can, add just a little bit of dye at a time to the shoes. Keep in mind the way colors blend naturally when applying, so you don’t get bleed over that turns into colors you don’t intend.
Let It Set
Once you’ve applied the dye to the shoes, place them each in their own plastic bag. Like I said before, I used old plastic grocery bags for this part.
I put each shoe in it’s own bag and tie the top securely. Then I put both shoes into another plastic bag together, and tie the top of that one, just to avoid any leakage from the recycled bags.
You want the shoes in the bags so the dye stays wet and continues to adhere to the fibers in the shoes.
Now you get to wait again.
It’s best to let the shoes sit at least 12 hours, if not 24, to really get the color soaked in there.
Final Steps
Once you’ve completed that waiting period, you can bust the shoes out of their plastic prison.
Rinse each shoe until the water runs completely clear from them and let them air dry.
I set mine out in the sun to speed up the drying process.
Once they’re all dry, they’re ready to wear!
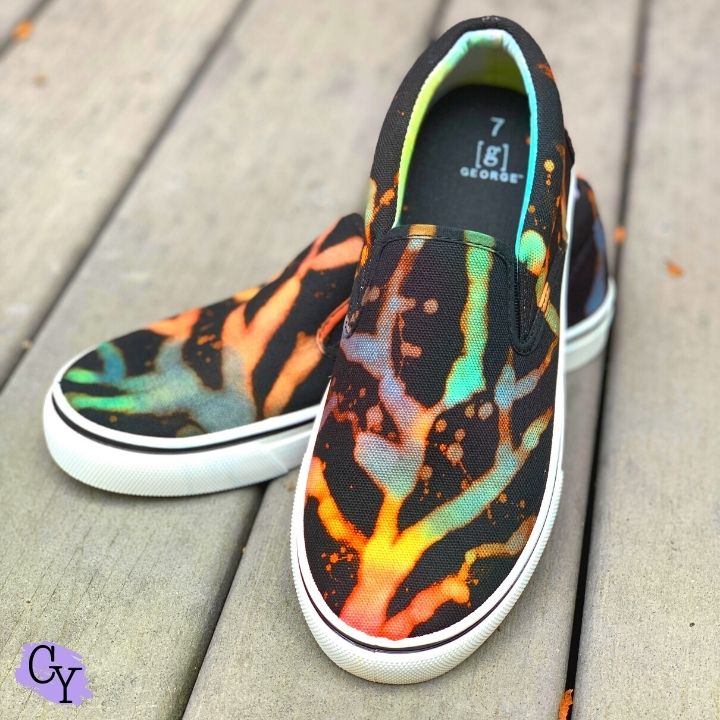
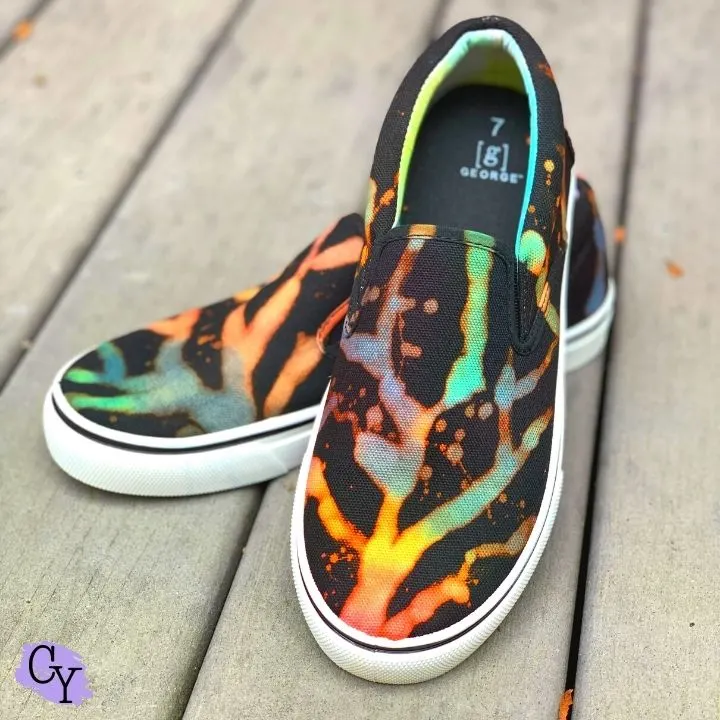
Finished Bleach Tie Dye Shoes
I love how the colors pop on these shoes. They look so different and unique.
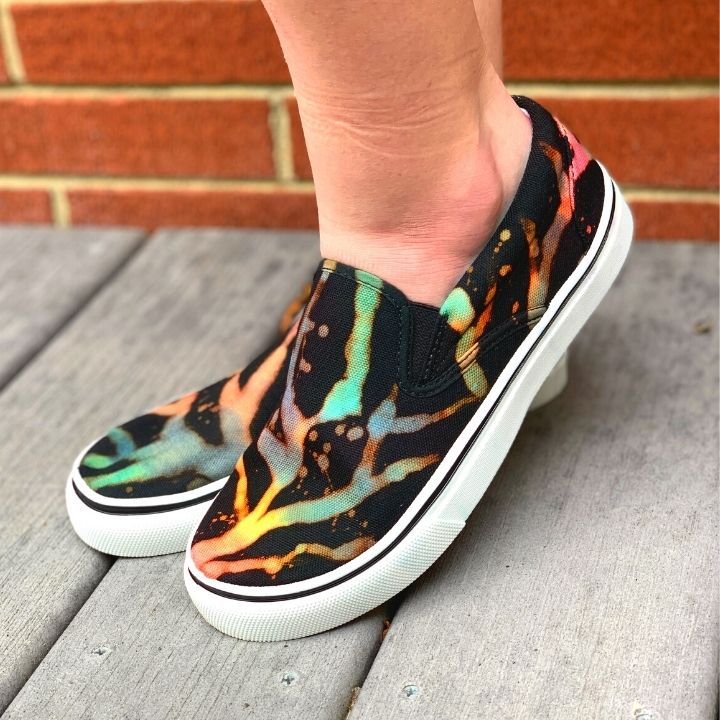
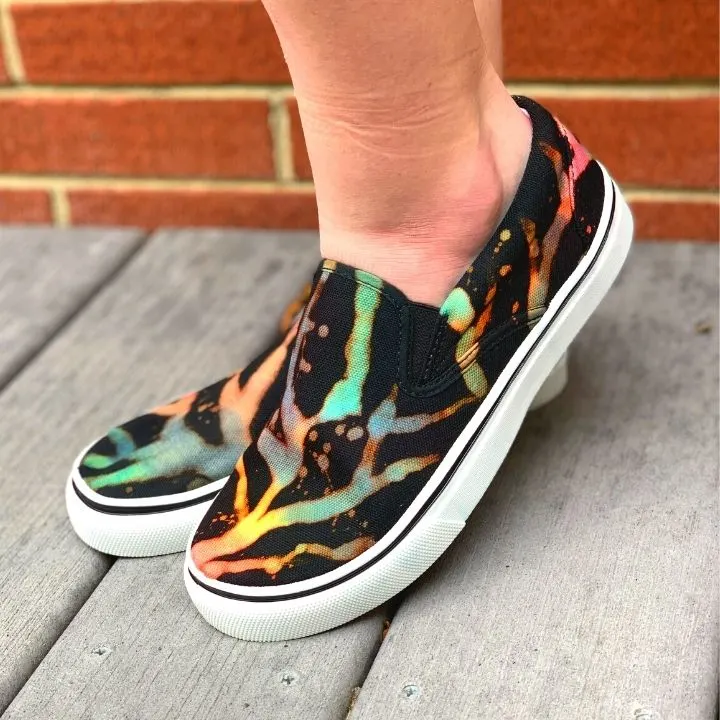
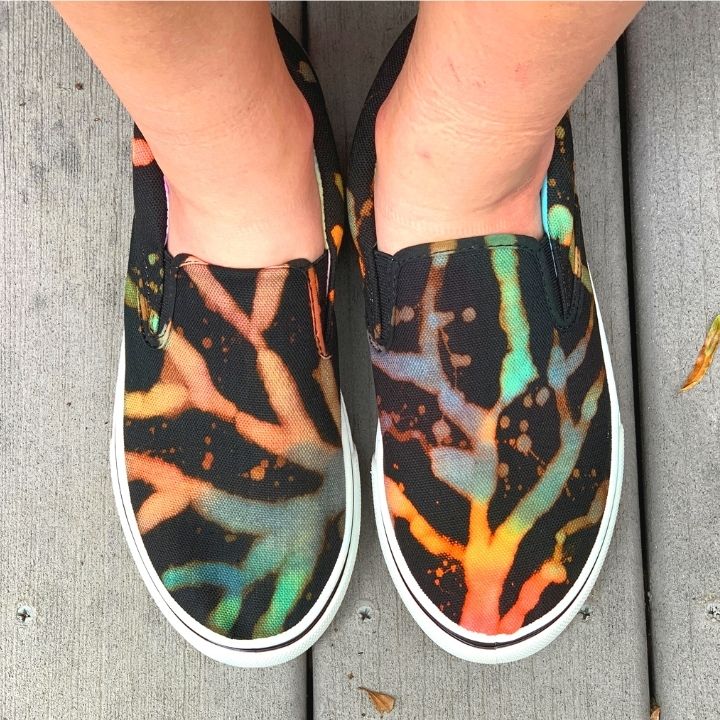

Plus they are surprisingly easy to make.
Have questions about bleach tie dye shoes? Made your own and have some tips for us? Leave me a comment!!