

Lightning Lanes can be some of the most helpful and most confusing parts of your Walt Disney World Vacation.
Understanding how to use the Lightning Lane system effectively can be difficult. But we’ve got you covered with this comprehensive guide to Lightning Lanes at Disney World.
Whether you’re a first time visitor to Disney World or die hard Disney Parks fan, you’ll want to know all about Disney World’s newest system designed to help you save time in the parks.
What Are Lightning Lanes at Disney World?
Lightning Lanes are a newest version of a way for guests to “skip the line” for some top attractions.
A Lightning Lane is a secondary queue that gives guests priority placement on popular attractions.
Almost all popular Disney World attractions have two types of lines: the regular standby queue and the Lightning Lane.
The standby queue is exactly what it sounds like. Any guest who meets the height requirement for the ride can simply walk up, join the line, and wait for their turn to ride.
Wait times in the standby queue can frequently get extremely long, sometimes taking hours for the most popular rides on busy days in the parks.
Guests who have access to the Lightning Lane are assigned a window of time they can experience a ride, kind of like a reservation for the attraction. They go through a separate entrance and are seated on the ride ahead of those in the standby queue.
Sounds awesome, right? Why wouldn’t you want to get access to the Lightning Lane and skip the line for the best rides at Disney World? You’re probably wondering how does Lightning Lane work at Disney World?
While in theory this sounds fantastic, the system for getting access to the Lightning Lane is much more complicated than you’d think, with a lot of factors to consider.
Lightning Lane vs Fast Pass
Lightning Lanes were introduced as a replacement for the Fast Pass system that was previously used in some form or fashion across Disney Parks for years.
FastPasses accomplished the same goal as Lightning Lanes, enabling users to skip the standby queue in favor of a “reservation time” to ride the most popular attractions.
FastPasses were completely free to all guests at Walt Disney World in Florida, making this system extremely popular.
Not only did this system please guests, it helped Disney to manipulate crowds and spread them more evenly throughout the parks.
FastPasses were originally distributed as paper tickets, available via kiosks located in strategic places.
With the advent of mobile apps, Disney replaced this system at Disney World with FastPass+. This enabled guests to grab them on the go, without having to run all over the parks to find a kiosk.
For years, Disney had been planning to monetize this system, and had already done so at Disneyland in California by introducing the MaxPass system.
With the parks shutdown of 2020, the perfect time to halt the FastPass+ system presented itself to the powers that be.
When the parks reopened, the Fast Pass was gone. Only standby queues and a few virtual queues (aka boarding passes) were options for guests at the parks during that time.
In October of 2021, Disney World introduced the Lightning Lane as part of the new Genie Plus service that it was adding to the My Disney Experience app.
Lightning Lanes accomplish the same things as the old FastPasses did, but now you have to pay for them and the system is a lot more complicated.

Genie Plus Lightning Lane and Individual Lightning Lanes
Now that you understand the purpose of the Lightning Lane system, we’re going to break down the types of Lightning Lanes you need to know about.
There are two different kinds of Lightning Lanes around Disney Parks: Genie Plus Lightning Lanes and Individual Lightning Lanes.
It’s extremely easy to mix up the two types of Lightning Lanes, and in my opinion, Disney would have been better off naming them differently to avoid confusion.
But unfortunately, they didn’t ask me, so it’s key that you understand the difference between the two if you want to fully grasp how this system works.
Genie Plus Lightning Lanes
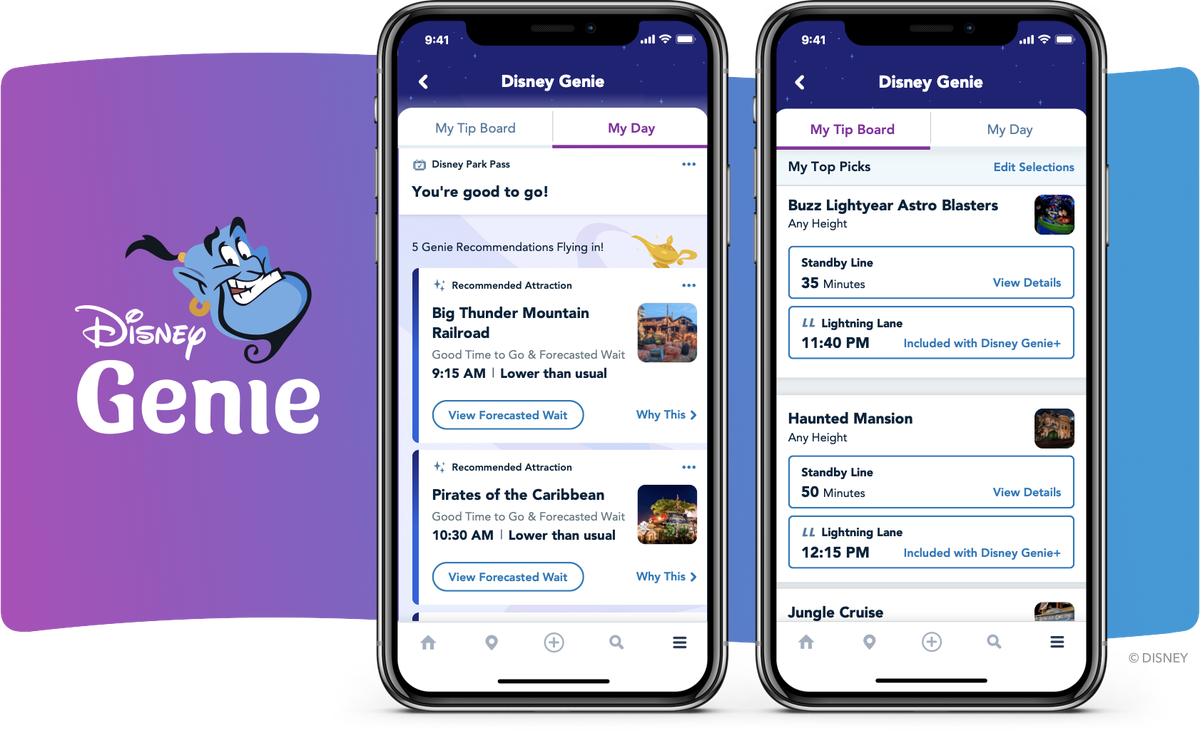
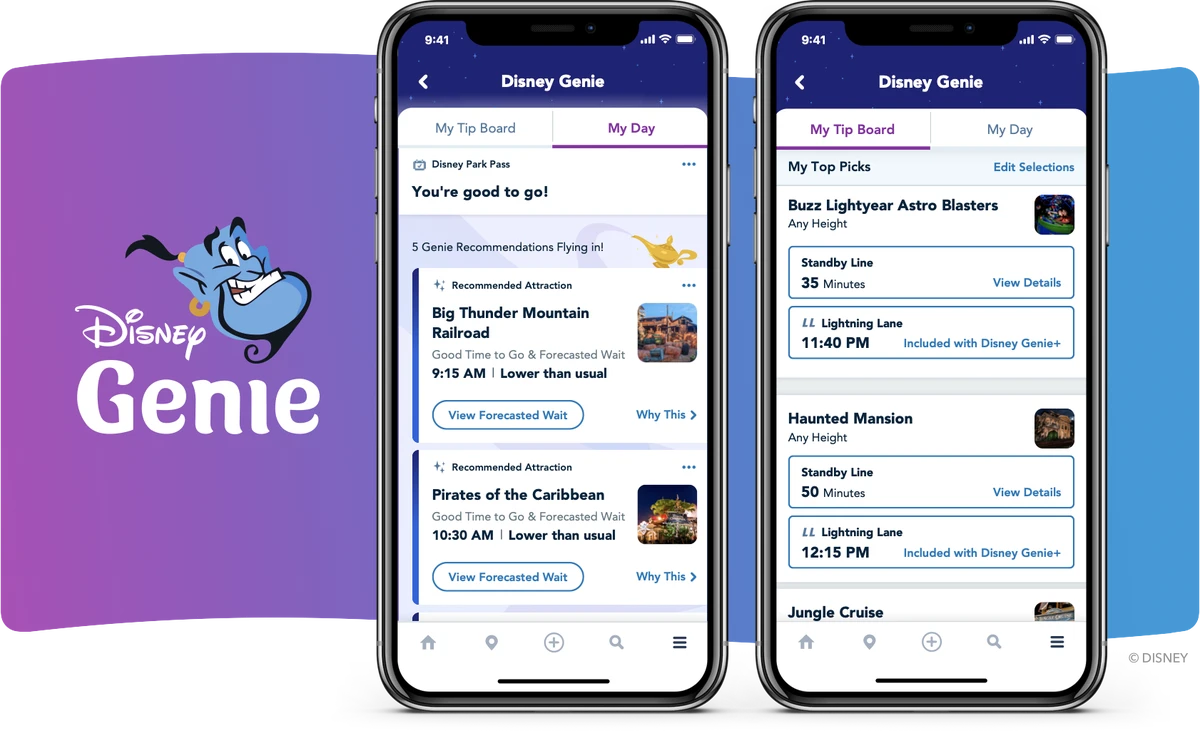
To understand Genie Plus Lightning Lanes, you need to understand a bit about the new Disney Genie system.
Disney Genie
Disney Genie is a service that was added to the MyDisneyExperience App in late 2021.
The basic functions of Disney Genie are completely free to anyone who downloads to app. Some of these functions include:
- Personalized daily itineraries
- Attraction and dining recommendations
- Customized tip board
- Interactive maps
As an add-on to Disney Genie service, for $15 or more per person per day (plus tax), guests can upgrade to use Genie Plus which includes access to Genie Plus Lightning Lanes.
Disney Genie Plus
For that additional fee, when guests upgrade to Disney Genie Plus, they get:
- Select Lightning Lanes Access
- All ride photos and PhotoPass photographer pictures
- Exclusive DisneyLens filters
- Audio Tales
Obviously, the big perk to adding Genie Plus to your visit is the access to select Lightning Lanes. The only other benefit that might justify the hefty cost is the photos.
Genie Plus Lightning Lanes include 60 different attractions across all four Disney World Parks (23 in Magic Kingdom, 12 in Epcot, 14 in Hollywood Studios, and 11 in Animal Kingdom). One price gets you faster access to all of them.
Prices for Genie Plus fluctuate based on how many people are projected to be in the parks that day. The lowest prices we’ve seen is $15 per person and the highest was $35 per person. Disney has put no cap on these prices, so be prepared for them.
Once you’ve paid for access, these Lightning Lanes can be booked through the My Disney Experience App similarly to how FastPasses were booked in the old system.
Unlike most add-ons to a Walt Disney World Vacation, you cannot buy Genie Plus for the entirety of your vacation, or even pre-book it before you get to the parks. Genie Plus must be added to your itinerary daily through the My Disney Experience App.
Individual Lightning Lanes
Whew! That was a lot, but it’s not everything you need to know. Now let me explain how Individual Lightning Lanes work.
To confuse matters even more, the most popular ride in each park is not included in Genie Plus Lightning Lanes.
To access the Lightning Lane for Star Wars: Rise of the Resistance in Hollywood Studios, Avatar: Flight of Passage in Animal Kingdom, Guardians of the Galaxy: Cosmic Rewind in Epcot and Seven Dwarfs Mine Train in Magic Kingdom, you must purchase an Individual Lightning Lane.
Individual Lightning Lanes are completely separate from Genie Plus Lightning Lanes.
You do not have to purchase Genie Plus service to access them.
I’ll say it again in case it wasn’t clear the first time: YOU DO NOT NEED TO BUY GENIE PLUS TO PURCHASE INDIVIDUAL LIGHTNING LANES!
Individual Lightning Lanes are sold separately for each attraction through the My Disney Experience app.

Lightning Lane Rules
Both Disney Genie Plus Lightning Lanes and Individual Lightning Lanes have a few rules that you should know about before committing to them.
Rules for Both Individual Lightning Lanes and Genie Plus Lightning Lanes
The rules below apply to both Genie Plus Lightning Lanes and Individual Lightning Lanes.
1. You must have already purchased a park ticket and have a park reservation to book Lightning Lanes.
While you can view available Lightning Lanes for both types in the My Disney Experience App anytime, you cannot book them unless you have a valid park ticket AND a valid park reservation for the day.
2. You can only use the Lightning Lane for an attraction once a day.
Unlike with Fastpass, you are only allowed access the Lightning Lane once per day per attraction.
So if you wanna ride an attraction multiple times, you’ll be using that standby line for all but one of your turns.
The only way around this is if you have booked a VIP Tour at the parks. While on those tours, your guide can take you through the Lightning Lane as many times as you want, except for a few select newer attractions that are in super high demand.
3. Lightning Lanes are available throughout the day.
You don’t HAVE to get up early to book Lightning Lanes. You can book them on the app all throughout the day, as long as there is availability left for the attraction.
That being said, we always recommend that you get up early to book them so that you can get earlier return times and grab some hard to book ones. If this doesn’t concern you, there’s no hurry in booking them.
4. You can book overlapping Lightning Lanes
In the old Fastpass system, if you could not book times that overlapped with other reservations.
This always seemed a little dumb to us, since you had an entire hour to check in for your FastPass. But it did prevent guests from booking FastPasses that conflicted with things like dining reservations.
Now with the Lightning Lane system, you can book it no matter what other plans you may already have. You’re just giving a pull down menu labeled “Plans During This Time” where you can check for conflicting times when you are booking them.
Maybe you have a hard-to-get dining reservation that conflicts with a Lightning Lane. It’s good to check out what plans you already have if that may be a possibility.
5. There is a grace period if you’re early.
While there are specific times linked to your Lightning Lane reservation, they do give a little leeway to guests who are early.
There is a five minute grace period before that stated time where they will go ahead and honor your Lightning Lane pass.
But five minutes is it! Don’t try to check in 10 minutes early. You will be asked to wait.
6. If you miss your return window, you forfeit your Lightning Lane access.
This one is super important to remember. If you happen to miss your return time window for your Lightning Lane, you will NOT be allowed to book another one for that attraction.
If you’re going to miss your Lightning Lane window for whatever reason, go into the app and cancel it before it expires.
If you can cancel it, the system will allow you to rebook another Lightning Lane for that attraction.
Genie Plus Lighting Lane Rules
These rules apply to Genie Plus Lightning Lanes only.
1. You can only book Lightning Lanes one at at time.
Unlike with the old Fastpass system, Genie Plus Lightning Lanes can only booked one at a time. You must badge in to the attraction before you can book your next one.
There is a loophole to this process that we’ll explain a little later in the post.
2. Everyone can book them starting at 7 am on they day of your visit.
No matter where you are staying, on Disney property or off, if you have purchased Disney Genie Plus, you have access to book Genie Plus Lightning Lanes at 7 am on the day of your visit. Note that this is only true for Genie Plus Lightning Lanes, not Individual Lightning Lanes.
Individual Lightning Lane Rules
These rules apply to Individual Lightning Lanes only.
1. You can only book two Individual Lightning Lanes per day.
No matter how many parks you plan to visit in one day, you are only allowed to book two Individual Lightning Lanes.
For example, you’re planning to start your day in Hollywood Studios, but want to park hop over to Magic Kingdom in the afternoon. If you book Mickey Minnie’s Runaway Railway and Rise of the Resistance Individual Lightning Lanes, you’ll be ineligible to book any other Individual Lightning Lanes at Magic Kingdom.
You can however book them in different parks. So you could book Rise of the Resistance and Space Mountain for use on the same day.
2. Prices for Individual Lightning Lanes vary.
Prices are not the same for every Individual Lightning Lane. The vary between attraction and can also increase and decrease from season to season.
They tend to range between $7 to $20 per person per attraction, but those prices could change at any time.
3. Disney Resort Guests can make their selections early.
If you are staying at at Walt Disney World Resort, you can book your Individual Lightning Lanes earlier than non-Disney resort guests.
Individual Lightning Lane reservations open up at 7 am for Disney Resort guests. They are available at park opening for any visitors not staying at a Disney owned property. (This is true only for Individual Lightning Lanes. As noted earlier, for Genie Plus Lightning Lanes, everyone who has purchased Genie Plus can book them at 7 am.)
Guests of Walt Disney World Swan Hotel, Walt Disney World Dolphin Hotel and Shades of Green Resort also get to book Individual Lightning Lanes at 7 am)

Real World Examples to Help You Understand
I know all of that sounds like a lot, and it’s way more complicated than it should be, so here’s a real world situation you might find yourself in that will help you answer the question: How do you use Lightning Lanes at Disney World?
Let me set up the scenario. You and your two best friends are HUGE Star Wars Fans! You book a two day trip to Walt Disney World and add the Park Hopper option so you can visit more than one park per day.
While you want to see Animal Kingdom and Hollywood Studios during your visit, your main goal is to experience all things Star Wars. You plan to ride Rise of the Resistance and Millenium Falcon as many times as possible.
You spend your entire first day at Hollywood Studios. You shell out an additional $45 ($15 per person) and purchase Genie Plus access. You’re able to book a Genie Plus Lightning Lane for Millenium Falcon.
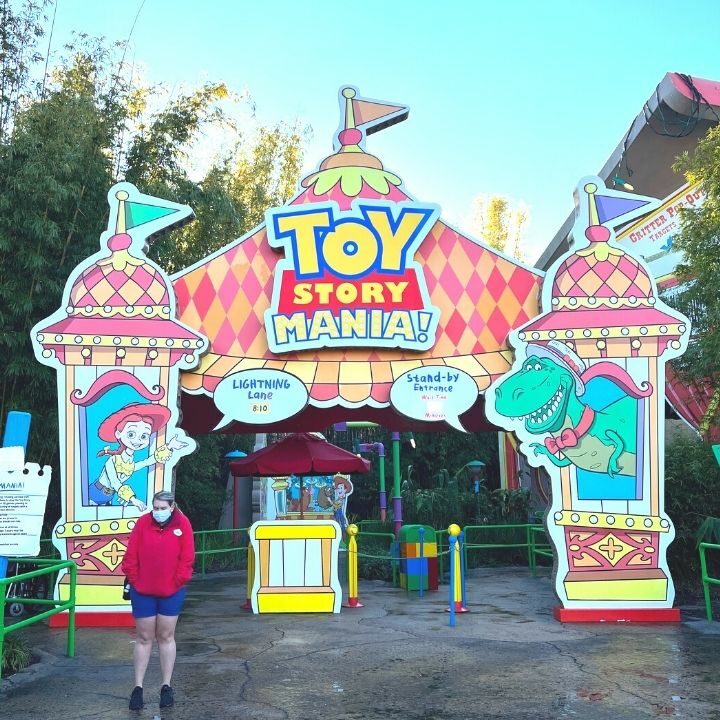
Using Genie Plus, you’re also able to get Lightning Lane Access for Star Tours, Toy Story Mania, and Tower of Terror, saving you a bunch of time.
You also really want to experience Rise of the Resistance on your first day, so you spend another $45 to buy Individual Lightning Lane passes for each member of your group (Individual Lightning Lane access is $15 per person for Rise of the Resistance during your visit).
You love both Rise of the Resistance and Millenium Falcon, and definitely want to ride them again during your first day at Hollywood Studios. But you’ve now used up your Lightning Lane access to both attractions for the day, so you have to wait over two hours in each of the standby queues to experience each ride one more time.
On Day two of your trip, you want to experience all the Star Wars rides again, but you don’t want to spend the whole day at Hollywood Studios. You decide to start your day with a visit Animal Kingdom.
You don’t want to buy Genie Plus for your visit to Animal Kingdom, since the list of available attractions there is pretty small, but you know you’ll be headed over to Hollywood Studios later in the day to head back to all things Star Wars.
You know you only get access to just two Individual Lightning Lanes per day, so you have to get strategic with what you use them on. You spend $27 to buy Individual Lightning Lane Access to Avatar: Flight of Passage (Individual Lightning Lane access is $9 per person for Flight of Passage during your visit) and another $45 for Rise of the Resistance Individual Lightning Lanes.
Once you’ve ridden a banshee, and enjoyed lunch at Yak & Yeti, you hop on a bus to Epcot. When you walk in the gates, you realized you’d really like to ride Guardians of the Galaxy: Cosmic Rewind, but unfortunately, you have to use the standby queue since you’ve already booked your two Individual Lightning Lanes for the day.
Now that we have a more functional understanding of how the Lightning Lane system works, it’s time to get down to the details.
Prep Your Phone
Before booking ANY type of Lightning Lanes, it’s super important that you prepare your phone for the process.
You’re gonna want to give yourself plenty of time to do this. I do NOT recommend trying to get it done at 6:45 am. Some of it can be figured out the day before, and some can be done the morning of.
The first step is to restart your phone so you get a fresh connection to any cell towers in your area.
The second step is to check your wifi signal. Keep in mind that when 7 am hits and those Lightning Lanes drop, everyone and their mother will be on the wifi at your hotel. Make sure you have really good signal.
If you don’t have good signal, turn off your wifi and check to see how fast your cell phone data is running. It will be up to you to decide which one to use based on which one you think is faster.
These two steps can be done days before you need to book your Lightning Lanes. The next steps should be done every morning that you want to book those Lightning Lanes.
Shortly before that 7 am release time, make sure you’re logged off of ALL other apps, even My Disney Experience. If other apps are running in the background, it can slow your phone down and affect how quickly you can snap up those Lightning Lanes.
Once you’ve closed those other apps, log on to My Disney Experience so it’s the only app running.
Use The Correct Time
While most cell phone clocks are pretty close to accurate, seconds count when booking Lightning Lanes, especially for those in high demand.
This is so important that we’ve written an entire post on hacks that can help you improve your speed just to grab a Slinky Dog Dash Lightning Lane in the first few seconds they’re released.
For this reason, you’ll want to be using the same clock that Disney World uses for their system.
The Official U.S. Time for the Eastern Standard Time Zone is what Disney uses to operate their systems. Make sure you use the clocks for the Eastern Time zone on Time.gov to make sure you aren’t starting late.
How Does Lightning Lane Work At Disney World?
So now that you understand what Lightning Lanes are, you’ll want to know how you go about booking them.
How To Get Genie Plus Lightning Lanes
To book Genie Plus Lightning Lanes, you’ll first need to add Genie Plus to your MyDisneyExperience App.
You’ll want to do this BEFORE 7 am, so you don’t waste time once those Lightning Lanes drop.
If you don’t already have it on your phone, you’ll want to add the MyDisneyExperience App as soon as you can.
It’s extremely helpful for just about everything you want to do at Disney World, and I highly recommend adding it to your phone and becoming familiar with it before you ever leave on your vacation.
From wait times to Mobile Checkout to dining reservations, it really has a LOT of helpful features.
Once you have the MyDisneyExperience App on your phone, you can upgrade to Genie Plus on the day of your park visit.
Disney Genie Set Up
First, you’ll want to open the My Disney Experience app and log in.
Next, tap “Summon Disney Genie” button in the center of the page. This will take you to the set up screen for Disney Genie.

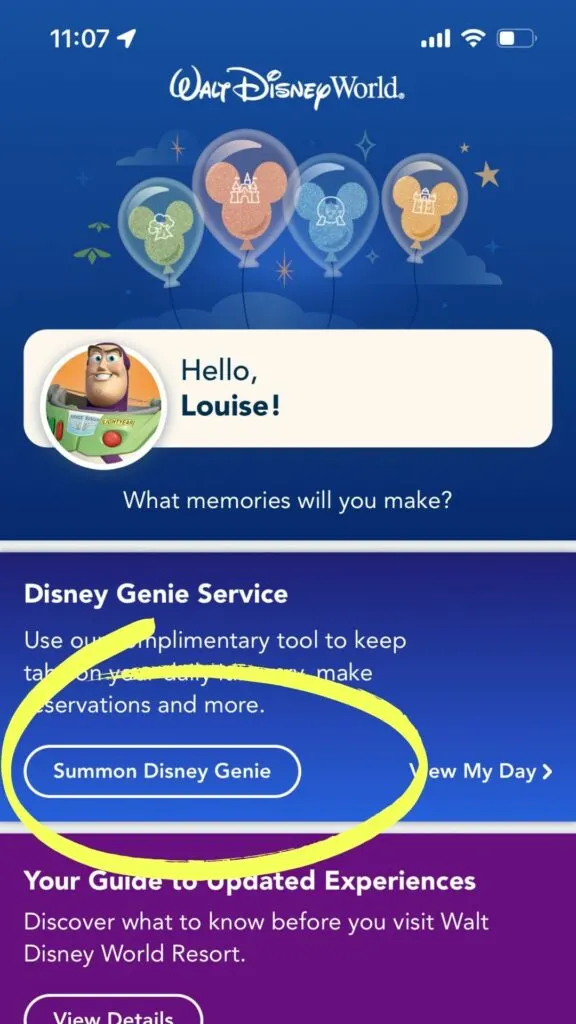
You have two options on this screen. You can either tap “Start Now” or “Skip to Tip Board.”
Unless you are SUPER familiar with Disney World and what the parks have to offer, I highly recommend tapping the “Start Now” button.
This will allow Disney Genie to gather some information from you and then populate it’s recommendations based on what you like and want to see while on vacation.
Once you’ve tapped the “Start Now” button, if they aren’t already connected, you’ll be instructed to link your tickets and park reservations if you or your agent hasn’t already done so in the app.
Once tickets are linked, you’ll be asked to select a date and a park that you plan to visit and confirm who is visiting with you.
Then you’ll be asked to select all the things your interested in seeing. You’ll be asked to select attractions, entertainment, dining and other experiences.
Then you’ll be asked about your general interests. Are you a princess fan? Can’t get enough Disney Villains? Want to see all things Star Wars? Here you’ll get a chance to indicate your priorities.
You’ll even be able to select the types of rides you like, the dining experiences you prefer, and the character interactions you’s enjoy.
After you make these selections, you’ll be asked if you’d like height requirements and accessibility options to show up in your recommendations. This info can be very helpful if your traveling with little ones or with someone who make need some special consideration to experience the attractions in the park.
Genie Plus will then customize your Tip Board to reflect these selections.
Keep in mind, setting up Disney Genie does not guarantee you access to your selections, it’s just giving the app an idea of what you’re interested in seeing.
Adding Genie Plus to Disney Genie
After you’ve made these selections, you’ll finally be taken to the screen that asks you if you’d like to upgrade to Disney Genie Plus service.
If you want to add Genie Plus, you will tap “Get Disney Genie+ Service” on your screen.
From here you’ll be taken to a confirmation page that will list the guests who will have access to the service (this should be everyone in your party who has a ticket) and the total cost of the service.
Next you’ll be taken to a purchase confirmation screen, where your total with tax (yes, there is tax added to each purchase) is visible and where you’ll have to agree to the terms and conditions of the service.
Once you click the “I have read and agree” box, tap “Purchase” and you’ll be taken to a payment screen where you can confirm your payment method.
Once you’ve entered your payment info, you’ll be taken to an order confirmation screen.
PRO TIP: Always screenshot your order confirmation screens! If there happens to be any glitch in the system when you purchase Genie Plus or an Individual Lightning Lanes, having these screenshots can be VERY helpful when getting assistance from Cast Members to fix the issues.
After you’ve completed the purchase, you can now access Disney Genie Plus services, including booking those all important Lightning Lanes!
You’ll need to add Genie Plus to your app every day of your trip. Unfortunately you can no longer purchase it in advance, so it must be added daily.
You’ll definitely want it added before 7 am when want to start grabbing those Lightning Lanes. You can actually add it anytime after 12 am each day, so if you happen to be up late, you can go ahead and add it for your next morning’s visit to the parks!
Booking Lightning Lanes
Once Genie Plus has been added to your MyDisneyExperience, you’re ready to start nabbing those Lightning Lanes.
The most process is the same for both types of Lightning Lanes.
Access to Genie Plus Lightning Lanes begins at 7 am every morning for everyone, even visitors who are not staying on Disney World property. Access to Individual Lightning Lanes starts at 7 am for those staying at a Walt Disney World Resort Hotel. For those staying off Disney Property, access to Individual Lightning Lanes starts at the time the park officially opens for the day.
Just before 7 am, you’ll want to go into your My Disney Experience App and click the three horizontal line icon on the bottom right of your screen.
On the next screen at the top left, you need to tap on “Tip Board.” This will take you to where you can book both types Lightning Lanes.
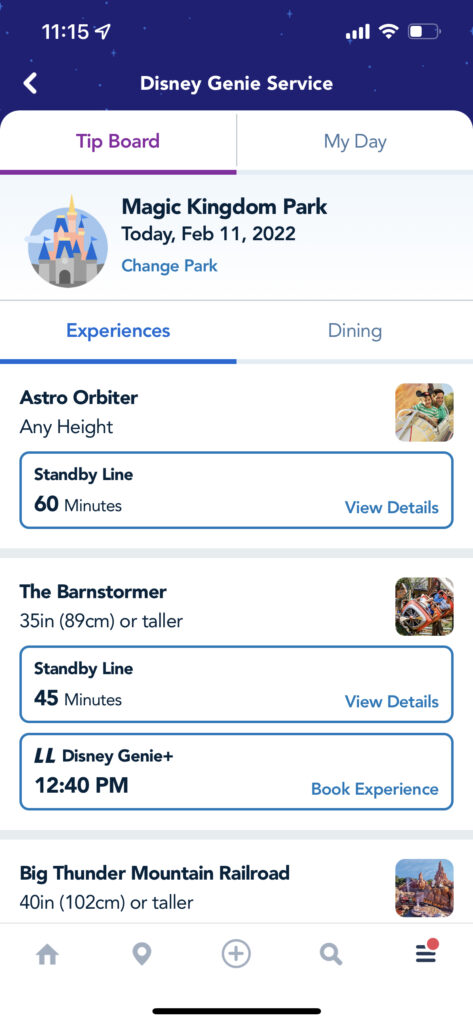
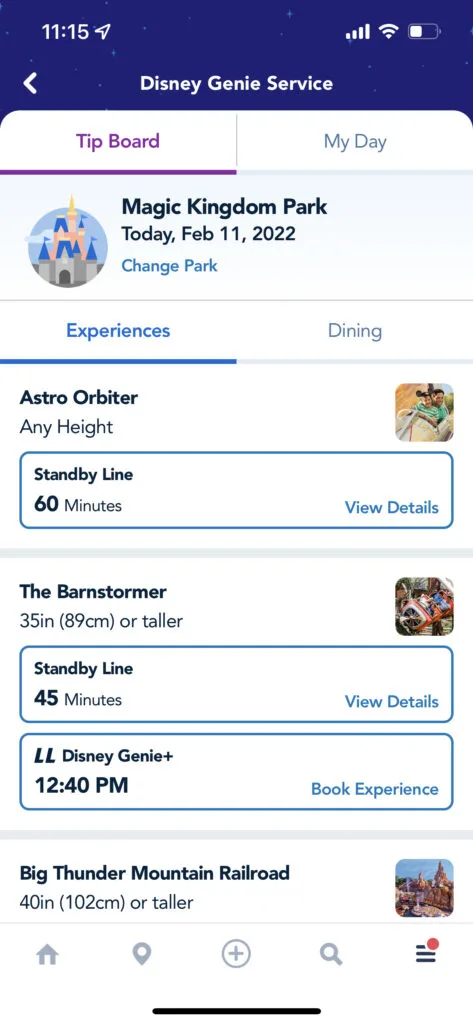
Make sure the park you plan on visiting is correct at the top of the screen. If it’s not correct, you can quickly change it to the accurate park.
From here, simply scroll down to the attraction you’d like to book. If the attraction has a Lightning Lane, it will be listed here with the current wait time, the next available Lightning Lane return time, and the price if it’s an Individual Lightning Lane.
Once you find the attraction, simply tap on the box that says “LL Disney Genie+” or “LL Individual Lightning Lane.”
This is where the process for Genie Plus Lightning Lanes and Individual Lightning Lanes differs.
Genie Plus Lightning Lanes
This will take you to a page listing info for the ride, the time of the Lightning Lane, and the members of your party. Make sure this info is correct and tap “Continue” at the bottom of the screen.

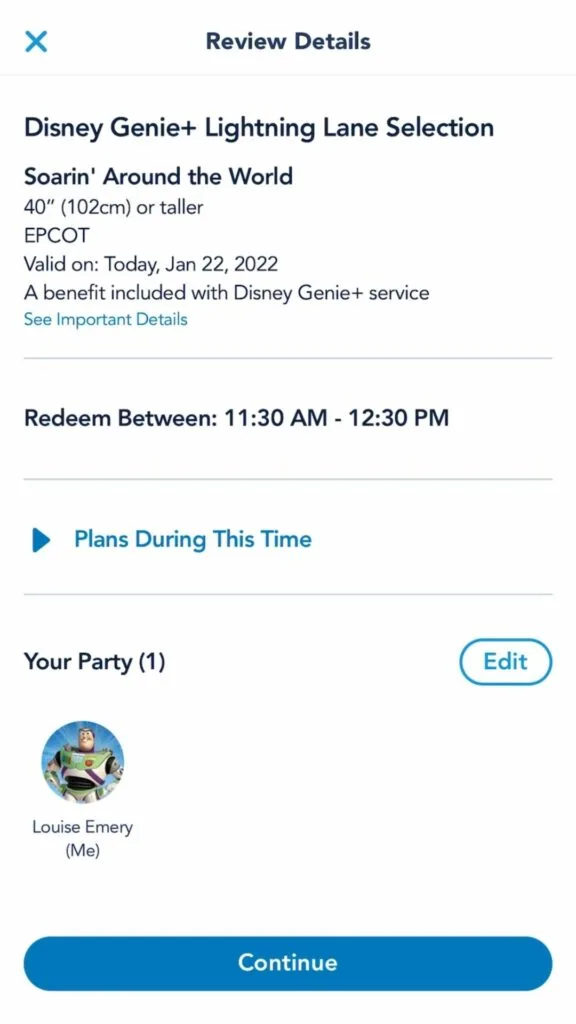
Then you’ll be taken to another confirmation screen that will include the ride info, the time of the Lightning Lane and the members of your party who are riding with you.
Tap “Continue” and now you’ve booked your Disney Genie Plus Lightning Lane!
You’ll be given a confirmation page showing you all the info for the selection you’ve just made. We ALWAYS recommend taking a screenshot of this page in case something goes wrong with the Lightning Lane system so you can prove that you booked it.
Individual Lightning Lanes
Once you’ve located the Individual Lightning Lane that you want to purchase, be sure to take note of the cost. That is the price per guest, not for the group.
Keep in mind, you DO NOT need to have purchased Disney Genie Plus to buy Individual Lightning Lanes.
Once you’ve clicked on the Individual Lightning Lane that you want, you’ll be taken to a page to select a time and confirm your party.

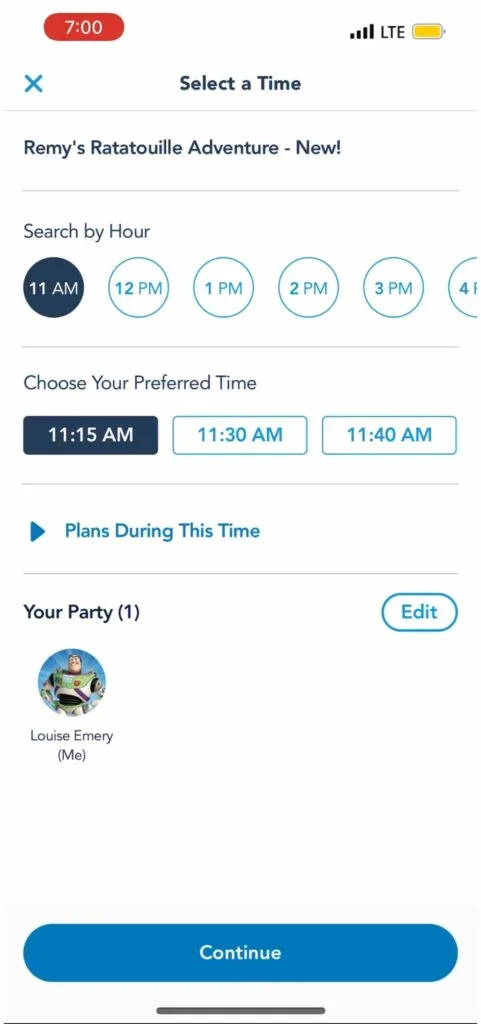
Individual Lightning Lanes give you a little more flexibility with choosing a time than the Genie Plus Lightning Lanes do.
Select the time you want and make sure your party includes everyone who is planning to experience the attraction. You can remove them here if there’s anyone who doesn’t want to ride.
You’ll then be taken to another confirmation page to confirm your selections. Double check your details, and then click confirm.
The app will then have you sign into your Disney Account to pay for your purchase.
It’s a good idea to have your phone set up with that password saved if you want to do this process quickly to make sure you score those hard to get Lightning Lanes. I use the face ID feature on my phone to enter the password, so it saves me crucial moments when booking Lightning Lanes.
If you get to this point, your Individual Lightning Lane selections will be held for 10 minutes while you pay for them.
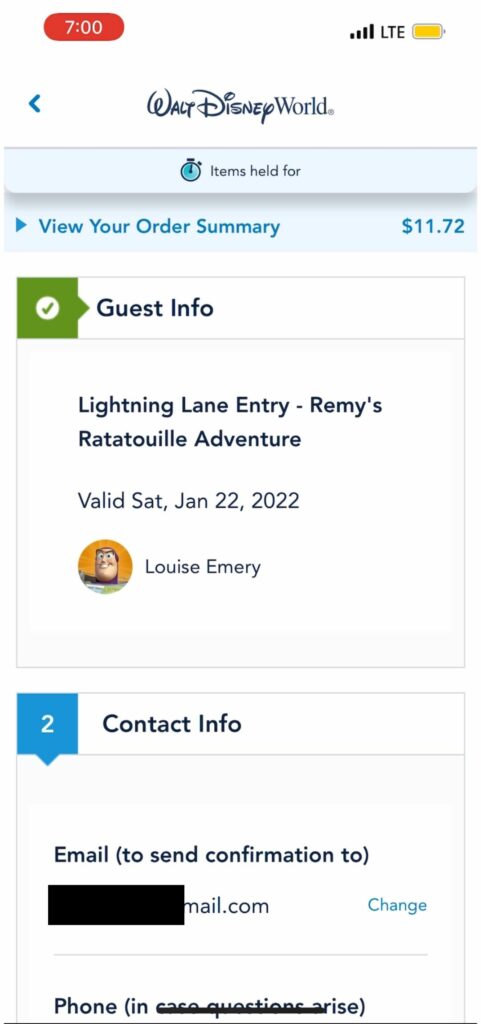

The next screen will give you the total with tax and prompt you to enter your payment information. Simply tap “Next”, then agree to the terms and conditions and tap “Purchase.”
You’ll then get your confirmation page that gives the details of your purchase. Again be sure to grab a screenshot of this page in case something goes wrong with Disney’s technology.
You’ll also be emailed a receipt for your purchase so you can keep track of all that money you’re spending.
Disney Lightning Lane Loophole
As I mentioned before, there is a big loophole in the Lightning Lane system that can be beneficial to guests at the parks.
The 120 Minute Rule
Basically, Disney knows that only booking one Genie Plus Lightning Lanes at a time can be problematic if availability is scarce and you can’t seem to get ones early in the day.
So exactly two hours after you’ve booked a Lightning Lane, if you haven’t badged in to use it, you can book another one.
Here’s where it starts to get complicated. That 120 minute countdown does NOT begin at 7 am when you may have booked your Lightning Lanes. It only begins when the park opens.
Let’s say you got up early and booked a Lightning Lane for Haunted Mansion at 7 am. The return time you were able to get starts at 12:15 pm. The park opens at 9 a.m. Thanks to the 120 minute rule, starting at 11 am, you can book another Lightning Lane.
By doing this, you can “stack” Lightning Lanes for later in the day.
Lightning Lane Strategies
Using the Individual Lightning Lanes really doesn’t need a strategy, you just need to determine if the price is worth it to you.
When it comes to Genie Plus Lightning Lanes, there are basically two schools of thought on how you can utilize them to save you time at Walt Disney World. Both of them are valid methods that can definitely work in your favor.
Longest Lines Strategy
This strategy uses Lightning Lanes just to shorten the wait times of the most in demand rides, like Slinky Dog Dash, Millenium Falcon: Smugglers Run, and Test Track.
This often means that you are spending your morning in stand-by lines, and stacking three or four those in-demand rides for later in the day.
For us, using this strategy meant setting an alarm on my cell phone so we could book an new Genie Plus Lightning Lane every 120 minutes.
We’ve found that with this method has you spending less time on the app trying to book attractions, but more time waiting in line for the less in demand attractions.
As Many As Possible Strategy
This strategy uses Genie Plus Lightning Lanes more for volume. This means nabbing a Lightning Lane for the earliest time you can, and then booking another based on time as soon as you’ve used that first one.
This strategy does require you to be on your phone A LOT, but it will minimize wait times when the parks are really full.
Which Strategy To Use
It really depends on which park you are going to and how crowded the parks are to determine which strategy is more effective.
If you’re going during peak season, using the As Many As Possible strategy is really going to save you time, but it’s alway possible that Lightning Lanes will for some of the most popular attractions will fill up before you have a chance to grab one.
If you’re going during a slower time of year, the standby lines for some of the less popular attractions may not be that bad, so stacking your Lightning Lanes for the in demand rides makes a lot of sense.
The key to both strategies is learning about the rides before you go, and really knowing what you want to experience on your trip so you can make those attractions a priority for Lightning Lane access.
Keep in mind, standby lines are available for almost every ride in the park, so you can alway utilize the regular queue to experience most attractions. The only exception to this is for Disney World’s newest rides which often require that you join a virtual queue.
Standby lines are available for every ride in Disney Parks, and you can use them as much and as often as you like during your visit. With a good touring plan, you can make the most of your park day, even without purchasing Individual Lighting Lanes or Genie Plus.
Final Thoughts
We hope this helps clarify all the ins and outs of the Lightning Lane system. It really is a LOT to take in.
Have any questions we didn’t answer? Concepts we need to explain a little more? Ask away in the comments!
Tom
Saturday 7th of January 2023
Is it worth getting an Individual Lighting Lane for as early as possible in the day for Rise of the Resistance if we are staying on-site and will have early access hours? Or should we rope drop and get to Rise of the Resistance without an Individual Lighting Lane?
Louise Emery
Tuesday 10th of January 2023
It all depends on your priorities. If ROTR is an absolute MUST RIDE for your family, getting an ILL is worth it. If it's not top priority, I'd rope drop it.
Stevie Joe
Saturday 26th of November 2022
I don’t want to get to the park at 8 am. Does Genie give me an option to pick later times. 1030 instead of 9 am
Louise Emery
Tuesday 29th of November 2022
You can select your own time window for Individual Lightning Lanes. For Genie+ Lightning Lanes, you are only able to select the next available time.
KP
Friday 5th of August 2022
I am confused by something I read on the Disney website. On the info page for Genie Plus it states, "On average, Guests can enter 2 to 3 attractions or experiences per day using Lightning Lane entrances..."
I don't understand why they would say the average is that low. It seems like you should be able to book way more than 3 Lightning Lanes in a 12 hour park day.
KP
Tuesday 9th of August 2022
@Louise Emery, According to the "120 minute rule" which you mentioned in the article (and I also confirmed on the Disney website), you should theoretically be able to book a pass at 9:00am, 11:00am, 1:00pm, 3:00pm, 5:00pm and 7:00pm. That's 6 passes right there according to the math. Am I missing something?
I realize some of the bigger attractions like Space Mtn and Seven Dwarfs Mine Train, etc., will run out of passes on a busy day, but it seems like there would still be the possibility of getting at least 6 passes for something.
Louise Emery
Tuesday 9th of August 2022
I think Disney is trying to keep expectations low with Genie+. I'd say 2 to 3 is the absolute minimum you should expect to be able to use Genie+ for. Of course, it all depends on a lot of variables, like the size of your group, how crowded the park is, are rides breaking down, etc.
Ann
Friday 1st of July 2022
Wow thank you so much for writing this! I’m going to Disney soon and this will be extremely helpful. Read the whole article and it was very well written and easy to understand!
Louise Emery
Friday 8th of July 2022
Thanks! I'm glad it helped. Have a ball on your trip!
Kat
Tuesday 21st of June 2022
Should I have my credit card saved in the MyDisneyExperience app, to make the 7am mad rush flow smoother? Thank you for this website!
Louise Emery
Thursday 23rd of June 2022
I usually do that, just to make things flow more smoothly.