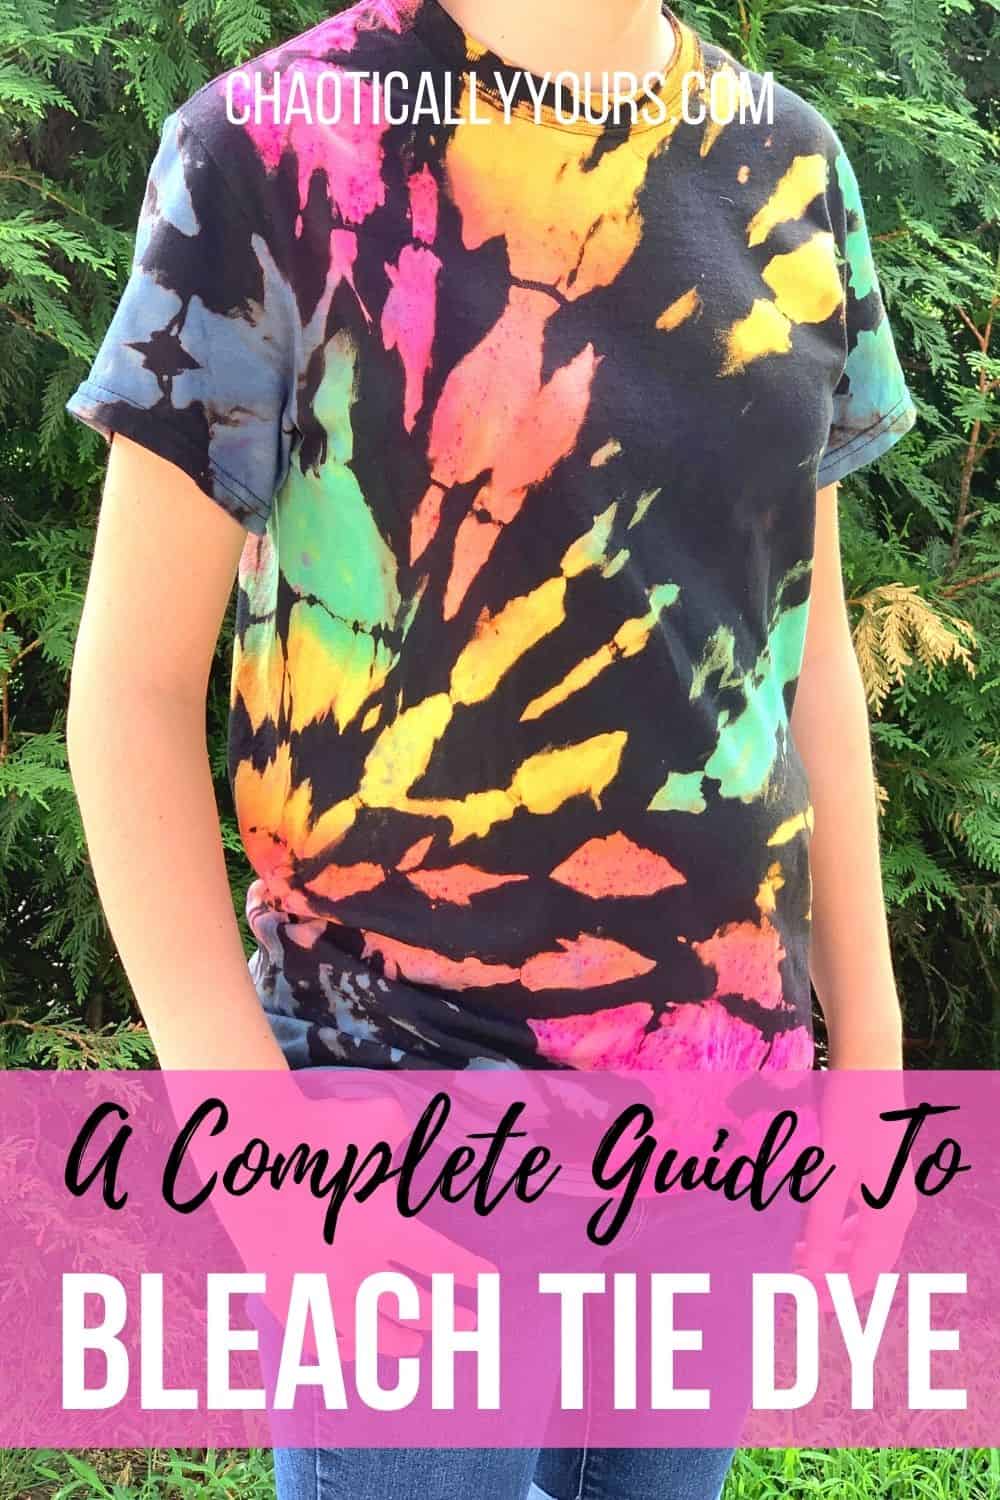
Bleach tie dye (also known as reverse tie dye) is one of the coolest craft projects I’ve come across in a LONG time.
I have two middle schoolers in my house now, a boy and a girl, and this project appealed to both of them!
It’s rare that I find a craft project that gets interest from both my kids, but this one was one of those rare times when they both though the final results were really cool.
Apparently tie dye ANYTHING is super popular right now (thanks to TikTok). From tie dye shirts to tie dye socks, all of it is popular at the moment.

I’ve always loved projects that deal with positive and negative space (see my Bleach Stencil T-shirt post to really get into that one!), but this project takes that idea to an entirely new level!
Plus, having your own, one of a kind item of clothing is always SUPER fun!
Over the past few days, we experimented with a few different ways to bleach tie dye, and came up with what we felt was the easiest way to get the process done. I’m super pumped to share it with you!
Links in this post may be affiliate links, which means I may earn a commission if you make a purchase from any of them. You can read my full disclaimer HERE.
FYI: This project involves using toxic materials. I do not recommend this project for children.
Bleach Tie Dye: What You’ll Need
You don’t need a ton of items for this project, but you do need some very specific ones.

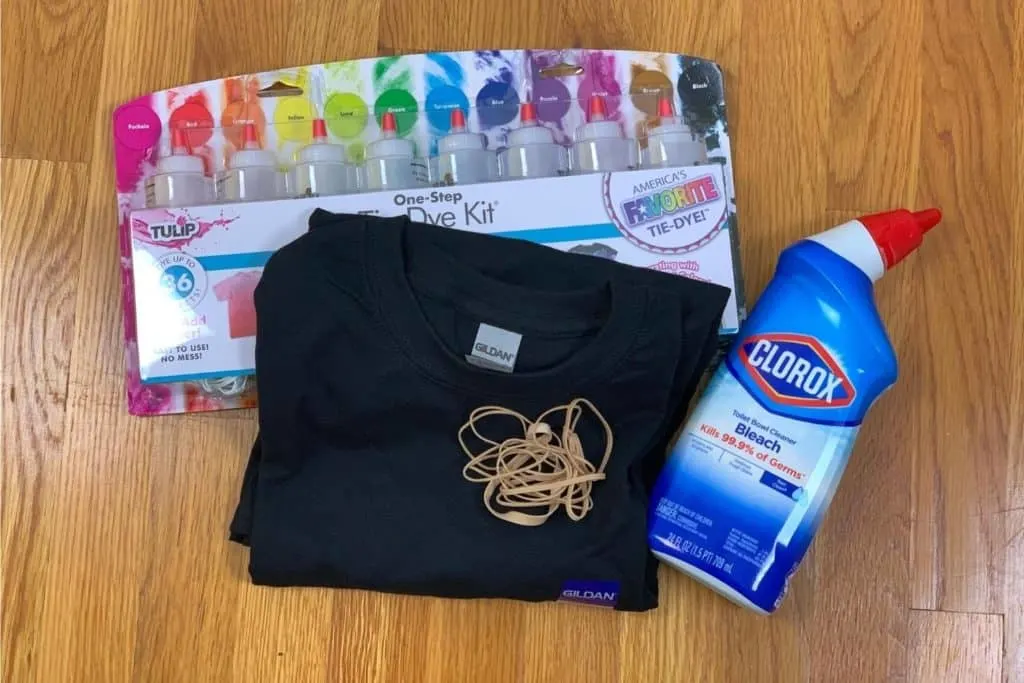
Here’s your supply break down:
- A black t-shirt
- A tie dye kit
- Bleach toilet bowl cleaner
- Rubber bands
- Disposable gloves (not pictured)
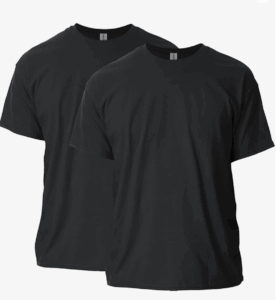
While you could try reverse tie dye on just about any color shirt, I recommend using a black one.
When you apply the dye, any areas that you “overspray” will just blend into the black, and won’t be visible on the shirt. If you tried this technique on any other color shirt, the “overspray” areas would look odd.
Now if you just want to put a bleach tie dye effect on a shirt, and not continue on with the other colors, you could totally do it on any color shirt!
For the best results possible, you’ll want to use a 100% cotton t-shirt. Cotton just seems to take the dye better than other materials.
We used these Gildan shirts that worked really well:
To make this bleach tie dye project, you’ll also need a tie dye kit. The one in the picture above isn’t actually the one we used.
I forgot to get a supply picture (whoops!) before we did this project, so I grabbed my other kit for the picture.
I know tie dye kits seem pretty pricey, but we actually made SEVERAL projects from the tie dye kit we bought, so the cost is actually spread out quite a bit across all the projects.
We actually loved the results of this project so much, we’re planning on making a few more! I’ve even given them as gifts!
Here’s the tie dye kit I actually purchased:
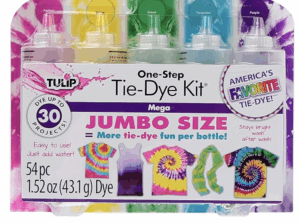

I loved these basic colors for this project. They turn out so vivid and so cool!
For the bleach part of this bleach tie dye project, we found that bleach toilet bowl cleaner was easier to work with than liquid bleach or a bleach/water mixture.
I know. It sounds weird. But it was fast, effective, and stayed put where we wanted it.
Make sure you use one that actually has bleach in it. Not all toilet bowl cleaners contain bleach.
If you don’t have access to bleach toilet bowl cleaner, we recommend using a 50/50 mix of bleach and water in place of the cleaner. Straight bleach can actually damage the fibers of the shirt if left on too long.
You’ll also need rubber bands of various sizes and a some disposable gloves to protect your hands from the harsh chemicals and the dye.
Bleach Tie Dye: Prepping Your Shirt
To start this project, you’ll want to prepare your t-shirt.Start with a dry t-shirt. For other methods of tie dying, it helps if the t-shirt is wet, but for bleach tie dye, it’s much better to start with a dry shirt.
You’ll want to prepare your shirt for whatever pattern you’d like to see on your final product.
There are tons of methods for making patterns. We used a classic tie dye bullseye pattern, but offset it a bit for a different look.
You’ll use your rubber bands to secure the shirt. I like to use several different sizes of rubber bands, just to change up the design a bit.
(Read my post about how to make a tie dye bullseye pattern for complete instructions on how to set up the rubber bands for this design.)
Bleaching Your Shirt
Now that you’ve got your shirt all prepped, here comes the tricky part: applying the bleach.
Definitely wear old clothes for this part, just in case some of the bleach gets on your clothing. It WILL stain! That’s kinda the point.
You’ll want to find a well ventilated area to apply the bleach, since the fumes can be kinda strong.
Also, be VERY aware that any bleach product can be damaging to surfaces. Make sure you are doing this project somewhere that will NOT get damaged in the process.
I’ve seen this step of the bleach tie dye project done outdoors, in kitchen sinks, in bathtubs, etc.
We chose to do this part of the project over an empty washing machine, but you could do it in any location where you feel comfortable with the ventilation and the clean up.
You’ll start by putting on your gloves. Trust me, you’ll want to use the gloves!
Then you’ll want to open your bleach toilet bowl cleaner.
Drizzle the cleaner over the prepared t-shirt with care. As you can see in the video, I used my hands to spread the bleach all over the shirt.
The amount of coverage you apply now with the cleaner will determine how much space is available to dye later. Make sure you consider this when spreading your bleach cleaner.
We did a medium to large amount of toilet bowl cleaner on this shirt.
Once the shirt is covered in toilet bowl cleaner to your liking, leave it to soak a while and change color.
It really doesn’t take long to take effect, just 15 to 20 minutes really. I definitely wouldn’t leave it for more than an hour.
Removing The Bleach for Your Reverse Tie Dye Effect
Next, you’ll want to rinse out the bleach.
I recommend doing this by hand, and NOT in the washing machine, as the bleach gel that is already in there can linger, and possibly mess up your design.
We rinsed ours in the bathtub. We also ran an empty load in our washing machine after this process, just to wash out the bleach gel.
After that empty load, we washed the shirt with soap to get out any remaining bleach that might have still be on the shirt.
Now you should have a shirt that looks something like this:
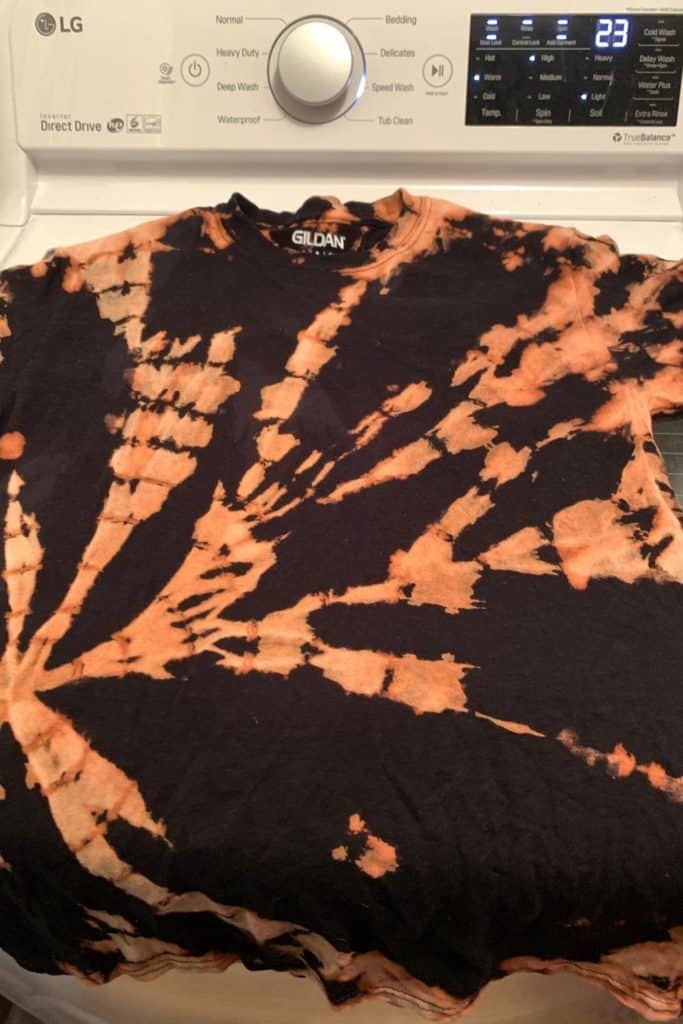
It looks awesome, right?? Such a striking contrast between the light spaces and the dark spaces!
You could actually leave your bleach tie dye shirt just as it is at this stage, and it would still be cool. But we LOVED the effect with the color, so we moved on with the tie dye process.
Reverse Tie Dye: Adding The Color
You’ll notice that the reverse tie dye didn’t get out ALL the color from the black t-shirt. It remained a little bit orange in the areas we applied the bleach.
Don’t stress that part! When you apply the tie dye colors over the orange-y bleached areas, they’ll blend in like the orange was never there.
It’s kind of amazing, really!
You’ll want your shirt to be slightly damp when you move onto the next step.
We found that the lightly damp shirt that came directly out of the washing machine was not quite damp enough for this step, so we wet the t-shirt just a little bit more.
DO NOT USE A SOAKING WET T-SHIRT!! The tie dye will spread WAAAAY too easily on it.
We did this project outdoors on a hot day, so the shirt was drying rather quickly. I kept a spray bottle of water with me outside, just to spritz it down if it seemed like it was getting a bit too dry to use.
Mix up your tie dye kit, according to package directions. Ours just required us to add water to the powder that was already in the squeeze bottles.
Find a place where you don’t have to worry about the color staining anything. We did this part outside on the grass.
Again, wear disposable gloves and old clothing.
Lay the shirt out flat.
Apply the dye to the areas that were bleached out. You may want to do this slowly, since the dye on the damp shirt will spread quickly.
Just make sure you use enough to get a good saturation of the color.
We applied the dye strategically, trying to add colors next to each other that would blend well if they bled over.
You don’t want colors like red and green next to each other or you’ll just end up with brown splotches in the places where the colors mix.
Just be mindful of your color placement when applying the dye.
Once we’d completed coloring in the front, we flipped the shirt over to make sure all of the bleached spots on that side had been covered. Most had, with just one or two spaces needed to be filled in.
When we finished, we transferred it to a plastic bag.
We let the shirt sit in the bag for about 6 hours to set the dye. If you want more vibrant colors, leave it in the bag longer. Just follow the directions on your tie dye kit.
I wish we had left this project in the bag overnight for REALLY vibrant colors. We just got too impatient to see the final results.
Bleach Tie Dye: Finishing Your Shirt
Next we rinsed the shirts in cold water until the water ran clear.
Again, make sure you rinse them in an area that won’t be damaged by the dye.
We used our bathtub, then immediately cleaned it out with some of that bleach toilet bowl cleaner that we just happened to have on hand. We didn’t want to leave any remnants of the dye in the bathtub to possibly stain the surface.
We then let our bleach tie dye shirts dry completely, then run them through the washing machine one more time.
Now they were ready to wear!!
The Finished Product

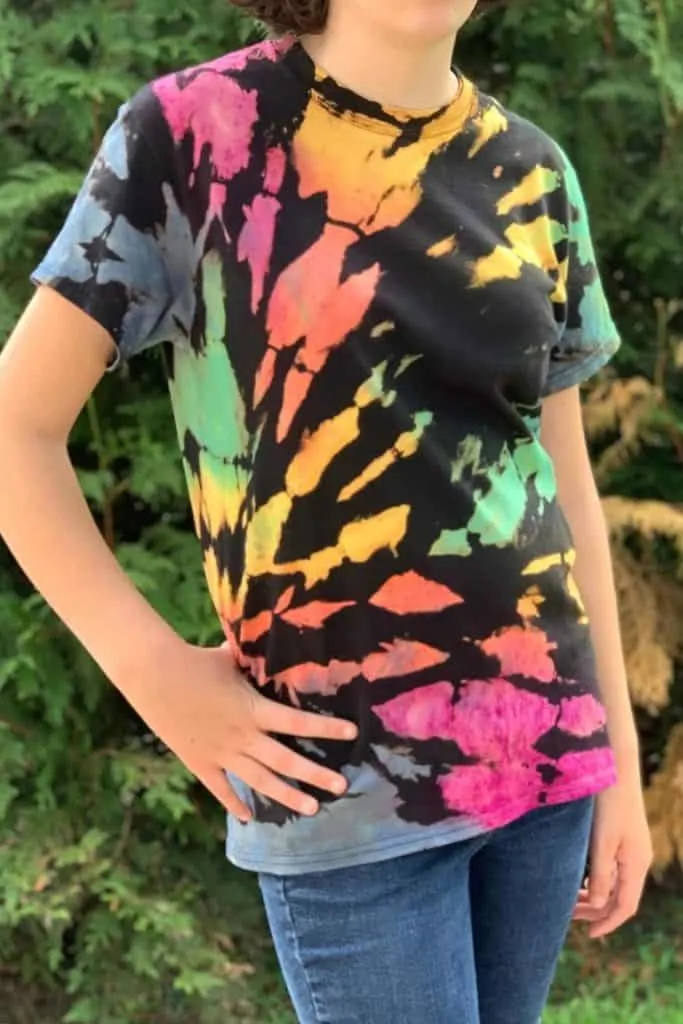
Don’t you love it?!?! Both my kids did! It was so fund to put this bleach tie dye / reverse tie dye project together.
You could totally do this same process on other garments as well! Socks, sweatshirts, dresses, even masks would be cool done this way!
The effect is so striking, and really stands out! Once we’d completed our first set of shirts, we found this process to be really easy, and plan on making more (including a hoodie!! More on that later!)
For the first two washes, I recommend washing them alone, to prevent any dye transfer to any other items of clothing.
You might even want to throw a color catcher in the wash with them, just to make sure!
Looking for more cool DIY projects? Click on the images below to check out these cool tutorials:


Bleach Tie Dye (a.k.a. Reverse Tie Dye)


Use this simple technique to make amazing bleach tie dye (reverse tie dye) shirts!
Materials
- A black t-shirt
- A tie dye kit
- Bleach toilet bowl cleaner
- Rubber bands
- Disposable gloves
Instructions
- Start with a dry t-shirt.
- Prepare your shirt for whatever pattern you'd like to see on your final product.
- Put on old clothes and disposable gloves.
- In a well ventilated area that won't be damaged by bleach, apply the toilet bowl cleaner to the prepared shirt, spreading evenly.
- Leave the shirt to sit until it has bleached out the desired areas, 20 to 60 minutes.
- Rinse the bleach gel out of the shirt in an area that won't be damaged by the bleach (i.e. a bathtub or stainless steel sink)
- Wash your shirt to remove any residual bleach that may be remaining. Do not dry the shirt. Leave it damp so that it will accept the dye.
- Find a space that won't be damaged by dye and wear old clothes and disposable gloves.
- Mix tie dye according to package directions and start process with a slightly damp shirt.
- Lay the shirt out flat.
- Begin applying dye to the bleached out areas of the shirt.
- Make sure to check to back to see if any places need extra dye.
- Lay shirt out to dry for a bit.
- When the shirt is just a bit still damp, and no longer dripping dye in any way, transfer it to a plastic bag.
- Let the shirt sit in the bag for about 6 to 8 hours to set the dye. (longer times for more vibrant colors)
- Rinse the shirt in cold water in an area that will not be damaged by the dye.
- Let the shirt air dry completely.
- Wash the shirt in cold water and dry normally.
- Wear your new bleach tie dyed shirt!
Notes
WARNING: Bleach is a toxic substance that is not safe for children. Please use with caution.
WARNING: Bleach and dye can damage surfaces. Always work in areas appropriate for the use of these substances.
For the first two washes, I recommend washing them alone, to prevent any dye transfer to any other items of clothing.
Recommended Products
As an Amazon Associate and member of other affiliate programs, I earn from qualifying purchases.


Bleach Tie Dye / Reverse Tie Dye
Anita
Wednesday 16th of July 2025
I wanted to have my 7 yr old twin granddaughters do this as a crafting project. However, I did a large adult tshirt when I bleached the kids sizes so I could test it out first. Bleaching stage worked great (Clorox brand toilet bowl cleaner and 18 rubber bands). However after doing the rinsing, empty washer rinsing and subsequent washing, the dye stage didn't seem to take at all. So I washed again in washer. Put dye on and it looked better while wet. I kept mine in bag overnight even, but after following next steps, color didn't look vibrant at all! Couldn't even tell I used blue! Red sort of there, yellow didn't look more than the orange from bleach, green also barely there. It's like the washer step drained all the color! I haven't moved to the kids still. Gilden shirts, too! Help! I'd like to get these finished.
Louise Emery
Thursday 17th of July 2025
Wow! I am so sorry this has been happening to your shirts. What brand of dye were you using? It might be the dye itself that is having an issue.
Janet Rathbun
Wednesday 13th of December 2023
I'm eager to try this and I love your result! My question is whether soda ash is used to soak the shirt before any of the steps. Thanks!
Addie
Tuesday 23rd of July 2024
@Louise Emery, if I bleached a glidden shirt and instead of being orange it turned gray, will the addition of color still take? Or does the shirt need more bleach? Thanks for your help!
Louise Emery
Thursday 14th of December 2023
I've never used soda ash, but if you want to I think it would probably make the colors hold stronger.
Gwen
Monday 15th of May 2023
I love the pattern on the tshirt in the pic. Is it a fold design or a stencil? I’m hoping fold as I don’t have a machine to make stencils. Thanks for all your great ideas,they are easy to follow and so fun!
Louise Emery
Tuesday 16th of May 2023
It was a stencil.
What about using the hydrogen peroxide after you bleach out the sweatshirt to neutralize it so then you can tie dye it with any color you want that's what I heard you're supposed to do you don't mention anything about hydrogen peroxide
Tuesday 22nd of November 2022
What about using the hydrogen peroxide after you bleach out the sweatshirt to neutralize it so then you can tie dye it with any color you want that's what I heard you're supposed to do you don't mention anything about hydrogen peroxide
Louise Emery
Tuesday 22nd of November 2022
I've never done that and have had no problems dying it other colors over where it was bleached, as long as the garment was thoroughly cleaned after the bleaching step.
Charlie
Monday 4th of July 2022
I've tried doing reverse tie dyeing but when I never seem to get any noticeable colour one I've dyed the garment, even if I leave it for two days :( I've bleached and rinsed following all the instructions. I don't know why it's going wrong, do you have any advice/ideas please? What brand of dyes are you using to get such bright colours?
Louise Emery
Friday 8th of July 2022
You might want to wash the shirt multiple times between bleaching and dyeing. You might still have remnants of bleach left in the shirt making it hard to dye. Also, make sure you're using the right type of dye for the fabric. Some synthetics don't take well to dye. 100% cotton is best.