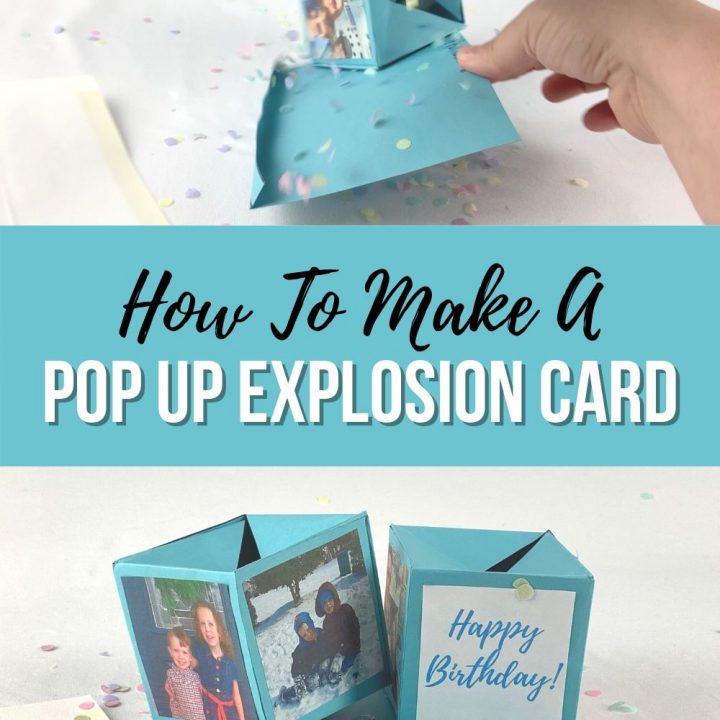
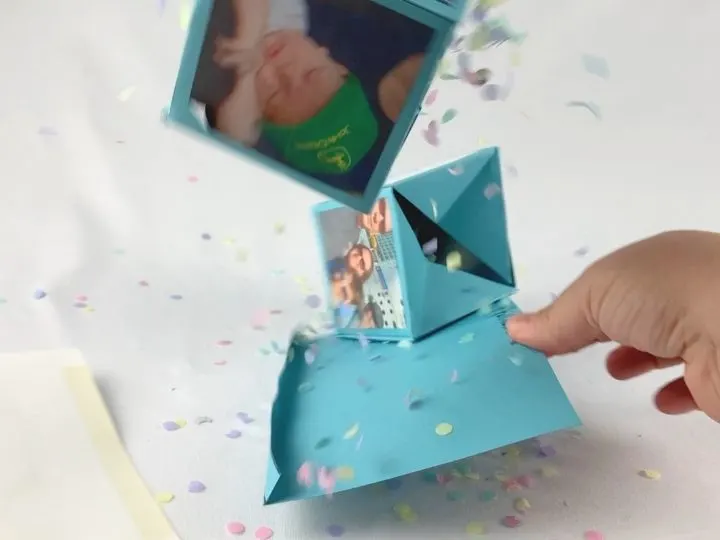
Explosion cards are the most surprising way to celebrate with people you love, and today I’m showing you how to make your own!
These fun pop-up boxes fit right inside an envelope and burst out when you pull on the tab for a fun and unexpected jolt of joy.
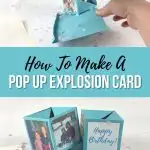
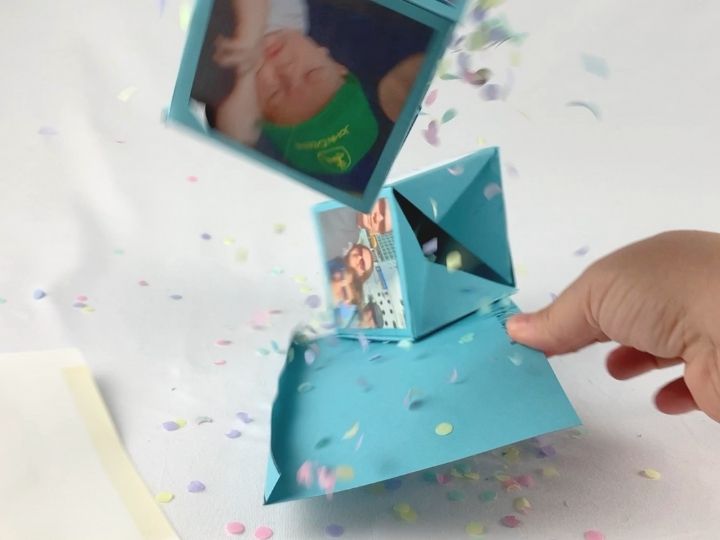
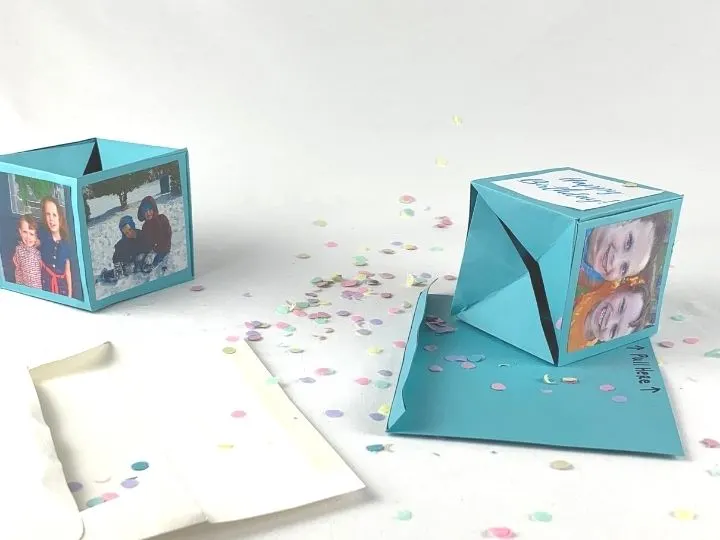
You can cover them with pictures and special messages for the recipient, and even stuff in some confetti for an extra surprise.
You can give them in person or send them through the mail!
I love giving these cards for all sorts of occasions, but they’re especially great for birthdays, Mother’s Day, or Father’s Day. I also love them for announcements or questions, like prom-posals, pregnancy announcements, or even marriage proposals!
Check out the video below to see how they burst out of the envelope!
No matter what you do with them pop up box explosion cards are a fun way to send any message.Just like with our Explosion Box Tutorial, this project is easy to make. The folding of the box may seem a little bit tricky, but if you follow these instructions, you should master the process in no time.
Links in this post may be affiliate links, which means I may earn a commission if you make a purchase from any of them, at no additional cost to you. You can find out more information by reading my full disclaimer policy.

Pop Up Box Supplies
To make a pop up box explosion card, you’ll need just a few simple materials that you should easily be able to find on Amazon or at your local craft store.
- 3 sheets of cardstock
- scissors
- ruler
- marker
- masking tape
- pin or a piercing tool
- double sided tape or craft glue
- pictures/messages/decorations
- a greeting card envelope
- confetti (optional)
For this project I’m using light blue cardstock so it will show up on camera, but you can use any color you like. I recommend card stock over regular paper here for durability. You’d hate to put in all this work and then have your pop up boxes rip!
I’m always a fan of good scissors for any paper projects. Good old fashioned Fiskar scissors always do the trick for me. I have different pairs for paper, fabric, and other projects.
I really like a good metal ruler when you’re doing any sort of paper project. They’re helpful for making sharp creases in the paper.
I’m including a video for you to follow for each step of the process to make a pop up box explosion card, so if the directions seem a bit confusing, just refer to the video for an example of how to complete each step.
Marking Your Card Stock
You’re going to start with a blank sheet of 8.5 x 11 inch card stock. You can use bigger pieces if that’s what you have on hand.
On the longer side of your card stock, you’re going to mark intervals of 3 inches, 6 inches, and 9 inches, making corresponding marks on each side.
Now connect each dot with a straight line, and trim off the excess at your 9 inch line, leaving your with an 8.5 by 9 inch piece of cardstock.
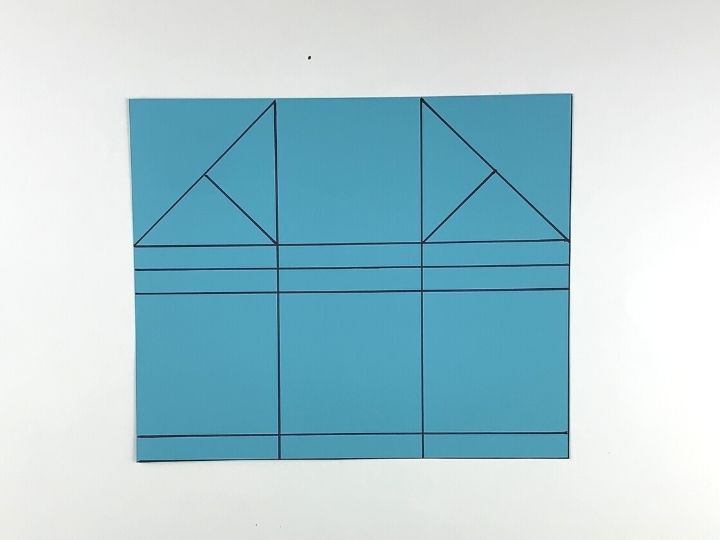
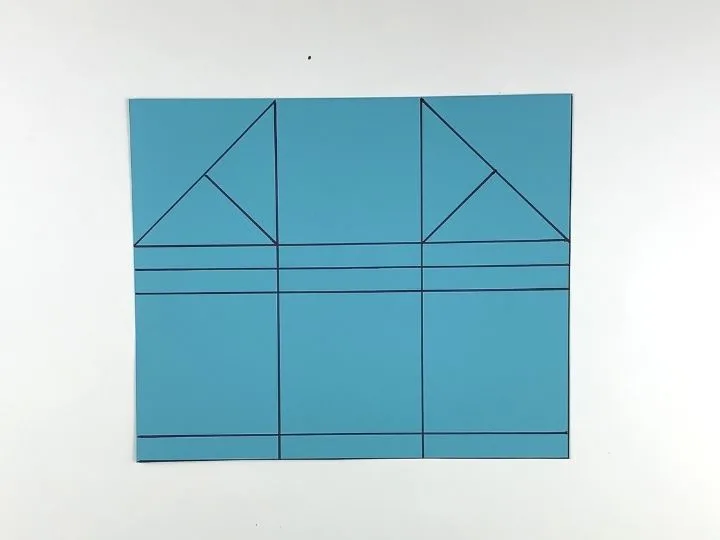
Now rotate your card stock to the 8.5 inch side. Mark lines at 3 inches, 3.5 inches, 4 inches, 7 inches, and 7.5 inches on both sides, making corresponding measurements on opposite side.
Again, connect your measurements with straight lines and trim the card stock at 7.5 inch mark. You now have a 7.5 x 9 inch piece of card stock with somewhat of a grid pattern on it, as seen in the picture above.
You should have one row of three 3 inch squares across the top, two rows of three half inch by 3 inch rectangles next, then another row of three 3 inch squares, followed by a final row of three half inch by 3 inch rectangles.
Cutting Your Pieces
Orient your page with the three 3 inch squares across the top.
Go to the top row of squares, and mark a line diagonally from interior corner to interior corner on each outside square. This gives you two triangles in each box.
Mark another line from the interior corner of each of those squares to the middle of the new line you’ve just drawn. This should split the lower triangles in each box into two more triangles.
Now you’ll trim off the top triangles from each side.
Now on each side of the bottom, trim off the bottom outside squares. You’ll want to trim the 1/2 inch sections above and below the square off as well, leaving the 1/2 inch section off the top exterior boxes. This part is REALLY clear in the video.
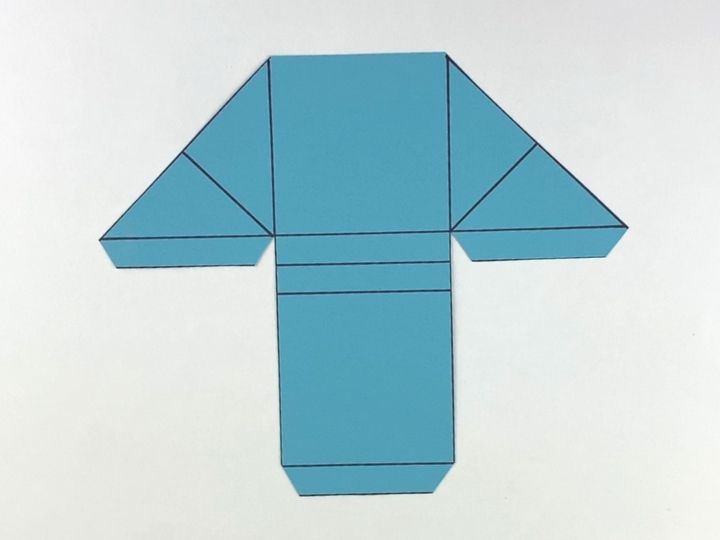
On the three half inch rectangles that now have an exterior side, trim the ends diagonally to create flaps. (Again, the video makes this really clear)
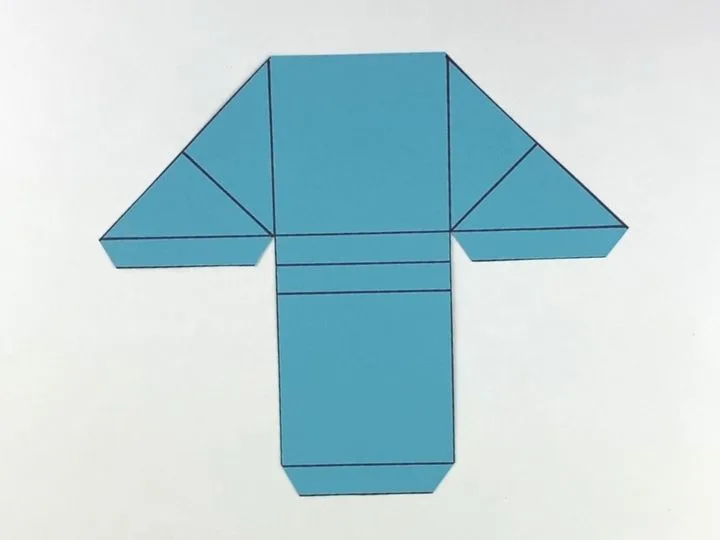
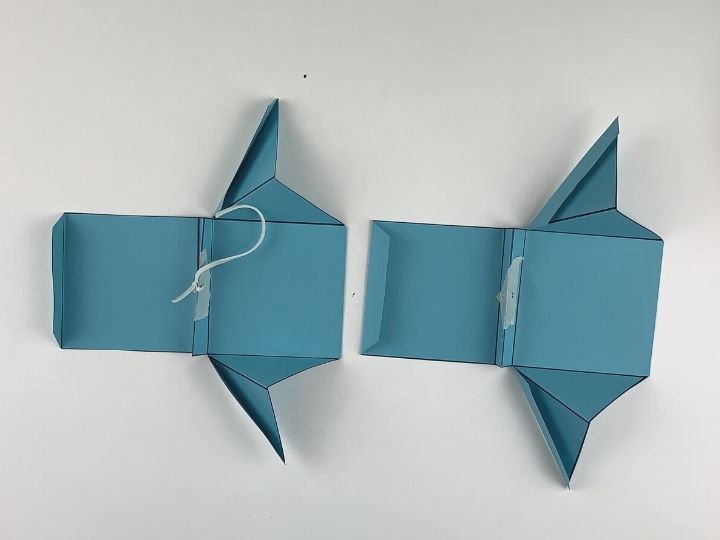
Now fold each section up along the lines you have drawn, using the ruler as a guide to keep each fold straight. The lines you’ve drawn can also serve as a guide for where to fold.
Make sure you’re folding the triangular sides in the create little wings on that portion of the card stock.
Make sure the center section is folded accordion style so that it will create a little pop up triangle when the piece is laying flat.
With the card stock folded at the center of that pop up triangle, cut the ends diagonally so that when it is opened it creates an hourglass shape when opened up.
That flap is where you will be attaching the rubber band to make the box pop-up, so it will take a lot of pressure during use.

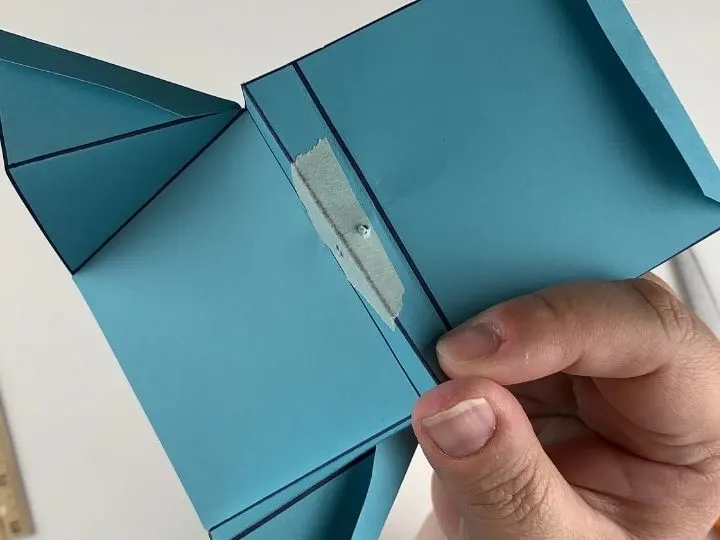
You can place a piece of masking tape in the center of this flap to reinforce it and prevent tearing.
With the card stock still folded at the center of that hourglass shape, poke a small hole big enough for you to thread your rubber band through it in the center of this flap.
I have a piercing tool that I use for putting a hole in the box, but you can use a straight pin if you don’t have one of these.
Assembling You Pop Up Box
Repeat this process a second time to create two identical pieces that will come together to create your box.
Once you have two identical pieces, you can now start the connecting process for your pop up box explosion card.
Take your rubber band and cut it so that it is now just one long rubber string.
You’ll want to use a relatively small rubber band for this project, one that lays about 4 inches long, when cut and not stretched.
Thread it through the hole you punched in the center folded flap of one of your card stock pieces and tie it off securely. Reinforce the attachment with a piece of masking tape.
Lay out your piece next to each other with the long sides horizontal, so that your wing flaps are on the right hand side. Make sure the piece you tied your rubber band to is on the left hand side.

For this next part of the process, I recommend using double sided tape. I really like using these Elmer’s Craftbond Permanent Tape Runners.
The tape runners are used frequently for scrapbooking and they make this process fast and easy. The tape adheres immediately to the paper and eliminates the oozing and slipping difficulties I’ve had with craft glue.
You could also use glue dots or just regular double sided tape. Most adhesive products used in scrapbooking work really well for this project.
If you’re really in a pinch you could use glue. I’m a huge fan of Aleene’s Tacky Glue for crafting. It’s thick enough that it doesn’t run, but holds more securely than school glue. It’s easy to use and easy to find at most retailers.
If you’re going to be using glue. Be sure to use the glue very sparingly. A little goes a long way!
You don’t want glue oozing out when you attach two pieces together. That can be really bad for your pop up box if that happens.
If I’m using glue, I also reinforce each tab with a piece of masking tape where I can. Just for extra security.
Now onto the next step!
Connect the two pieces by putting some tape on the end flap of one piece and securing it to the top of the center box of the other piece (see the video for detail).
Starting on the left end, fold the wing flaps inward and tape the tabs to the adjacent square piece on the left. If you’re using glue instead of tape, take care not to glue the rubber band string into the flaps.
This will create one half of your pop up box!
The rubber band string should be inside the half of the box you just created.
Now stretch the rubber band string across the card stock and thread it through the hole in the other side, tying it securely. You’ll also want to reinforce this side with a small piece of tape as well.
Be sure that your rubber band is stretched pretty taut at this portion. This is the piece that will make the box “POP” so you want to make sure it’s springy.
Fold the remaining wings inwards on the right hand side of the card stock and put tape on the tabs. Now fold it inward and secure the tabs to the middle square.
Take the remaining tab on the left hand side of the cube and put some tape on it. Then attach it to square by tucking it inside newly created right hand side of the box and pressing firmly.
Now you have a pop up cube that folds flat and pops up when not compressed!If you’re using glue, once your pop up cube is complete you might want to fold it flat and lay something heavy, like a book on top of it and let the glue dry. This will help stabilize the box without putting pressure on the points you just glued.
Repeat this whole process to make two or three pop up boxes for your explosion box card.
Decorating Your Explosion Card
Now that you have your pop up boxes made, it’s time to decorate your card!
Print pictures. Write messages. Add drawings or stickers.
Just be creative. You know what the recipient of your box would like most. Customize it to what is special to them.
You can add just about anything you want to these boxes, as long as it lays flat. Adding 3D items could inhibit the way the box opens.
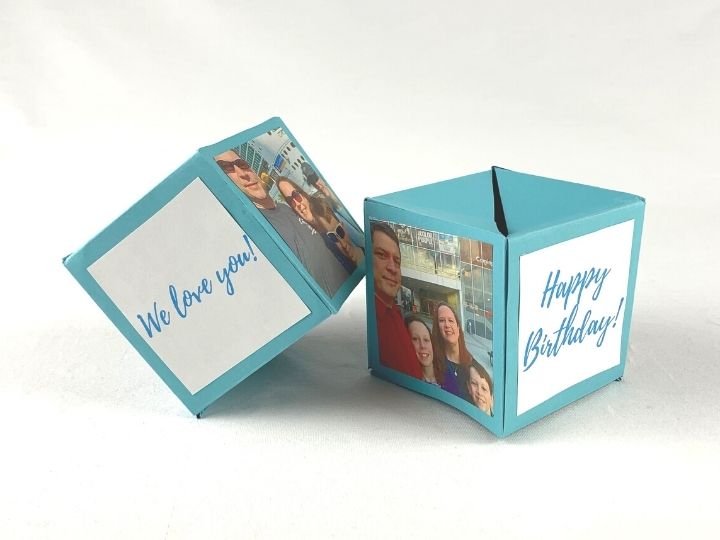
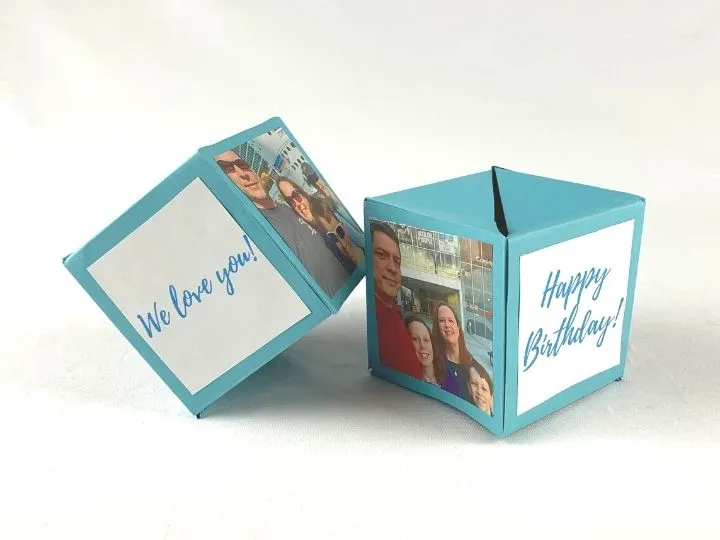
I recommend only decorating the four flat sides of the box and leaving the sides that separate to fold inward blank. You don’t want to anything to get in the way of the boxes popping open for that big reveal moment!
Each side of the box should measure 3 inches by 3 inches, so you’ll want to create designs for your box that are just slightly smaller than those dimensions.
The dimensions of 2.75 by 2.75 inches worked well for me. This gave me a border of about 1/8 of an inch all the way around the item when I glued it to my pop up box.
Once you’re boxes are completely decorated, you’re ready to move onto the next step.
Packing Your Pop Up Box Explosion Card
The pop up boxes are the fun part, but the real hero of this project is the piece that keeps it all together inside the envelope. We call this piece the nest.
You’ll need to know the exact dimension of your envelope to make a nest for your pop up boxes.
The envelope we used for our pop up box explosion card was and A7 size greeting card envelope that is 7.25 by 5.25 inches. It’s a pretty standard size for a greeting card, and it was a perfect size for these 3 by 3 inch pop up boxes to fit into.
To create the nest for your card, it needs to fit within your envelope and be about half inch longer longer to create a lip that will pull the boxes out of the envelope. So for our 7.25 x 5.25 envelope, we cut a page of cardstock down to 7 inches by 5.5 inches.
Laying the cardstock out with the shortest side horizontal, measure the height of your envelope down on each side and drew a line across it. For us that measurement was 5 inches.
Then fold the cardstock along this line, creating a half inch wide flap at the bottom of the page.
At the top center of the larger piece, write “Pull Here” with an arrow pointing up. You could even cut out a little tab there. Just make sure it’s wide enough to support the weight of pulling the entire pop up explosion card box out of the envelope.
You can write a special message and decorate the inside of your nest. Again keeping all the components flat so they don’t catch on your pop up boxes.
Once you’ve created your nest, it’s time to pack your card into your envelope.
You’ll have to hold the pop up boxes flat and in position in the nest to keep them from popping up while you complete the packing steps.
Stack your decorated pop up boxes in the flat position on top of each other. Place them inside the fold of the nest you’ve just created.
This is where you could add confetti or even make this project into a glitter bomb! Just sprinkle the confetti on top of the pop up boxes before you put them in so it will explode everywhere when the tab is pulled.
Keeping the nest held tightly closed, work the entire thing into the envelope with the “Pull Here” tab facing up and visible to the recipient.
Once your pop up boxes are secure in your envelope, seal it up.
Now your explosion card is ready to go to it’s recipient!
Watch The Pop Up Box Explosion Car Magic!
Giving these cards is so much fun. The little jolt of surprise is always surpassed by joy when someone opens a pop up box explosion card.

If you’re sending your pop up box explosion card through the mail, be sure you put enough postage on it! These will most likely require more than just the postage of a regular stamp!
I absolutely love seeing the results of these projects! Feel free to share them with me on Facebook!
Looking for other paper crafts to do? Try our Easy Silhouette Portrait Tutorial or learn How To Make Hexaflexagons!