
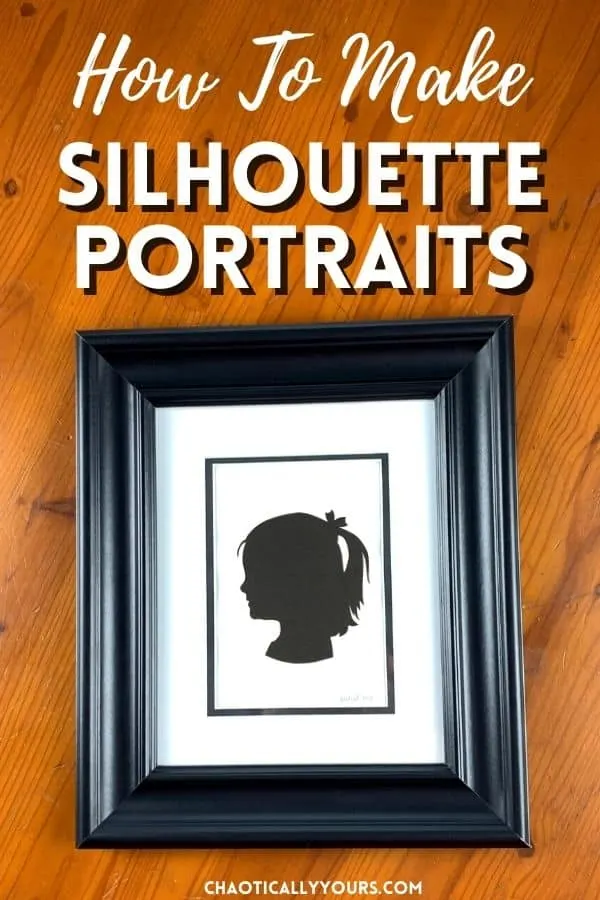
Silhouette portraits are some of the most beautiful and surprisingly some of the easiest crafts I’ve ever made.
I’ve always love silhouette portraits. I can still remember sitting for one on my very first trip to Disney World.
11 year old me was enchanted as I watched the artist skillfully cut out an amazing likeness of myself and my sister from plain black paper.
I was fascinated by how she got every detail correct, just by looking at us for a few minutes.
Those silhouette cut outs hung in my granny’s house for years and years, and now over 30 years later, my parents have them hanging in their home.
While I don’t have the talent to freehand a silhouette portrait like those artists did, I do know how to make them myself and make them look just as good, using a few handy cheats along the way.
I’m including printable instructions for this project at the bottom of this post, but it’s really just the absolute basics meant to refresh your memory.
You’ll want to read the whole post first to get all the important tips and tricks to get this project right the first time!

Links in this post may be affiliate links, which means I may earn a commission if you make a purchase from any of them, at no additional cost to you. You can find out more information by reading my full disclaimer.
I first made portrait silhouettes over a decade ago, when my children were just three and five years old.
They really captured something special about how my children looked at those ages. Now that they’re teenagers, I treasure these pieces of art and have them hanging in my living room.
Just like my Explosion Box project, these silhouette portraits make wonderful, sentimental gifts.
Silhouette Portraits: What NOT To Do
There are a bunch of tutorials out there on how to do make silhouette portraits, and a lot of them give some advice that’s not so great.
The Shadow Method
Several tutorials recommend using the super old fashioned way of just tracing a shadow.
While this method works, it’s pretty hard to achieve since your subject would have to sit still for a long period of time.
I can’t imagine that would work well with small children!
Plus, getting the light set up just right can be a huge pain, and leaves room for distortion and some big mistakes in the final product.
In today’s world with so much technology at our fingertips, I say use all the help you can get to make your silhouette portraits look perfect.
Tracing The Screen
I’ve seen multiple tutorials that suggest taping a piece of paper to a computer screen and tracing an image of your subject from there.
Y’all.
PLEASE don’t do this.
It’s so awkward to try to trace something this way, and also possibly damaging to your computer screen.
Seriously, why would you do this when you could just print the picture out?
Let technology be your friend and make this process SO much easier!
Slap Some Paint On It
One major crafting website recommended cutting out a photo and just putting some black paint on it.
I guess it could work better than the other two crummy methods, but the final product is not gonna look like that traditional paper-only cut out.
Plus it’s WAY messier than this process has to be. Nobody wants to do more clean up than necessary.
Trust me, I’m going to give you the easiest ways to do this.
What You’ll Need
All of these supplies should easily be found at your local craft store or on Amazon.

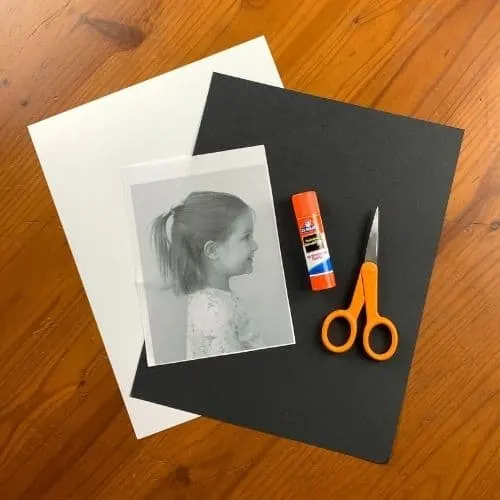
Supplies:
- color paper
- white cardstock
- a digital camera (your phone is perfectly fine)
- a computer
- a printer
- a pencil
- printer paper
- a glue stick
- sharp scissors
- a picture frame
The best way to make sure this process goes smoothly and that you end up with the best results possible is to take your time and use good tools and materials.
Small, sharp scissors are the absolute way to go with this project. A crappy pair of scissors can ruin your silhouette portrait in a hurry.
I use a 5 inch pair of small Fiskars that I only use for paper.
I know not everyone has a “paper only” pair of scissors. Just make sure what you use is good and sharp.
You can use whatever color paper you want to match your decor. We went with black for a more traditional silhouette portrait look.
I used fade resistant black construction paper. You could used cardstock, but I find a lighter weight paper is easier to work with.
I recommend using white cardstock for the background instead of regular white paper because it’s simply more durable and will stand up better over time.
Taking The Photo For Your Silhouette Portraits
One of the best shortcuts I’ve found for making silhouette portraits is to use a photo to base your silhouette on. This way no one has to sit still for the project, which is especially handy if you’re working with young children!
To get the perfect photo to work with, you’ll want to find a light colored blank wall. Taking the picture with a light colored wall as your background will give you the contrast you need to create a better silhouette.
To take the perfect photo for your silhouette cut outs, position your subject facing sideways, parallel to the wall, as if they’re walking past it.

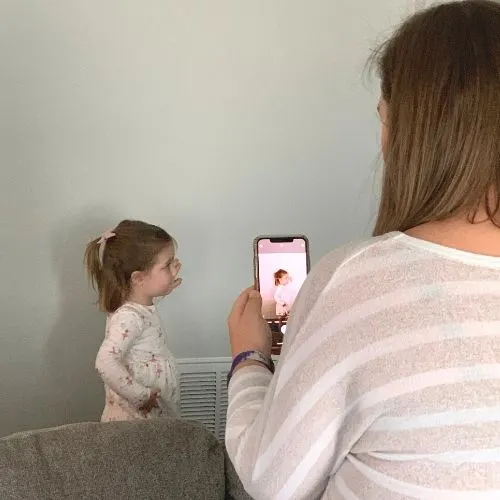
Try to make sure your subject is standing straight up with good posture. You want them looking straight ahead with their chin up, but not with their head tilted upwards.
This will make sure that the camera is capturing as clear of an image of their profile as possible.
Make sure you include the shoulders in your image, and not just from the neck up.
I recommend not having your subject smile. This will give the lips of your silhouette a more natural look.
You’ll want to take the picture with the camera facing the wall, with the lens level with your subjects face.
You don’t want to be tilting the camera down or up in any way.
Take several shots so you’ll have more than one to work with.
For subjects with long hair, you might try a few different hairstyles in the pictures. Sometimes a ponytail or a bun can be easier to capture in a silhouette.
Once you’ve captured your photos, you can move onto creating your actual silhouette portraits.
Sizing and Printing Your Pictures
To get started on your silhouette portraits, the first thing you’ll need to do is print out your pictures.
Be sure to take into consideration the size of your frame, and how much white space you want to leave around the silhouette.
Also, if you’re doing multiple silhouettes that you’ll be displaying together, you’ll want to make sure they’re roughly the same size.
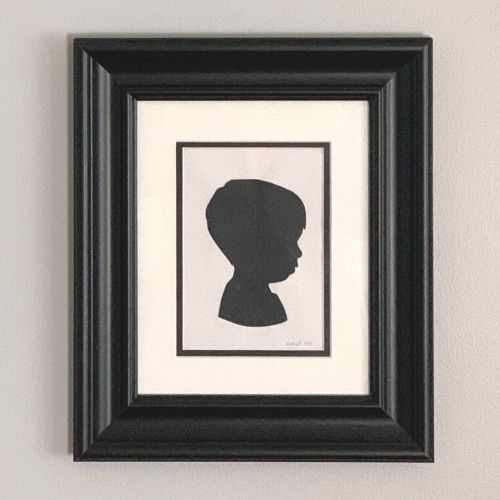
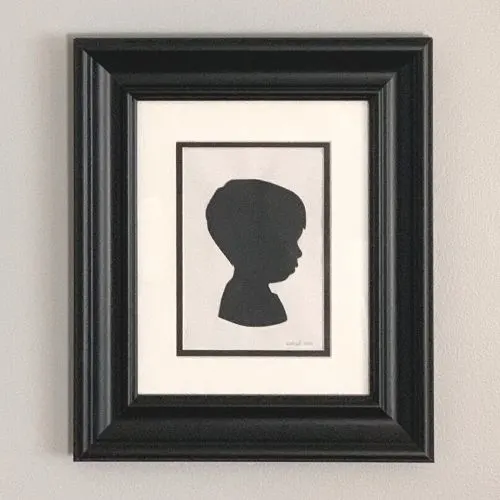
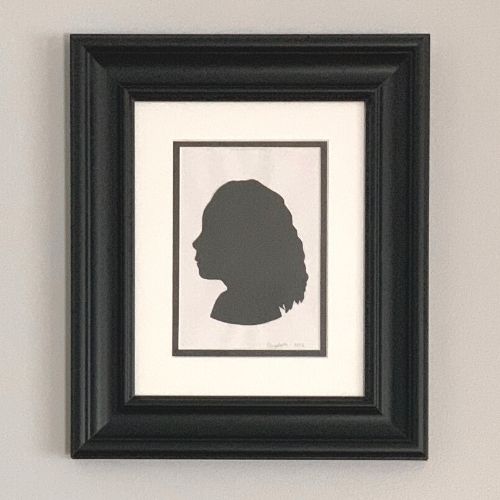
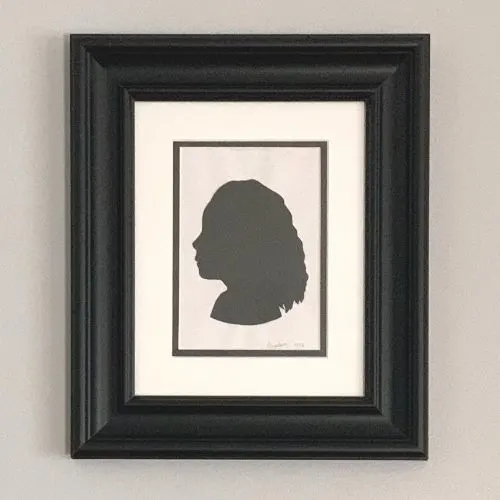
In the first set I did, my daughter was four years old with tons of wild curly hair. My son was two with his straight hair cut close to his head.
I had to shrink her silhouette down just a little bit so that it would be even with her brother’s when they were displayed together.
You’ll also need to take into consideration the size of your frame.
My first set was made was 5×7 inches and fit into a double matted 8 x 10 inch frame. This size proved to be fairly easy to cut out.
Keep in mind, the smaller the silhouette portraits, the harder they’ll be to cut out.
You’ll also want to take into consideration which direction you’ll want your portraits to be facing.
In my method of hand cutting portrait silhouettes, the final image will mirrored the original picture.
Make sure you orient your photos appropriately so that the images face the directions you want for your final product.
Since I was doing 2 of them, I had them face opposite directions. It all depends on personal preference.
If you have access to an editing program, it can be super helpful for working with these image.
I use Canva Pro, and always take the background out when making a silhouette portrait. It’s super helpful!
Once you’ve sized and prepped your pictures appropriately, print them out on regular printer paper.
I always print them in black and white so I don’t waste color ink and it also makes the contrast show up a little better.
Prepping Your Silhouette For Cutting
After you’ve printed your pictures out, the next step is getting the images onto the color paper and getting it ready to cut.
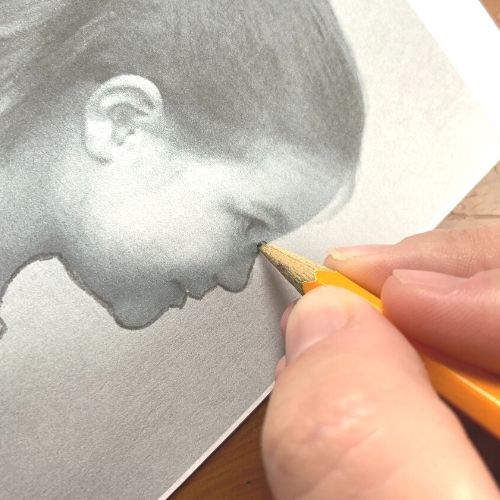

At this point, I’ve also found that I like to take a pencil and lightly trace the lines on my image that I’m going to cut.
This gives me the opportunity to add a details to things like the hairstyle or to clearly define where I plan to cut to indicate clothing or accessories.
This step is optional, but I find it really helps me out for cutting the final silhouette portrait.
After you’ve traced your image, trim your picture to the general shape of the silhouette.
I’ve found that trimming the image down a bit before putting it on the color paper makes it easier to manage when cutting.
Once you’ve given your picture a general trim and trace, glue it to the color paper with a glue stick.
I recommend a glue stick over regular liquid glue because you’ll be able to get the image to attach without wrinkling which sometimes happens with liquid glue and regular paper.
It also dries faster, making it the process move along much more quickly.
Make sure you put some of the glue right along the edges of where you’ll be cutting to make sure it stays secure.
Cutting Your Silhouette Portrait
The first time I did this project, I was really scared to hand cut everything.
But it’s really easier than you might think.
Yes, it does take time and can leave you open to some mistakes, but I find it’s easier to get the details you want into the silhouette portrait this way.

When you’re cutting by hand, it’s easier to get those extra touches like eyelashes and to exaggerate some of the finer features of the shape like the hairline to get a more refined looking silhouette.
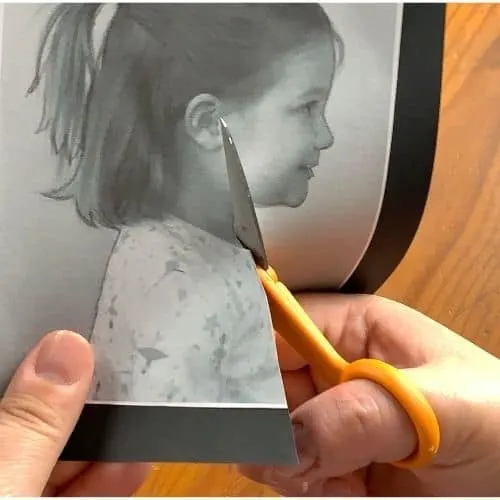
Once the glue has dried, you’re ready to start cutting out your silhouette portrait.
Like I mentioned before, you’re going to want to use a good pair of sharp scissors.
Carefully cut the silhouette, paying very close attention to the details.
This is where outlining the image before you cut really comes in handy.
Take your time and err on the side of cutting less. Remember you can always come back and cut more if you need to adjust the image later.
When you reach the bottom of the image, I like to round it a bit so you don’t have a sharp line at the bottom. Again, this is something that is really helped when you pre-outline your image before gluing it.
It can also be handy to have a razor cutting tool like an Exact-o Knife around to help cut out some of the finer areas.
Once you’ve finished cutting, take a close look at the image and see if there’s anything you want to trim. Sometimes adding a little definition to the hair or to the neckline of a shirt can really bring the silhouette portrait to life.
Adding Your Silhouette To The Background
Once you’re happy with the image you’ve cut out, it’s time to add it to your background.
Like I said earlier, I like to use cardstock for the background for durability, but you can use any paper you like.
I always use white, but it could be really fun to mix up the colors here and create some super unique pieces of art with different backgrounds.
For the classical look though, I’d recommend white.
Use your glue stick to attach the silhouette you’ve cut to the background page, paying special attention to placement.
You want to make sure it’s placed evenly on the page so that when you frame it, it won’t be lopsided.
I always like to work with a background page that has been cut to size to fit the frame BEFORE adding the silhouette image.
This makes it easier to tell if you image is balanced.
Finishing Your Silhouette Portraits
Once you’ve glued your image onto the page and it’s completely dried, I like to add the name of the subject and the year it was created to the bottom of every silhouette portrait.
I always write it lightly in pencil, just to make it subtle.
I’ve been so glad that I did that now that it’s been almost a decade since I made my first set of silhouette portraits.
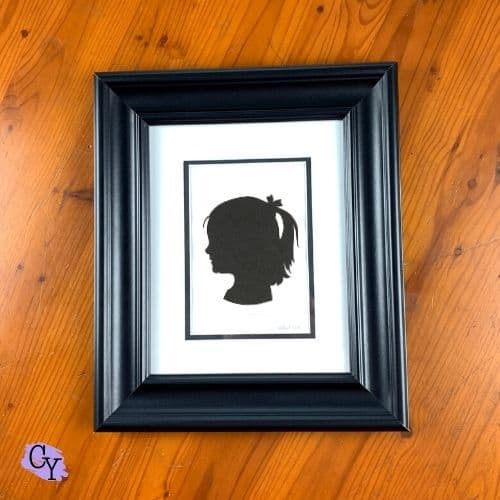
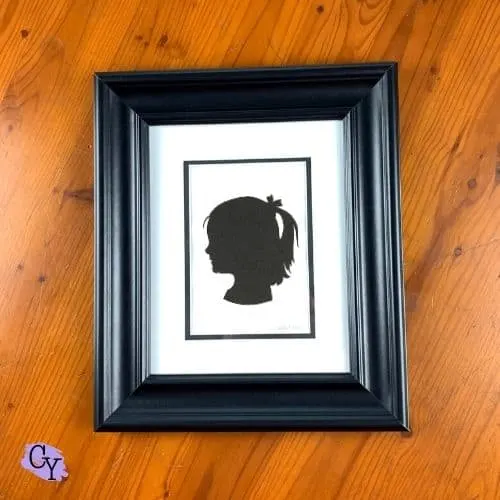
Once that little touch is added, all there is left to do is frame your new piece of art.
I love using a double matted frame with a black outline for these. It just give the finished product such a polished look.
Silhouette portraits somehow capture a moment in time in the most elegant way possible.
These silhouette portraits make amazing gifts for that loved one who has everything already.
Have you ever made a silhouette portrait? How’d it turn out? Tell me in the comments!
How To Make Silhouette Portraits
Learn how to make your own elegant artwork with this silhouette portrait tutorial.
Detailed instructions are available in the full post.
Materials
- color paper
- white cardstock
- printer paper
- a glue stick
- a picture frame
Tools
- a digital camera (your phone is perfectly fine)
- a computer
- a printer
- sharp scissors
Instructions
- Take a photo of your subject standing sideways against a light colored background.
- Size your photo to fit inside the frame you plan to use.
- Print your photo on regular printer paper.
- Trace around your subject directly on the printer paper, adding the detail you'd like to see in the final silhouette.
- Use the glue stick to glue your image onto your color paper.
- Using sharp scissors, carefully cut your image out along the line you traced earlier.
- Flip your picture over so the solid color side is facing outwards and glue it to your white cardstock background.
- Put your silhouette portrait into a frame.