

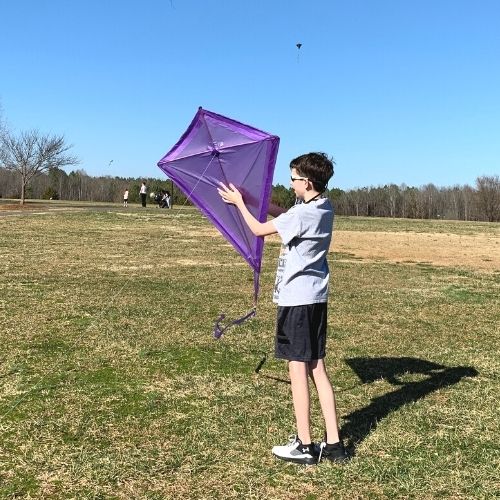
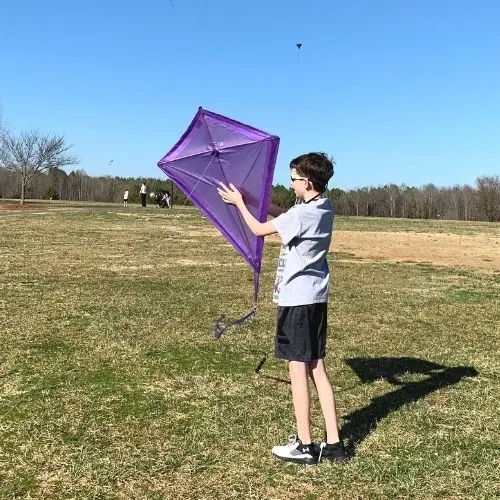
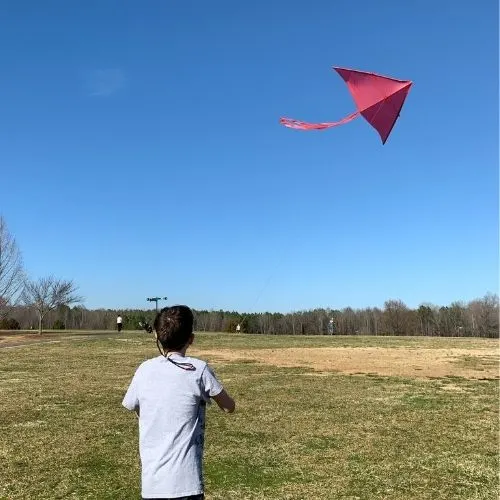
I am so excited to teach you how to make a kite!
The sheer joy of launching a kite into the air is something every kid should experience. And the whole thing can be even more special if the kite is homemade.
It’s really not too complicated to make your own kite. All you need is a few simple materials and a little know how, and your DIY kite comes together in a few minutes.
Learning how to make a kite also a great way to teach kids about science. The concepts of lift and drag are easily explained when kids have a hand in making and flying their own kites.
You can always buy kites online, but making one yourself is so much more fun!


I’m going to share with you two different ways to make a kite: the classic Diamond kite and the basic Delta kite.
I’m including printable instructions for this project at the bottom of this post, but it’s really just the absolute basics meant to refresh your memory.
You’ll want to read the whole post first to get all the important tips and tricks to get this project right the first time!
Links in this post may be affiliate links, which means I may earn a commission if you make a purchase from any of them, at no additional cost to you. You can find out more information by reading my full disclaimer.
Kite Making Supplies
Learning how to make a kite is surprisingly easy, and the materials needed to make one are easy to find. You probably already have everything you need already on hand at your house.
What We Used
- A large piece of plastic sheeting (A plastic tablecloth or a medium duty tarp)
- Heavy duty tape
- 2 to 4 long dowel rods – depending on which kite design your making
- String
- Large beads
- A marker
- Scissors
- A yardstick or some other straight edge
We used a plastic tablecloth from our local dollar store for this tutorial. We liked that there was a variety of colors to choose from.
*NOTE: Using the plastic tablecloth definitely made this a one time use kite. It sustained some damage in a few crash landings along the way.
If you want your kite to last for more than just one day, I recommend using a stronger material.
We’ve also made kites from a medium duty tarp, and they have held up for multiple trips to the park for flying. They’re still sitting in our garage right now waiting to take them out for some fun.
Other materials you could try are a plastic garbage bag, newspaper, or even thick wrapping paper.
We also found duct tape the same color as our plastic tablecloths at the dollar store, so we picked that up as well.
Wooden dowel rods are traditionally used in kite making, and you can find them at any hardware store.
For our string, we grabbed some multipurpose twine from the hardware store, but you could use fishing line or any lightweight string you have. You just want to make sure you have a whole lot of it so your kite can fly really high!
If you can’t get out to purchase all these items, you can easily order them all on Amazon!
How To Make A Kite: The Classic Diamond Kite
When you picture the shape of a kite in your mind, you’re likely picturing the classic diamond shape.
This four sided design is the most simple to make, and easy to fly. They make a great beginner kite.
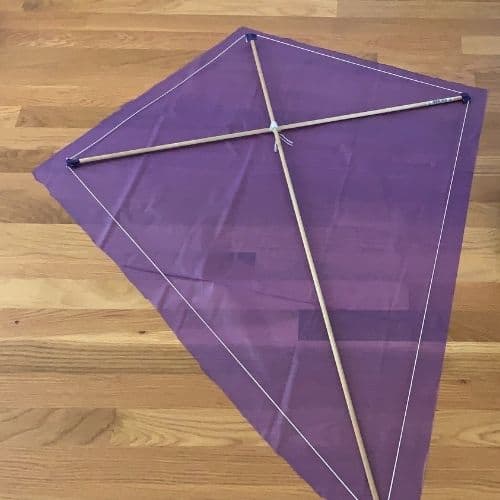
Building Your Kite Frame
To make a diamond kite, you’ll want to start by making a frame.
You can make your DIY kite any size you want, but a larger kite is going to fly better than a smaller kite.
I wouldn’t recommend making one any smaller than 24 inches long.
For the diamond kite, you’ll need two relatively long dowels. We used one that was 40 inches long and one that was 32 inches long.
Take your shorter dowel and find the middle. Mark that spot on the dowel.
Place the middle point of that shorter dowel about one quarter of the way down the longer dowel, forming a cross.
Use some of your string to secure the the two parts together, wrapping it tightly around the two dowels. Make sure to keep them at right angles and to keep the cross piece centered in the middle to insure the right shape for your kite.
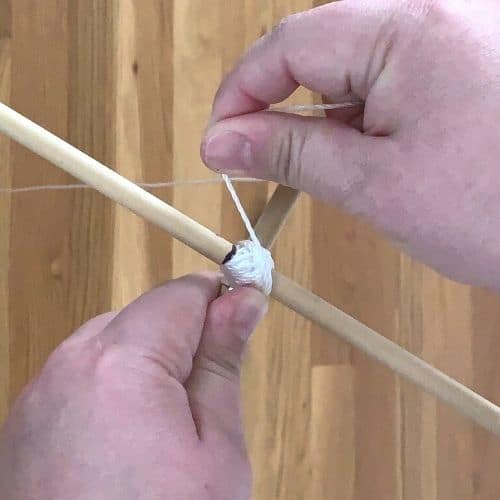
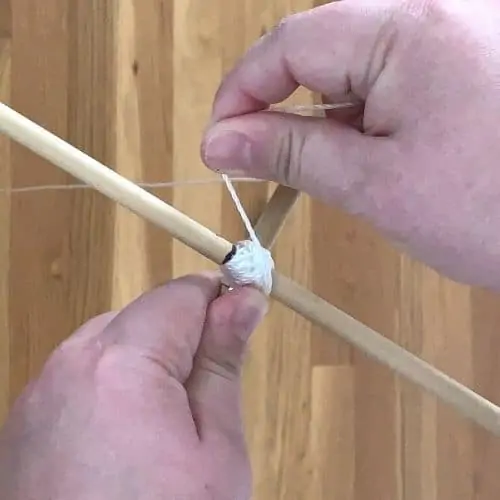
We left the beginning of our string a little long so we could tie the end off when we finished tying the two dowels together.
Next you’ll want to run a piece of string from one cross piece, over the top dowel to the other cross piece.
Then run the same piece of string down around the bottom dowel and back to the original cross piece, securing each point with tape. Make sure the string is taut when you attach it to each dowel.
This will help the kite retain its shape and keep those right angles.
You’ve now created the frame for you kite.
Creating Your Kite Sail
The next step in how to make a kite is to create a sail to catch the wind and make your kite fly.
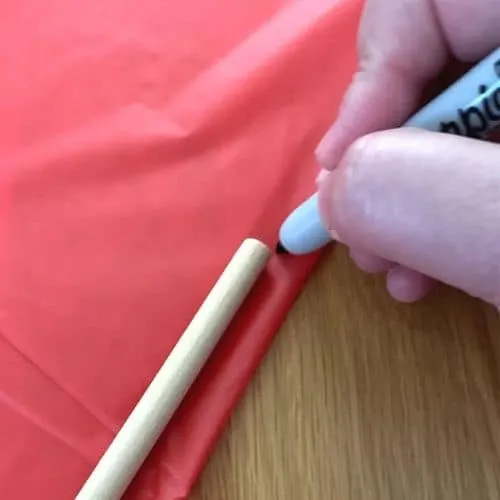
Start by laying your plastic out completely flat.
Then place the kite frame you just created onto your plastic.
Using a straight edge guideline like a yardstick and a marker, trace the diamond shape of your kite just a little larger than your frame.

Cut out the shape you’ve just traced from the plastic, and you’ve cut out your sail.
Lay your kite frame on top of the newly cut sail, and fold the sides inward, working on one side at a time, attach each side of your sail with your heavy duty tape.
It’s a good idea to make sure the tape wraps all the way around the edge of your sail, to give it a little more strength and prevent ripping.
Making a Kite Tail
Next you’ll want a tail for your kite.
The tail may seem unnecessary, but it actually serves a really important purpose on a diamond shaped kite.
The tail of a diamond kite will keep it more stable in the air and keep it from spinning wildly in the wind.
Longer tails tend to add more stability, but adding a little bit of weight with beads can help stabilize the kite without having to make the tail so long.
For the size kite we made, we cut a tail from our about three times the length of our kite and about two inches wide. Since our kite was 40 inches tall, we cut a piece around 120 inches long.
Once you have your tail cut and measured, attach it to you kite at the bottom with some of tape or just tie it to the frame.
Creating A Bridle
Now that the tail is created and your sail is attached to the frame, you’ll want get the bridle ready.
The bridle is the way the string is attached to the kite to keep it steady when flying.
You’ll want to cut a piece of string about twice as long as your horizontal dowel.
Tie each end of the string to the end of the horizontal dowel.
When you’re ready to fly, tie your fly line to the middle of this bridle string.
You’ve now made a classic diamond kite!
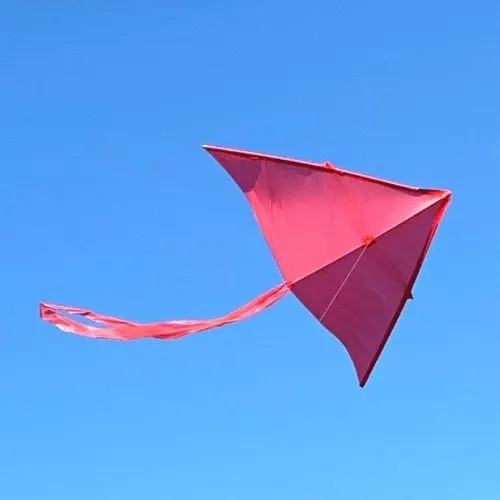
How To Make A Kite: The Basic Delta Kite
If your looking to learn how to make a kite that’s a little different from the diamond kite but still for beginners, the basic delta kite is a great option.
It does requires a little bit more materials, but it gives you more options for doing tricks with the kite.
Creating the Sail for a Delta Kite
In contrast to the diamond kite, to make a delta kite, you’ll need to create your sail first.
The measurements of your sail will depend on how long your dowels are.
You’ll need four dowels: two long dowels and two slightly shorter dowels.
For our delta kite, we used two 36 inch dowels and two 30 inch dowels.
To cut the delta kite sail, fold the plastic in half.
Along the fold, measure the length of your shortest dowel. Our shortest dowel is 30 inches, so we measured out 30 inches along the fold and marked the spot.

Along the edge of the plastic, from the corner with the folded side, make another measurement the same length as the shortest dowel. We made another mark at 30 inches from that corner.
Now use a straight edge, like a yardstick or something to connect these two dots.
Keeping the plastic folded, carefully cut out your sail along the line you just marked.
Building Your Kite Frame
Unfold your newly cut sail, and lay it out flat, so that you have an isosceles triangle in front of you.
Take your shortest dowel and lay it down the middle of your sail, from the apex to the middle of the widest side. Secure it at the top and bottom with tape.
Next take one of your longer dowels and lay it along one side of the sail, lining one end of the dowel up with the corner of the sail. The dowel will NOT touch the center dowel.
Repeat this process for the other side of the sail.
Once both sides and the middle of the sail have dowels attached to them, now you’ll want to attach the dowel that will brace all of this together.
With the sail laid out flat, take your remaining dowel and line it up perpendicular to the center dowel at the point where the bracing dowel leaves about an inch hanging over the edge of the exterior dowels.
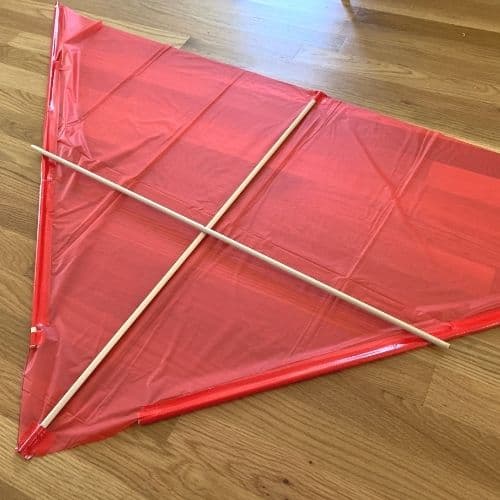

Tape the perpendicular dowel to the exterior dowels and then tape the joint to the sail.
Attaching the String
Once you’ve attached all the dowels, you’re ready to move onto attaching the fly line.
Just as with the diamond kite, you’ll want to make sure your kite has the sail facing up and the frame facing down.
You’ll again want to tie a bridle to your kite with string like you did for the diamond kite.
Cut a piece of string about twice the length of your horizontal dowel.
Tie each end of the string to the ends of the horizontal dowel, and secure them in place with a little bit of tape.
When you’re ready to fly, tie your fly line to the center point of the bridle string.
Attaching A Kite Tail
While it’s not 100% essential to have a tail on a delta kite, it can be helpful for stability when flying your kite.
To make a tail, cut a piece of the remaining table cloth approximately three to four times longer than the vertical height of your kite.
Our delta kite was 30 inches tall, so we cut a tail that was 120 inches long.
Attach the tail to the bottom of the center vertical dowel. You can tie it on with a simple knot or attach it with duct tape.
Now your DIY delta kite is ready to use!
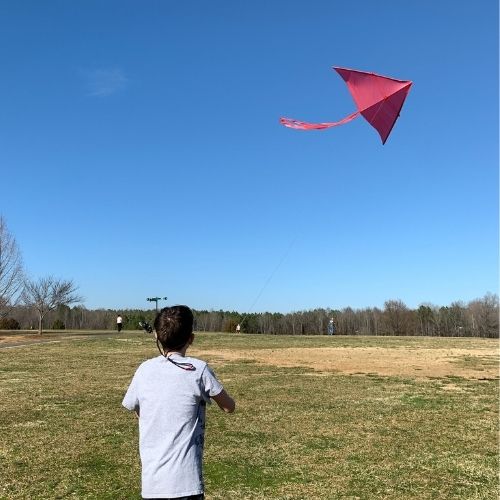
Tips on How to Fly a Kite
Flying a kite can seem a little tricky at first, but once you get the hang of it, you’re kite will be sailing along in the sky in no time.
Here are a few tips that can help you along the way.
Find A Safe Space To Fly Your Kite
Safety is absolutely paramount in flying your kite. Be sure to find an appropriate space to fly your kite.
You’re looking for a large area, free from powerlines and trees.
The beach is an excellent place to fly a kite. Lots of local parks also have open spaces that make it easy to fly a kite safely.
Kite Flying Weather
Make sure you have appropriate weather to fly a kite in.
Look for a clear, breezy day with winds ranging from 5 to 12 mph.
Never fly a kite in an approaching storm. Lightning is attracted to tall objects, including kites, and flying one when there might be lightning is extremely dangerous.
Kite String
Make sure you have lots of string that can be let out quickly. You’ll want at least 100 feet that can unroll very fast as the kite gains altitude.
Since the spool our string was on was hollow, we placed another shorter dowel in the middle of it so the string could run out quickly to keep up with the kite.
If you order kite string online, they usually come with a spool that will accomplish this for you.
Common Flight Problems
If you’re kite won’t launch easily, try getting a running start.
If you kite keeps taking a nosedive, there could be too much wind. If the kite sinks by the tail, there’s probably not enough wind.
If your kite starts spinning, try adding beads or tying ribbons to the tail to it to add just a little more weight to keep it upright.
How to Make A Kite Two Ways: Diamond or Delta

Learn how to make a kite two different ways with these simple instructions! Detailed instructions are available in the full post.
Materials
- Plastic sheeting
- Heavy duty tape
- dowel rods
- String
Tools
- A marker
- Scissors
- A yardstick or some other straight edge
Instructions
How To Make A Kite: The Classic Diamond Kite
- To make your kite frame, find and mark the middle point of your shortest dowel.
- Place the shorter dowel vertically across approximately one quarter of the way down the larger dowel to form a cross shape.
- Secure the dowels together with string at the cross point, taking care to keep the right angles.
- Connect the ends of the dowels with string pulled taut, securing each end with tape, again working to retain those right angles.
- To make your kite sail, lay out your plastic flat.
- Lay your kite frame out on top of the plastic.
- Using a straight edge, trace the diamond shape of the kite onto the plastic, making it just a little bit bigger than the frame.
- Cut out your kite sail along the lines you just marked.
- Lay your frame on top of your sail, and secure each side by folding it inward and securing it with tape.
- To make your kite tail, cut a piece of the plastic about three to four times longer than your kite and about two inches wide.
- Attach your kite tail with a knot or with tape to the bottom end of your kite.
- To add the fly line, lay your kite down with the frame facing down and the sail facing up.
- Cut a length of string about half the length of your horizontal dowel.
- Attach the string to each end of the horizontal dowel.
- Tie your fly like to the center point of the string you just attached.
- Go fly your kite!
How To Make A Kite: The Basic Delta Kite
- To make your kite sail, fold your plastic in half.
- Measure along the fold the length of your shortest dowel and mark this point.
- Measure along the edge the length of your shortest dowel again and mark this point.
- Using a straight edge, connect these two marks.
- Cut your still folded plastic along the line you just marked to make a triangle shape for your kite sail.
- To build your kite frame, lay the sail out flat in a single layer.
- Take the shortest dowel and lay it across the middle of the triangle, from the right angle to the center of the longest side.
- Secure the dowel with tape at the top and the bottom.
- Take one of the longer dowels and lay it along the edge of the sail, starting at the corner of the triangle. This dowel will not touch the center dowel at the top. Secure it with tape.
- Repeat with the other long dowel on the other side.
- Take the remaining short dowel, and lay it perpendicular to the center dowel, leaving about an inch on each side hanging over the edge of th sail. Secure it with tape on each end. Do NOT secure it to the center dowel.
- To attach the fly line for your kite, flip your kite over, laying the frame side down and the sail side up.
- Cut a length of string about half the length of your horizontal dowel.
- Attach the string to each end of the horizontal dowel.
- Tie your fly like to the center point of the string you just attached.
- To create a tail for your delta kite, cut a piece of the remaining plastic approximately three to four times longer than the vertical height of your kite.
- Attach the tail to the bottom of the vertical dowel with either tape or just by tying a knot.
- Go fly your kite!
Notes
Be sure to fly your kite safely. Only fly it in clear weather, far away from tree and powerlines.
How To Make A Kite: Two Types of Kites You Can Make At Home