

An origami star is a beautiful yet inexpensive decoration that you can make in a few minutes with just a simple piece of paper.
Once you learn how to make them, you can create lots of them in all sorts of sizes and colors for to use any way you like.
Today we have full instructions on how to make an origami star, complete with step by step pictures, video, and even a FREE printable guide!

What Do Origami Stars Mean?
Origami is the traditional Japanese paper-folding crafts.
The word “origami” comes from two other words in Japanese: ori, meaning “folding”, and kami, meaning “paper”.
In Japan, origami creations are often used to signify different things. Origami stars signify love and good luck.
Paper Christmas Stars
Origami stars have also long been a staple of Christmas decor.
You can line them up together to create a garland or use them as ornaments on your tree. I’ve even seen them used as gift decorations or tree toppers.
Pair an origami star made out of newspaper with a string of popcorn or homemade items, you can get a real vintage feel for your holiday decor.
How Do You Make An Easy Origami Star?
It’s quite easy to learn how to make these five pointed origami stars, and I’m happy to share full instructions on how to accomplish it.
Links in this post may be affiliate links, which means I may earn a commission if you make a purchase from any of them, at no additional cost to you. You can find out more information by reading my full disclaimer.
What You’ll Need
A scoring tool (optional)
String (optional)
Paper For Origami Stars
I frequently use scrapbooking paper for this project. You can easily find it on Amazon or at your local craft store.
Scrapbook paper is great because it comes in all sorts of prints, colors, and most importantly, sizes.
The size of your finished star will be about 60% of the size of the original piece of paper you use.
For example, if you start with a 12×12 inch paper, your star will end up being around 7 inches.
If you don’t have scrapbooking paper, you can use any type of paper you like. I’ve seen people use regular printer paper, wrapping paper, old newspapers, and even money to create an origami star.
Scissors
You’ll need a good pair of scissors for trimming the paper.
I always love a good pair of Fiskars. I have several sizes and several pairs that I only use for for different types of projects. Ths smaller ones are especially good for working with paper.
Optional Supplies
In addition to paper and scissors, there are a few optional items that can make creating and displaying your origami star easier.
Anytime I do a paper folding project, like an explosion box or a pop up card, I like to have a scoring tool on hand to make my folds straight and clean.
I like this scoring tool from Amazon, but surprisingly, I’ve also them at the Dollar Tree as well. In a pinch, you can use a butter knife to sharpen up those folds.
Once you’ve finished your origami star, it can also be helpful to have some nice string around to make them into ornaments or garlands.
How To Fold An Origami Star
Folding an origami star will seem complicated at first, but once you’ve mastered the skill, it really is quite easy.
In my opinion, the best way to learn how to make an origami star is to watch the videos.
But if you need more details on any step, read through written instructions (complete with pictures) or print out my FREE guide at the bottom of the post.
Create a Pentagon
The first step to folding an origami star is to create a pentagon from your square sheet of paper.
It may seem daunting to try to get five even sides cut into your paper, but there’s an old origami trick to getting this shape. It’s illustrated in the video below, but I’ll also write out the steps for you.
Step 1: Fold your square in half, lining up all the edges.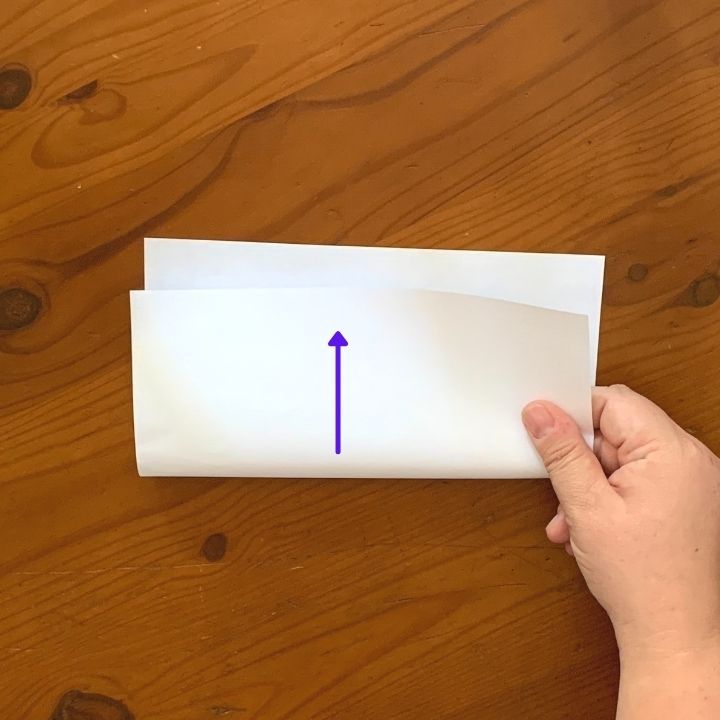

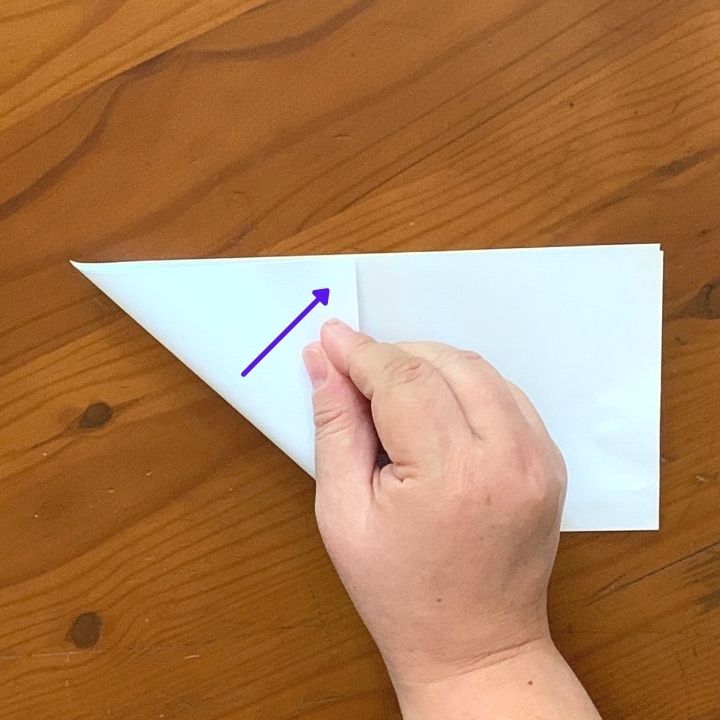
Step 2: With the paper still closed in half, take one corner of the folded side and bring it up to meet the edge of the unfolded side, creating a 45 degree angle along that end of the paper.

Step 3: Unfold the last step, and mirror it by bringing the top, unfolded side down to create another 45 degree angle in the opposite direction. Unfold this as well.

You should now have two creases that form an X on one side of your paper.

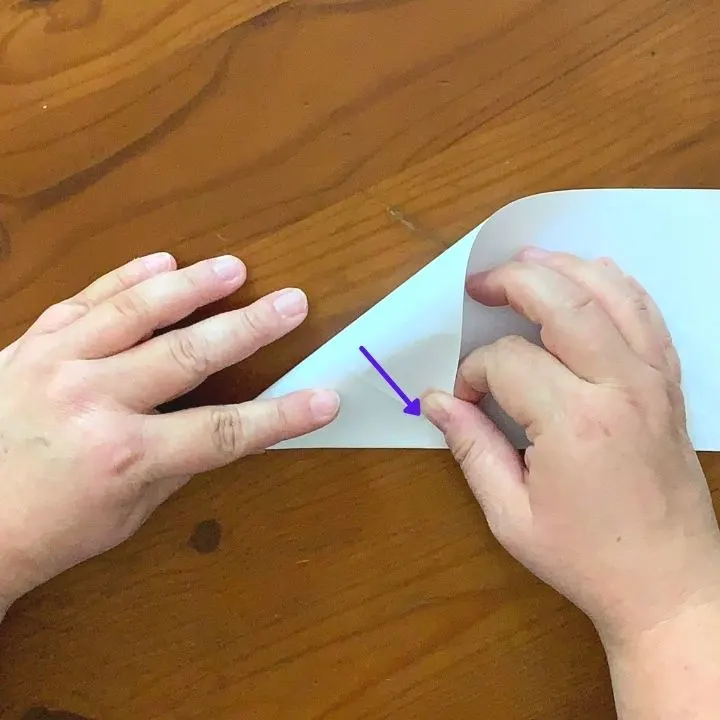
Step 4: Now take the bottom, folded edge of the opposite side of the paper, bringing the corner up to the center of the X you just made and fold.

Step 5: Of the edge you just folded, now fold it back on itself to meet the outside edge.

Step 6: Take the opposite corner and fold it inward to the meet the edge of the paper you’ve folded inward.
Step 7: Now flip the entire paper over and fold it in half so that the fold runs from the pointed end to the paper edges.

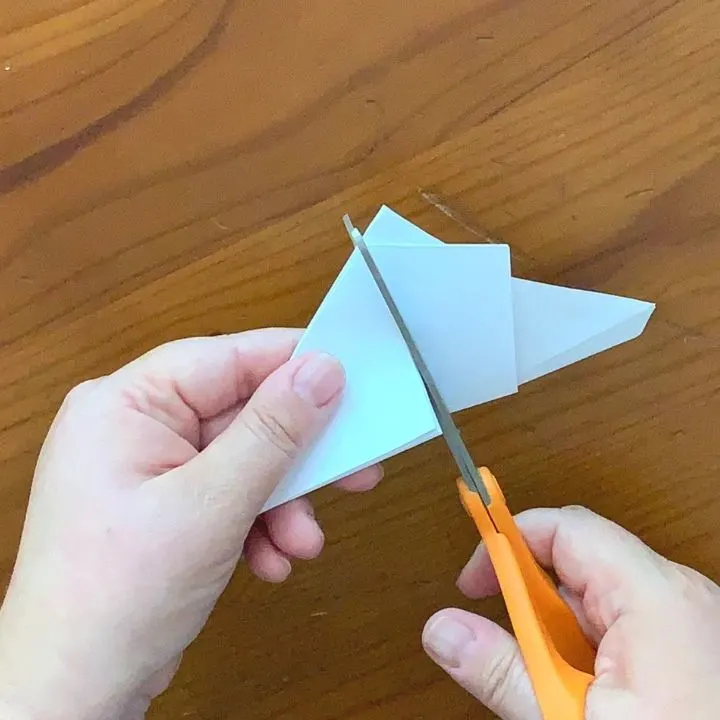
Step 8: Take your scissors and cut along the straight edge closest to the point.

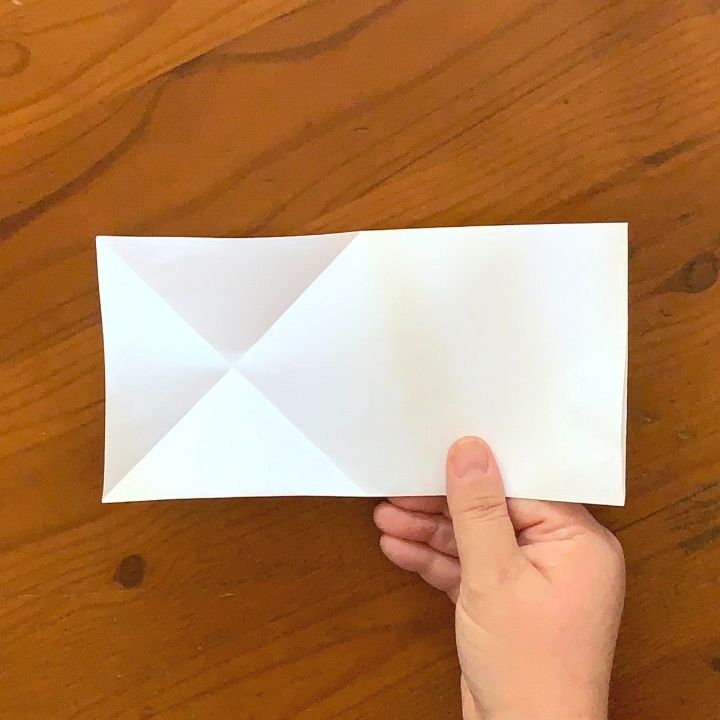
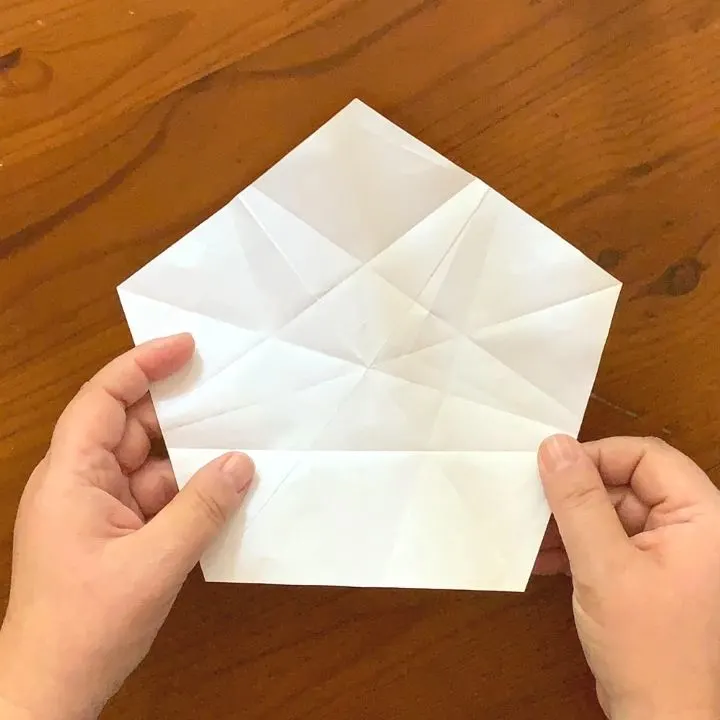
Step 9: Unfold your paper and you should have a perfect pentagon.

Creating the Origami Star
Now that you have your pentagon, you can begin folding your 5 pointed origami star. The whole process is outlined in the video below.
Again, the video is the absolute clearest way to understand this process, but I’m also writing it out for you as well.
Step 1: Place the paper flat in front of you with any decorated side that you want showing facing down.
Step 2: Reinforce each of the five folds that run from a point to the opposite flat side so that they’re crisp and ready to be utilized again.
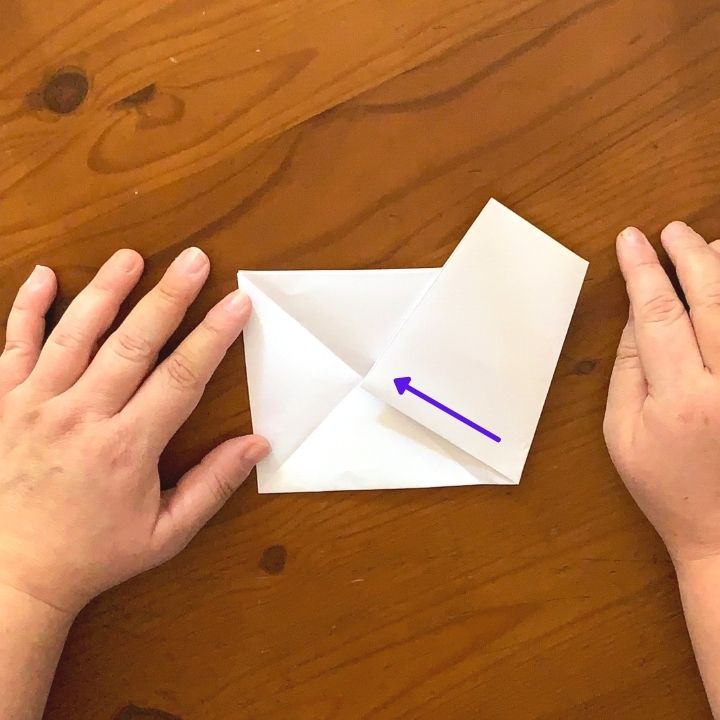
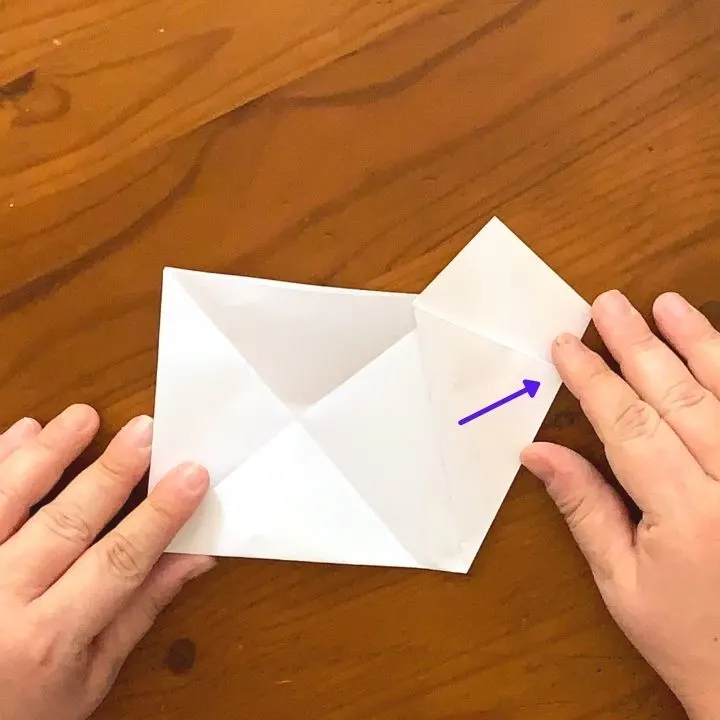
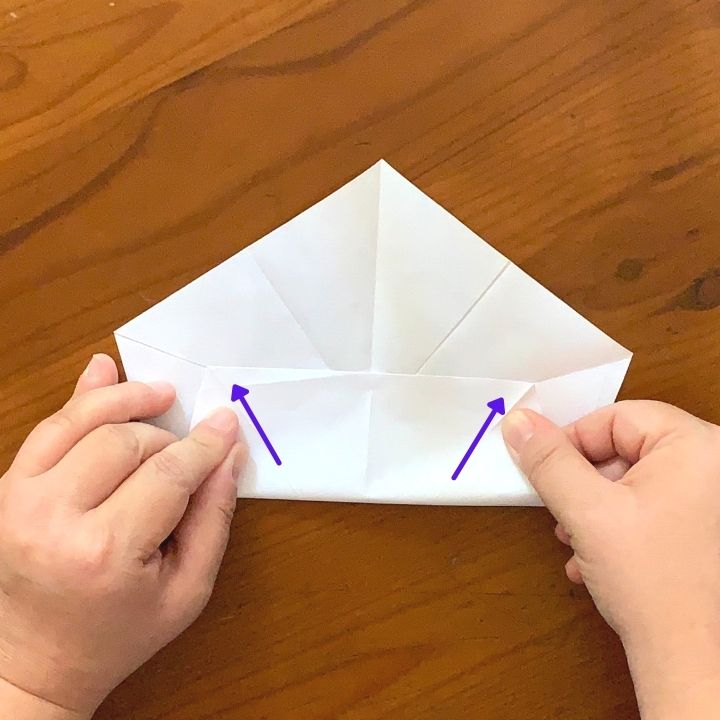
Step 3: Open up the pentagon so that one point is facing away from you and a flat side is facing toward you. Fold the bottom flat side up so that the corners meet the creases of the folds on the top half.

Step 4: Open the fold then rotate your paper to the next edge of the pentagon and do step 3 again for that side. Repeat this process for all sides of the pentagon.
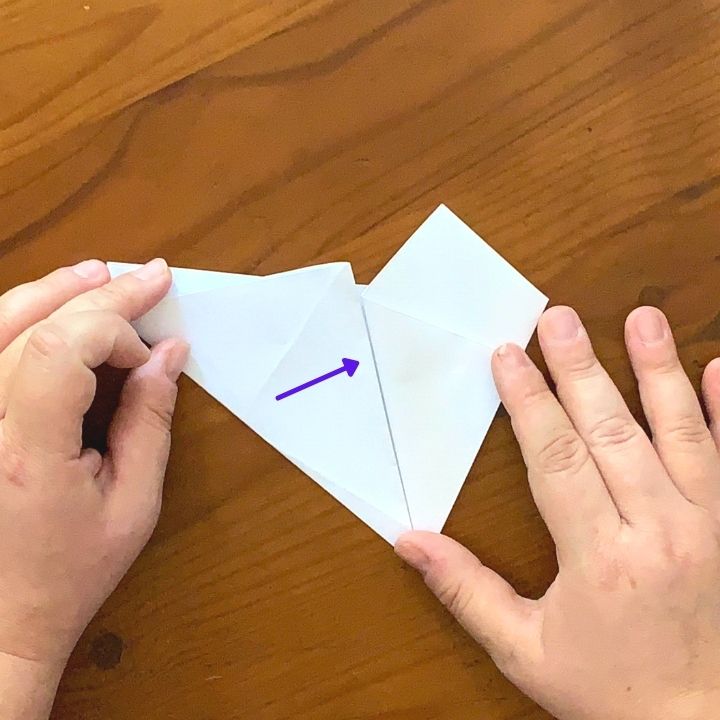
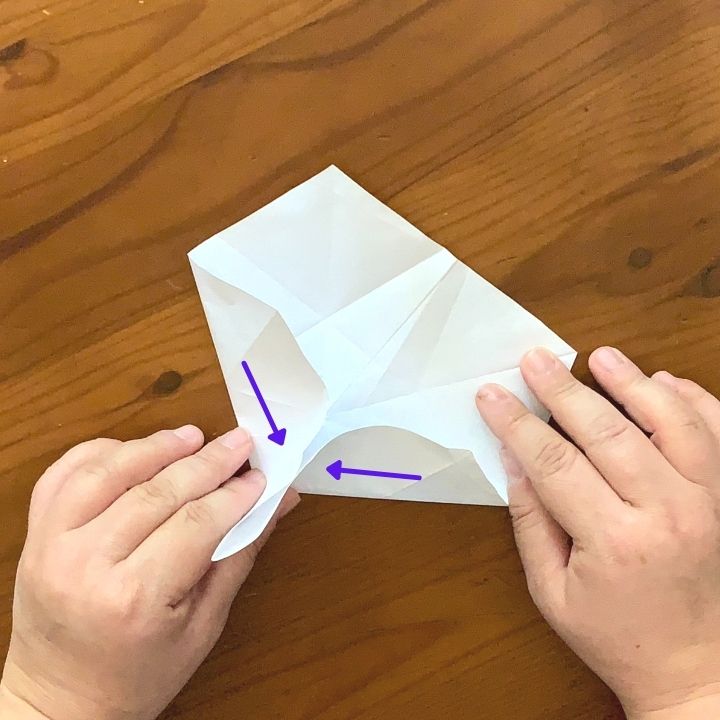
Step 5: Open the pentagon up again, and from the left side, fold the side in again. Now fold the bottom in as well, but push the side out where the two folds will overlap, creating a sort of flap.

Step 6: Open the pentagon backup and repeat this process for all sides.
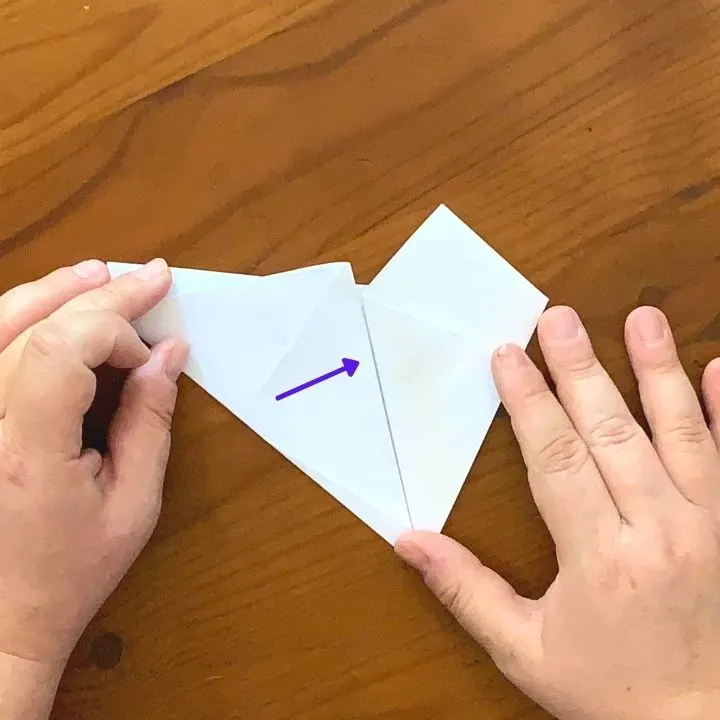
Step 7: Now pinch all the corners together and work the paper so that it starts to collapse onto itself, with each part overlapping the next. You should end up with a rough star shape that has a small pentagon in the middle.
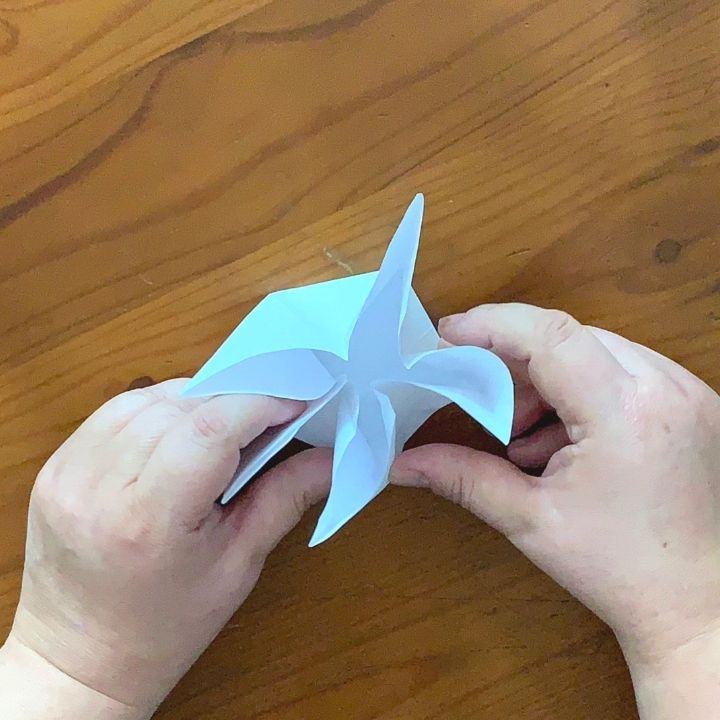

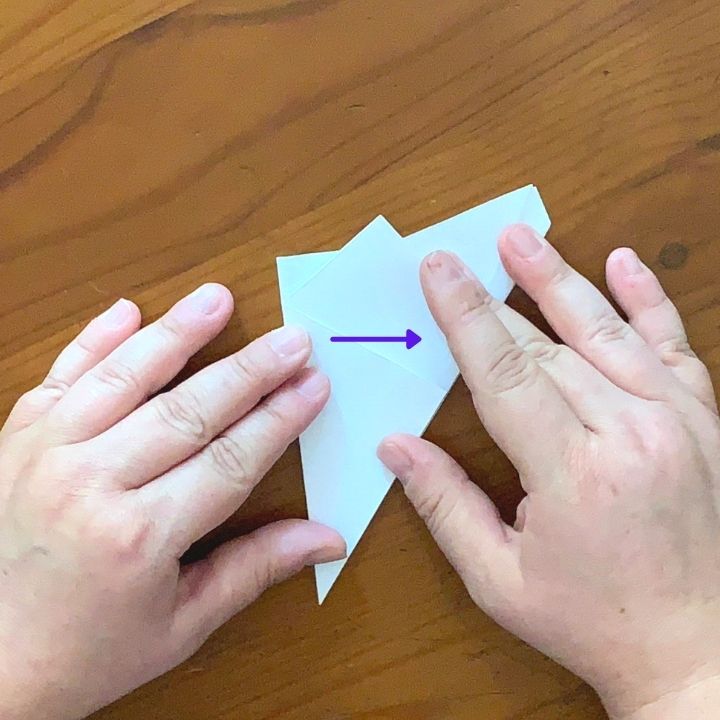
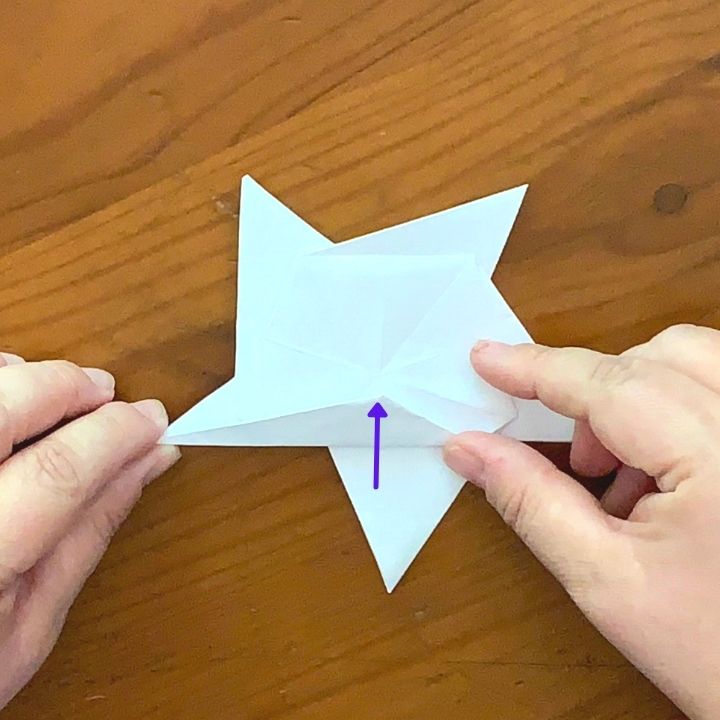
Step 8: Flip the star onto the opposite side. Take one of the flaps and bring the point of the small pentagon so that the corner meets the middle. Repeat for all sides. The last one is a little bit tricky because it will be tucked under the first one, but it is possible to get that fold done.

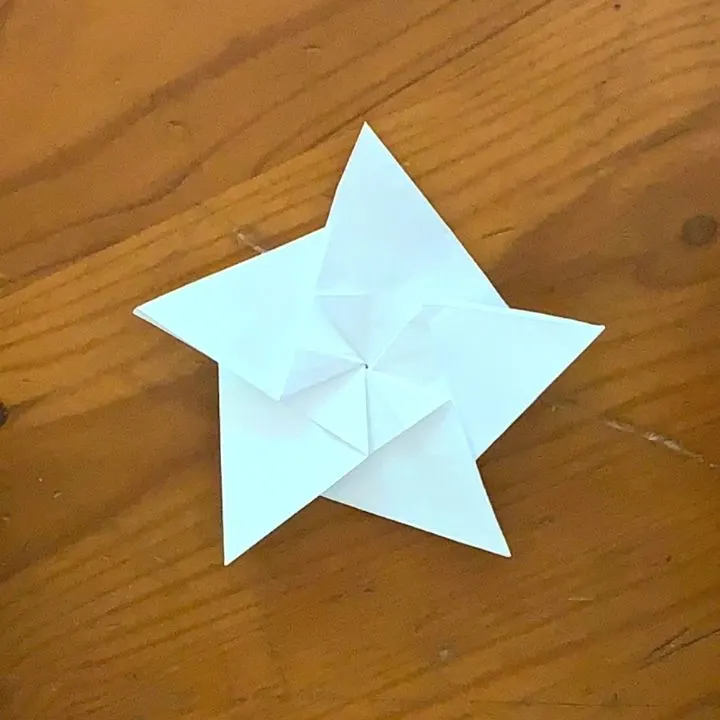
Optional Step 9: On the back side of the star, you’ll still have a hexagon that is the same color as the back side of the paper. If you want to cover this, take your scissors and clip along the folds of the pentagon. Then tuck these ends under the other flaps so that the ends are not visible.
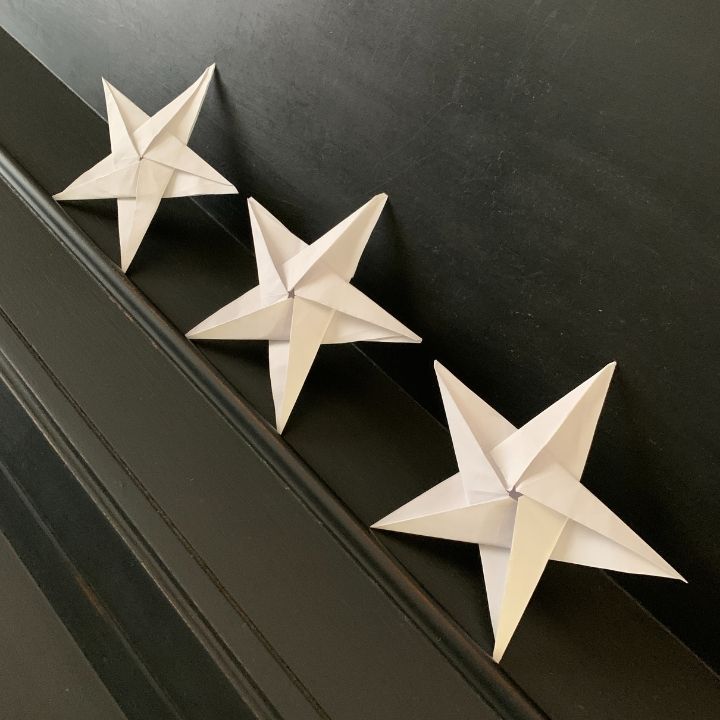
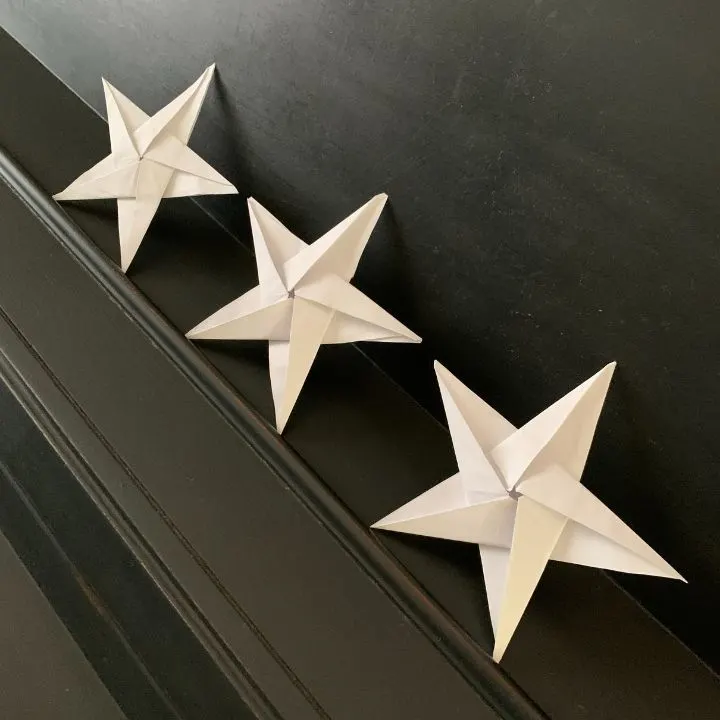
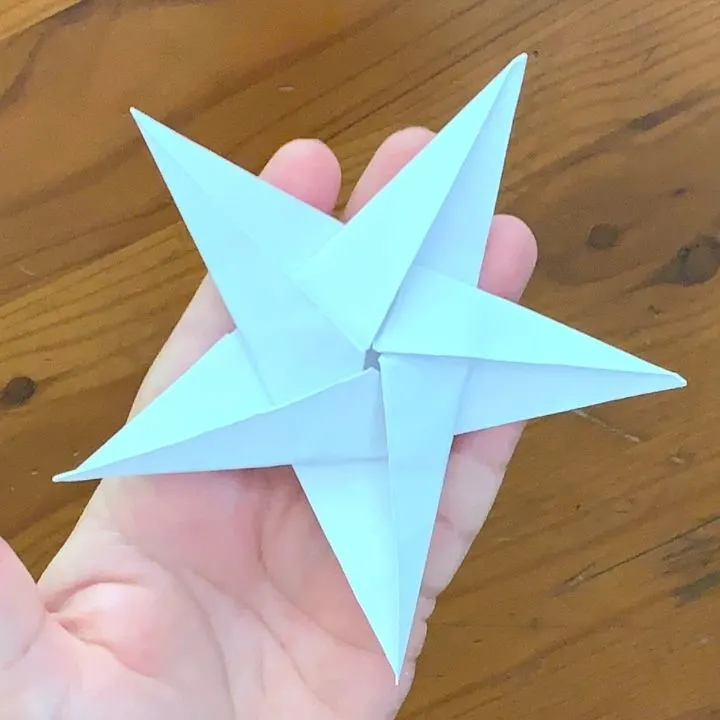
Now you have a five pointed origami star!

How To Display Your Finished Origami Star
I absolutely love how these origami stars turn out.
Once they’re completed, you can punch a small hole in the end of one point or through the center of the origami star and run string through it to make an ornament or a garland.
They can be colorful or understated, with the look changing depending on what paper you use to make them.
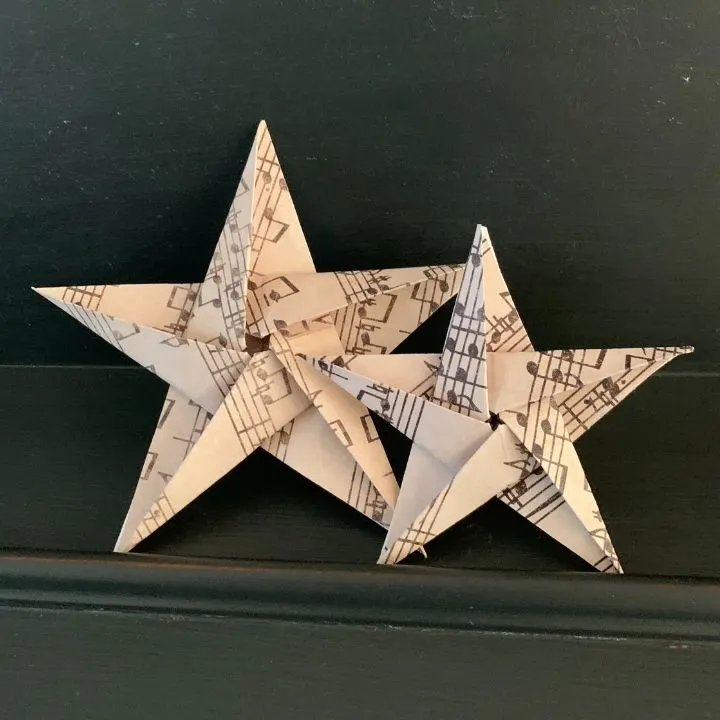
You can create a vintage look by using old book pages or sheet music.
If you don’t have old paper, create the look by using coffee or tea to age the pages.
These stars pair beautifully with these rustic clothespin ornaments for a classic holiday decorations.
No matter how you use them, these stars are fun, easy, and inexpensive to make!
Happy Crafting!
Origami Star: The Easy Way To Create One
Follow this easy tutorial to create an origami star.
Materials
- A square piece of paper
Tools
- Scissors
Instructions
TO MAKE A PENTAGON:
- Start with a square piece of paper.
- Fold your square in half, so that the fold is facing towards you and the edges are facing away from you, making sure to line up the top and bottom edges.
- With the paper still folded in half, take the bottom left corner of the folded side and bring it up to meet the edge of the top unfolded side, creating a 45 degree angle along the left end of the paper.
- Unfold the last step. Now take the top left corner that has the two unfolded edges and bring them down create another 45 degree angle in the opposite direction.
- You should now have two creases that form an X on the left side of your paper.
- Now take the bottom, folded edge of the right side of the paper, bringing the corner up to the center of the X you just made and create a fold.
- Take the edge of the paper you just folded, now fold it back on itself to meet the outside edge of the right side.
- Take the bottom left corner of the paper and fold it inward to the meet the edge of the paper you've folded inward on the right side.
- Now flip the entire paper over and fold it in half so that the fold runs from the pointed end to the paper edges.
- Take your scissors and cut along the straight edge of the top layer.
- Unfold your paper and you should have a perfect pentagon
TO FOLD AN ORIGAMI STAR:
- Place the pentagon you've just created flat in front of you with any decorated side that you want showing in the final origami star facing down.
- Reinforce each fold that run from a point to the opposite flat side. Do this for each side of the pentagon.
- Open up the pentagon and lay it out so that one point is facing away from you and a flat side is facing toward you. Fold the bottom flat side up towards the point, stopping where the corners meet the creases of the two side folds on the top half.
- Open up the fold you just made then rotate your paper to the next edge of the pentagon and repeat step 3 again for that side. Repeat this process for all sides of the pentagon.
- Open the pentagon up, and from the left side, fold the side in again. Now fold the bottom in as well, but push the side out where the two folds will overlap, creating a sort of flap.
- Open the pentagon back up and repeat this process for all sides, creating a "flap" for each corner.
- Open the pentagon up again, and now pinch all the corners together and work the paper so that it starts to collapse onto itself, with each part overlapping the next.


You should end up with a rough star shape that has a small pentagon in the middle.
- Flip the star onto the opposite side. Take one of the flaps and bring the point of the small pentagon so that the corner meets the middle. Repeat for all sides. The last one is a little bit tricky because it will be tucked under the first one, but it is possible to get that fold done.
- OPTIONAL: On the back side of the star, you'll still have a hexagon that is the same color as the back side of the paper. If you want to cover this, take your scissors and clip along the folds of the pentagon. Then tuck these ends under the other flaps so that the ends are no longer visible.
Bee Meldahl
Friday 30th of January 2026
These are the best instructions I’ve found anywhere! I tried two others first. Please post step by step instructions for other origami projects! I’m interested in making a horse, a good one, but I get lost in the video. Great job here!
Monday 22nd of December 2025
I don't get step 7
Sara
Thursday 23rd of January 2025
Tried several other videos first. Hours practicing. Getting it to fold up correctly is the hardest ( step 7) some times it looks more like a pinwheel.
Annette
Wednesday 18th of December 2024
Thankyou I will be making this for my grandchildren
scott anderson
Thursday 5th of December 2024
this star was absoluatly horibble i made i was so prouad of myself and 5 minuares later my sar broke and i was sp upset
Louise Emery
Thursday 5th of December 2024
I'm so sorry this happened to you. I can't imagine what went wrong. I encourage you to try again. Once the process is mastered, the stars should hold together. I have some I've made that have held up for years.